
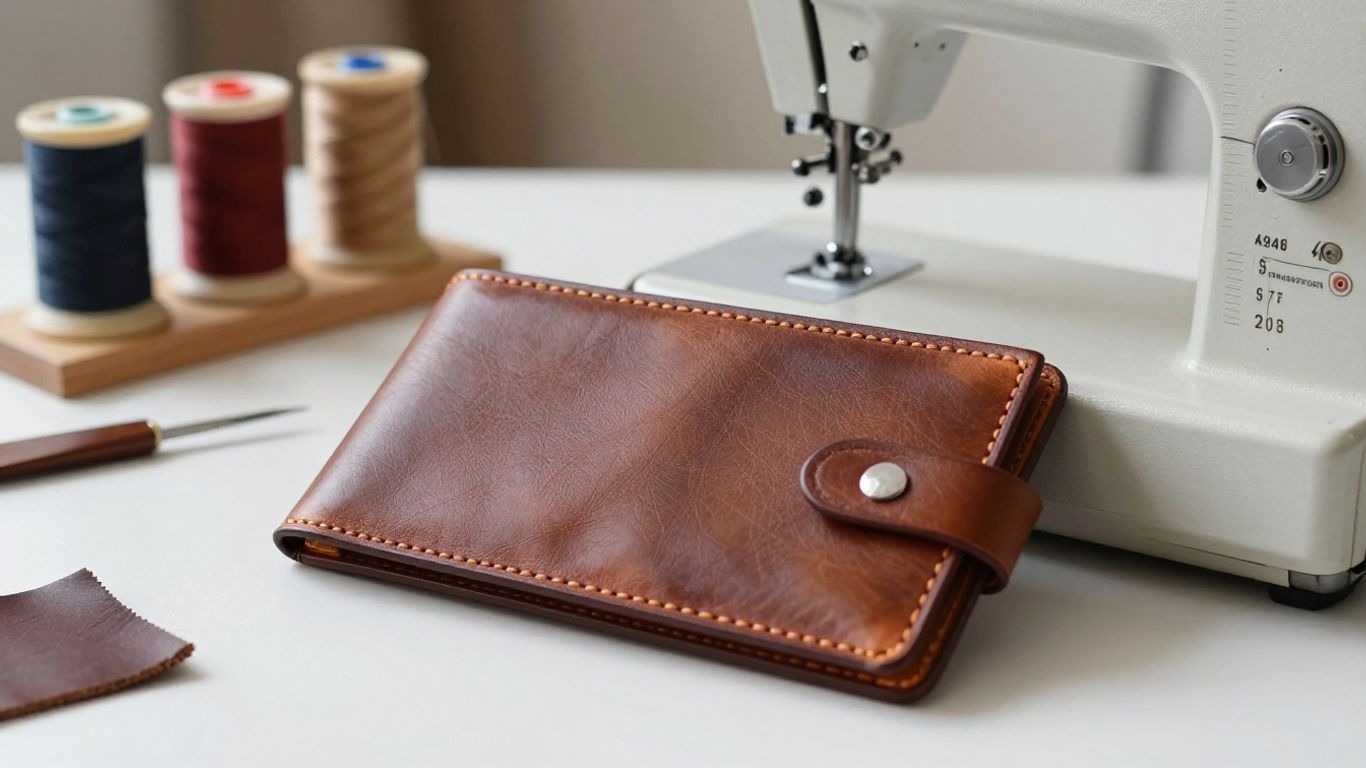
How to Sew Leather on a Sewing Machine: A Complete Beginner’s Step-by-Step Guide
This is Maria Sew. Leather intimidated me for years before I actually tried it. Every needle hole is permanent, so there’s no unpicking a mistake and trying again the way you can with cotton; that alone makes it feel riskier than it needs to be. After testing this on several of my own machines across wallets, pouches, and bag panels, I can tell you the real barrier isn’t skill; it’s preparation: the right needle, the right thread, and a full test seam before you touch your actual project.
This guide walks through exactly that process, what leather your machine can handle, how to set it up correctly, and how to avoid the mistakes that turn a first leather project into a pile of ruined scrap.
Key Takeaways
- Start with soft garment leather, chrome-tanned leather, suede, light upholstery leather, or a beginner-friendly faux leather rather than heavy vegetable-tanned tooling leather.
- Use a genuine leather needle for real leather, but check the fabric construction before using one on faux leather because a cutting point can create oversized permanent holes.
- Choose a thread weight your domestic machine can tension correctly. Strong polyester is usually easier for home machines than very thick industrial bonded thread.
- Use clips, removable leather tape, or temporary adhesive instead of pins because every puncture remains visible.
- A 3.0 to 4.0 mm straight stitch is a useful starting range, but the correct setting depends on material thickness, thread, and machine.
- Test the complete seam stack, including interfacing, lining, folded edges, and topstitching layers, before sewing the project.
- Never force the handwheel or pull the leather behind the presser foot. If the machine cannot advance the layers, reduce bulk or move to a more capable machine.
Quick Answer: Can You Sew Leather on a Regular Sewing Machine?
Yes, many regular home sewing machines can sew thin, soft leather, faux leather, and light upholstery leather when the machine manual permits it. The safest setup is a fresh leather needle for genuine leather, strong polyester thread that fits the machine, a non-stick, roller, or walking foot, and a longer straight stitch. A domestic machine is not designed for thick saddle leather, heavy belts, multiple dense seams, or production-level leatherwork, so test the exact number of layers before starting the final project.
Do not judge suitability by leather thickness alone. Firmness, finish, number of layers, seam intersections, adhesive, thread size, and the machine’s presser-foot clearance all affect whether the material can feed and form a stitch. Stop immediately if the motor strains, the handwheel becomes difficult to turn, the needle deflects, or the machine repeatedly jams.
Why Sew Leather at Home?
Leather provides structure, durability, and a finished look to handmade projects that can’t be achieved with regular fabric. It can be applied to card holders, key fobs, bag panels, zipper pulls, notebook covers, straps, patches, cuffs, and decorative trim. These projects do not use the heavy equipment that is used in saddlery or commercial production to teach accurate cutting and controlled topstitching.
Once you’re comfortable sewing leather, you can apply the same techniques to beginner-friendly accessories like this simple tote bag or other fabric bag projects.
Leather sewing is also a good machine-control practice. The material can’t be unraveled over and over again without leaving holes, so planning the seams, aligning, and slow cornering become a must. These habits also help to make the vinyl, cork fabric, coated fabric, canvas, denim, and other challenging materials easier to work with.
Understand Leather Before You Choose a Project
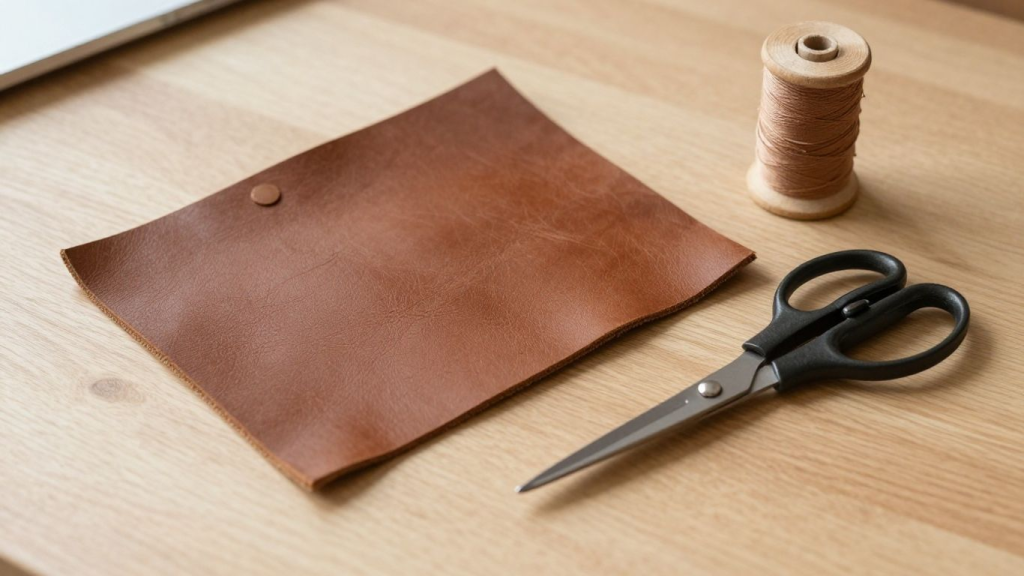
Leather is used for a variety of materials that have vastly different weights, finishes, temper, stretch, and uses. The thin lambskin garment panel is not the same as firm belt leather, even if it is made of real leather. Rather than assuming that all hides can be sewn on a home machine, beginners should consider softness, number of layers, and presser-foot clearance.
Leather weight is usually expressed in ounces, which is about 1/64 inch thick. That’s a good measurement, but it is not everything. A firm two-ounce vegetable-tanned leather might be more difficult to machine than a softer three-ounce chrome-tanned leather, particularly at the folded intersections.
Leather sewing is best approached after gaining confidence with regular fabrics. If you’re completely new to sewing, consider learning how to learn sewing first before experimenting with leather.
Garment Leather
Garment leather is light, supple, and meant to be draped around the body. Some of the easiest leathers to test on a good home press are lambskin, goatskin, and other soft garment leathers that pass under the presser foot less.
Garment leather for jackets, skirts, soft bags, applique, trim and light accessories. It is easily stretched or marked, so place on a table, handle as little as possible, and test clips or tape on a hidden scrap first.
Chrome-Tanned Leather
The range of soft upholstery and accessory weights for chrome-tanned leather is extensive. It can be lighter than firm vegetable-tanned leather, making it suitable for beginner bags, pouches, cushions, and decorative panels.
Surface finish may be sticky under a metal presser foot, so a non-stick, roller, or walking foot may help with feeding. Don’t assume that all upholstery leather is machine-friendly, as some are so dense that they can’t be folded or layered.
Suede and Nubuck
Suede and nubuck are both textured and can grip and move when sewn. Thin versions can be effective on a home machine, but the nap should be consistent throughout pattern pieces to ensure a uniform colour and texture of the finished product.
Fine clips in seam allowance and clean hands on surface. Test any tape, chalk or adhesive first as marks and residue may be hard to remove from the brushed finish.
Vegetable-Tanned Leather
Wallets, cases, straps, belts and tooled goods are often made from vegetable-tanned leather. The thin, supple pieces can be sewn with some strong home machines, but the firm or multi-layer vegetable-tanned leather may require an industrial walking-foot machine or hand stitching.
Never push a domestic machine through thick strap ends, folded handles, or hardware tabs. If the material is not yielding to the handwheel or the needle is bending, decrease the number of layers, skive the seam allowance, or select another construction technique.
Faux Leather and Vinyl
Faux leather and vinyl may be more readily available and may be more uniform in thickness than real leather, but can also have different backing, stretch, and heat sensitivity. A non-stick or roller foot can be useful as the coated surface can sometimes slip under a normal metal foot.
Not all faux leather is necessarily the best choice for a genuine leather needle. If the backing is knit or woven, a sharp denim, microtex, or universal needle recommended by the fabric and machine manufacturer may create a cleaner hole with less chance of cutting through the backing too much.
Since many beginners practice on faux leather before moving to real hides, starting with a reliable beginner machine from our list of the best sewing machines for beginners can make the learning process easier.
Leather Types for Home Sewing: Practical Comparison
- Choose soft, thin leather for the first project.
- Test the full seam stack rather than one flat layer.
- Avoid heavy belt, saddle, holster, and sole leather on an ordinary domestic machine.
- Use faux leather needle advice based on its backing, not only its surface appearance.
The easiest material is not always the thinnest one. Flexibility and surface finish can affect feeding as much as measured thickness. A soft leather may compress and pass under the foot smoothly, while a firm material of similar thickness can deflect the needle and overload the feed mechanism.
Essential Tools and Materials for Sewing Leather
A successful leather setup isn’t all about having every specialist tool, but it is about having the right tools that will prevent unnecessary holes, reduce friction, and keep control. The essential kit will contain the right needle, appropriate thread, an appropriate presser foot, clips, sharp cutting tools, a ruler, scrap leather, and a marking technique that has been tried on the back.
Don’t just select accessories because they are labeled ‘heavy duty’. The needle should be the same as the material, the thread should go through the needle eye and tension system, and the foot should fit the machine. Before putting on screw-on feet, thick thread, or an unusually large needle, be sure to consult your model’s manual.
Keeping these accessories organized in a dedicated sewing box also makes leather projects much easier to manage.
Choose the Correct Needle
The cutting point of a home sewing machine leather needle is made to cut through real leather smoothly. Thin to medium leather sizes are typically 90/14 and 100/16, but may vary depending on the thread size, number of layers, and machine limitations.
Change the needle when it starts to skip stitches, deflect, make a popping noise, or penetrate roughly. A damaged or oversized needle will weaken the line of stitches, not strengthen it, when it is used to make a permanent cut.
If you’re unsure whether your current machine supports leather needles or heavier fabrics, our roundup of the best Brother sewing machines and best Janome sewing machines compares models suited for different sewing needs.
Use Thread Your Machine Can Handle
The strong polyester thread is a good option for most home leather projects as it is suitable for tensioning by home machines and has a good level of abrasion resistance. Use the heaviest thread your needle eye/bobbin system and manual can handle, not the heaviest thread you can find.
In professional leatherwork, bonded nylon and continuous-filament polyester are popular choices, although coarse sizes might not work properly in a home machine. If the thread shreds, loops, or interferes with the needle forming a stitch, decrease the size of the thread before making any aggressive tension changes.
Select a Non-Stick, Roller, or Walking Foot
A non-stick foot provides a low surface drag on leather and vinyl, and a roller foot provides consistent movement of the coated surface with the feed dogs. These feet are particularly beneficial for one or two relatively flat layers that adhere under a standard metal foot.
When two layers are shifting against each other, a walking foot can be used to help control the shifting. It will not make an underpowered machine safe to sew leather, nor will it increase the piercing power of a motor, but it can help align layers on materials the machine can sew safely.
If you’re unfamiliar with specialty presser feet, learning how to use a blind hem foot and other sewing machine attachments can make it easier to understand how different feet improve stitching performance.
Use Clips, Tape, or Temporary Adhesive Carefully
Pins create permanent holes; use sewing clips, small binder clips, removable leather tape, or a small amount of leather-safe temporary adhesive. If possible, do not stretch the leather when placing the layers and keep clips within the seam allowance.
Adhesive residue may build up on the needle and lead to skipped stitches or thread breakage. If possible, place tape away from the stitch line; otherwise, try a narrow strip of tape to see if the needle will pass through without getting gummy.
Cut with a Sharp Blade and Stable Ruler
Use a rotary cutter, sharp utility knife, leather knife, or special shears, and a stable straightedge and a cutting mat. The ideal tool is the one that doesn’t lift, stretch, or drag the hide to create a clean edge.
Do not place fingers in the path of the blade, and for straight cuts, use a non-slip ruler. Do not make a single deep cut, as this may result in a jagged edge or a cut that slips.
Presser Feet for Leather: Which One Should You Use?
- Use a non-stick foot for sticky coated surfaces and relatively flat seams.
- Use a roller foot when the leather needs continuous low-friction feeding.
- Use a walking foot when layers creep or shift against each other.
- Use a standard foot only when scrap tests show smooth feeding without marks.
No one foot is best for all leather projects. A non-stick foot is used to minimize friction, a roller foot is used for moving contact with the surface, and a walking foot is used to synchronize the upper layer with the feed dogs. The right selection will be determined by the primary issue of sticking, drag, or layer movement.
Before sewing the project, check to see if the foot will fit the machine and if the needle will pass through the opening at the desired location. Rotate the handwheel towards you once through a full stitch cycle, with the machine off, before operating the foot under power.
How to Prepare Leather Before Sewing
Most leather sewing problems can be avoided by preparation. Before cutting, examine the hide for scratches, scars, thin spots, stretch, color variation, and grain direction. Mark pattern pieces to ensure that obvious sections are in the best areas and defects are in seam allowances or hidden.
Unlike regular fabric, leather won’t react to pressing and seam ripping. Design the sequence of construction, try the seam allowance, and determine the finish of the edges before the first permanent hole is cut.
Step 1: Confirm the Pattern Is Suitable for Leather
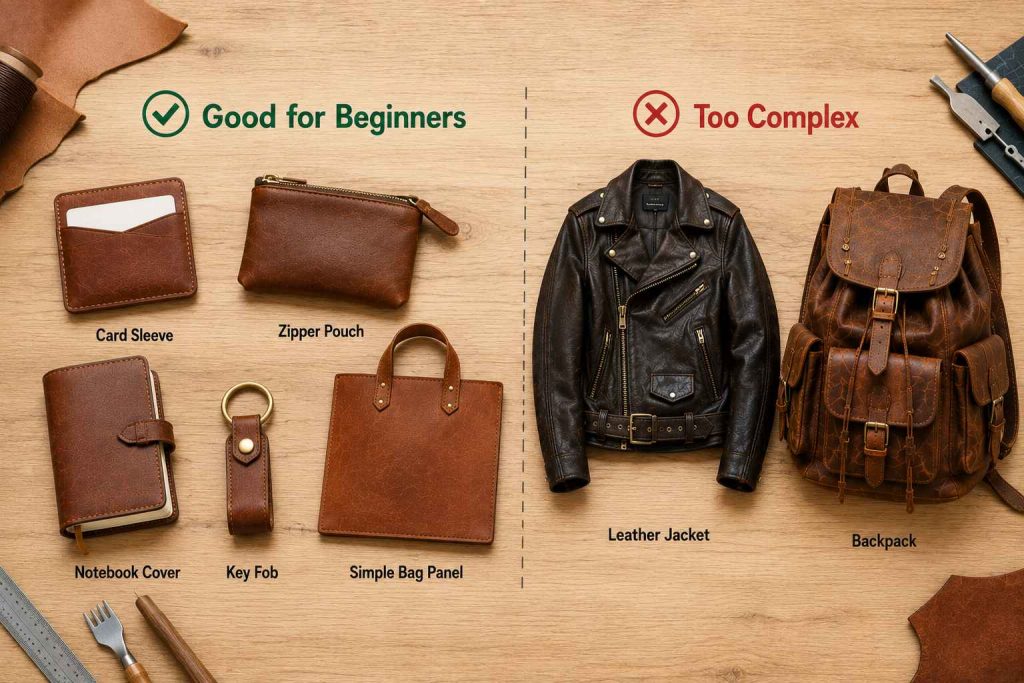
Select a simple pattern that is not too layered, has wide curves, and doesn’t have a lot of easing. Simple flat designs like card sleeves, zipper pouches, notebook covers, key fobs, or simple bag panels are the best first designs to consider rather than fitted garments or multi-layer straps.
Check all overlaps of seams, lining, pockets, and folded edges at intersections. If you’re using a flat machine, it might break at a corner with six or eight layers, so avoid cutting complicated details.
If you’d like another beginner-friendly project after practicing on leather scraps, try sewing a fabric bag or an apron.
Step 2: Make a Full Test Stack
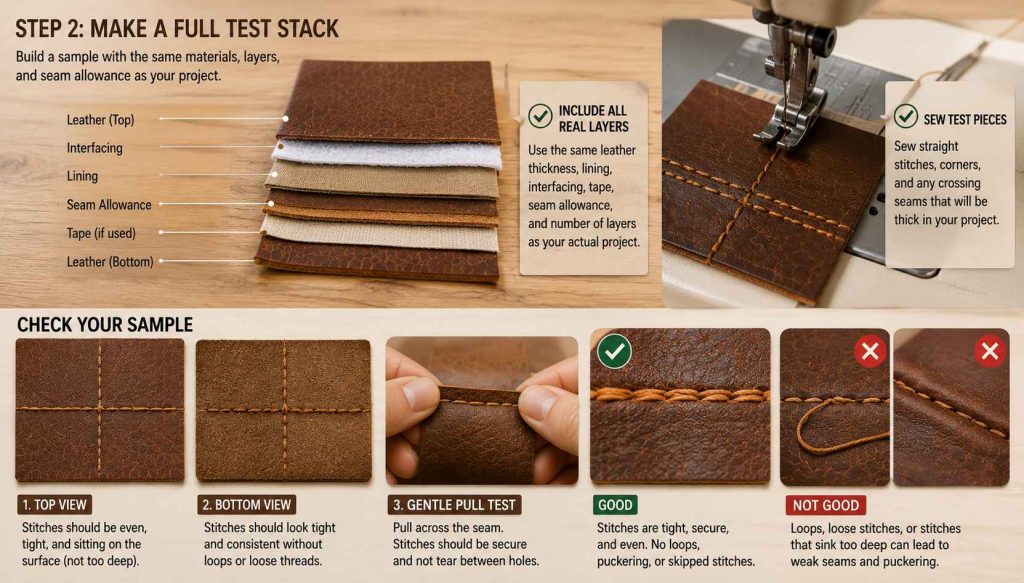
Construct a sample of the same leather, lining, interfacing, tape, seam allowance, and number of layers that will be used in the project. Sew straight pieces, corners, and any crossing seams that are thick to determine if the machine feeds consistently.
Look at the top and bottom of the sample and gently pull across the seam. The stitches should be tight and secure, without a loop or ripping between holes, or sinking too far into the leather to cause puckering.
Step 3: Arrange Pattern Pieces and Mark Grain Direction
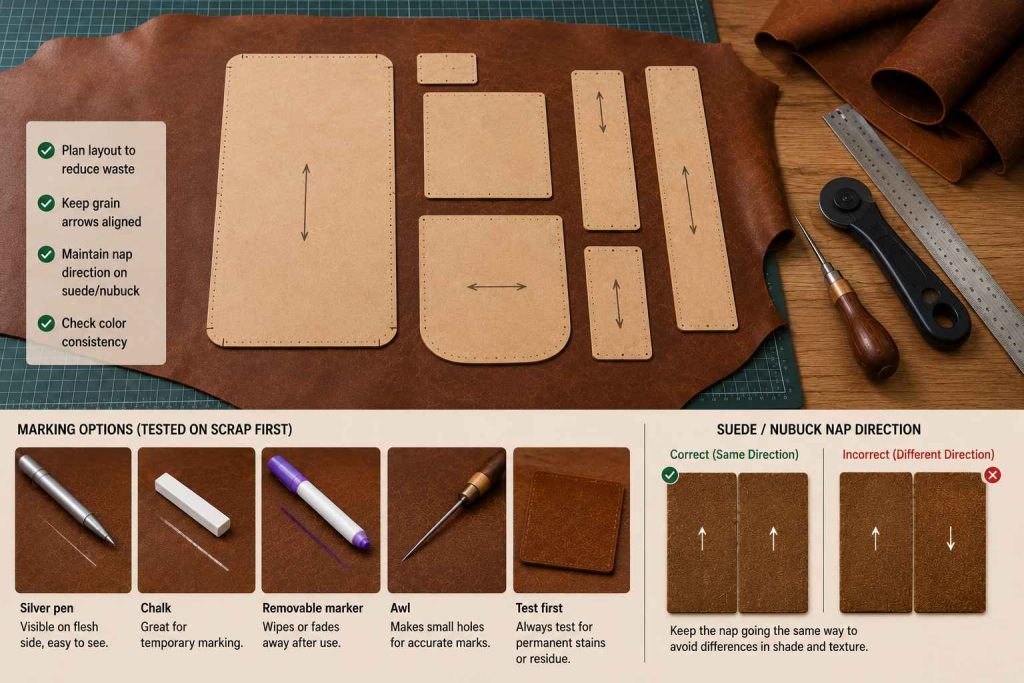
Use pattern pieces to make the best use of the leather and ensure the grain, stretch, and colour are consistent. For suede or nubuck, be sure to maintain the direction of the nap so that adjacent panels don’t look like they are different shades.
Use a tool tested on scrap to mark on the flesh side or other hidden place. Silver pens, chalk, removable leather markers, and an awl can be used, but all marking products must be tested for permanent residue first.
Step 4: Cut One Layer at a Time
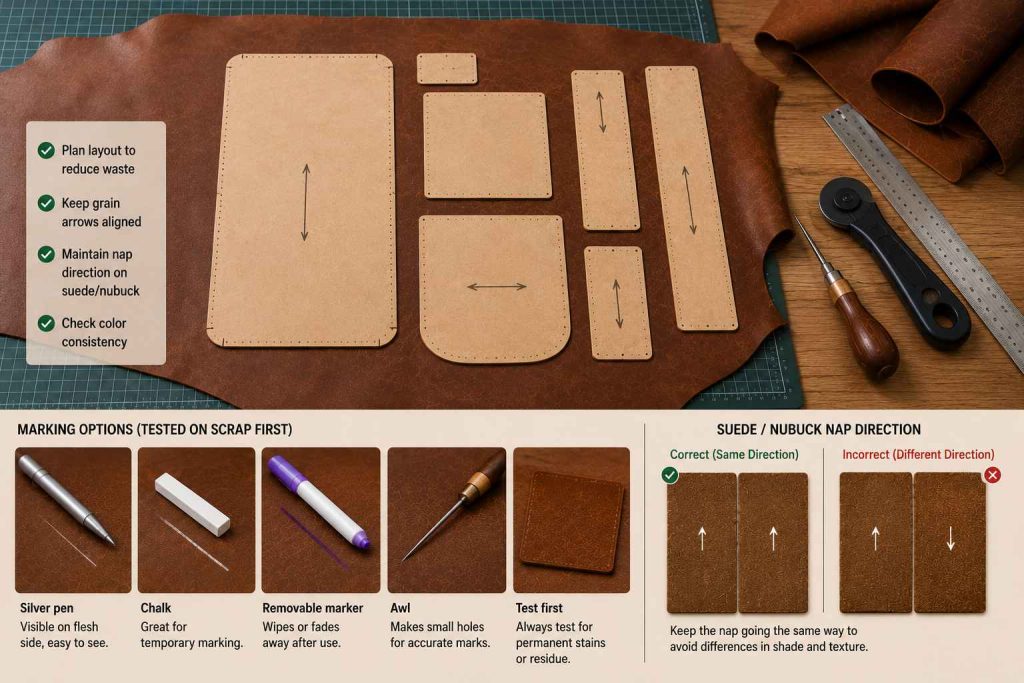
Cut leather in one piece, as folding can cause an uneven cut. Secure the template with pattern weights or removable tape and cut slowly with a sharp tool, always supporting the leather on the table.
If the pieces are to be mirrored, turn the pattern instead of the hide. Write the label on the back side right away to avoid mixing up left and right parts when putting it together.
If your first leather project is a bag, you may also enjoy making a simple tote bag at home once you’ve mastered accurate cutting and stitching.
Step-by-Step Guide to Sewing Leather on a Sewing Machine
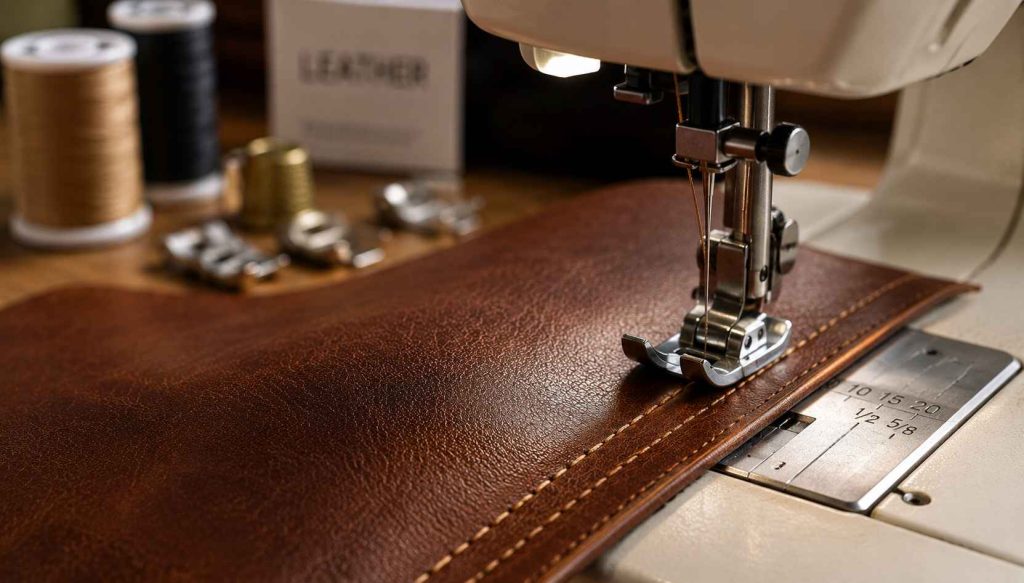
When setting up the machine, the presser foot should be lifted, and the power turned off. Follow the steps one at a time and only change one thing at a time, as changing the needle, thread, tension, stitch length, and foot all at once will make troubleshooting more difficult.
Slow and steady sewing is rewarded with leather. Help the project; do not push, stand ready to guide, but do not strain the machine. A moderate-speed seam is stronger and easier to control than a fast seam with deflected stitches and larger holes.
Before beginning, ensure your machine is threaded correctly. Even experienced sewists occasionally make threading mistakes that lead to skipped stitches. Here’s a complete guide on how to thread a sewing machine.
Step 1: Install a Fresh Needle
Use a leather needle for real leather (usually the flat side of the shank facing the direction specified in the machine manual). Insert it completely into the needle clamp and press the screw firmly.
When using faux leather, use the needle that matches the backing and manufacturer’s suggestion instead of a cutting-point leather needle. Rotate the handwheel once to ensure that the needle clears the foot and needle plate.
Step 2: Thread the Machine Correctly
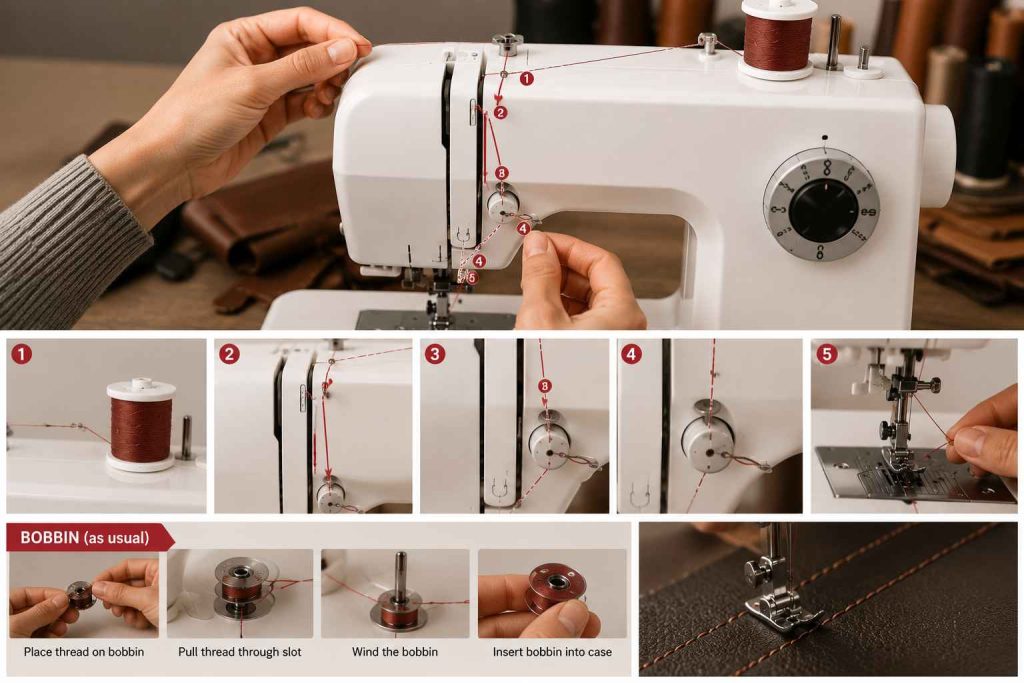
Run the upper path with the presser foot up, so that the thread goes through the tension discs properly. Thread the machine with a smooth polyester thread that will go through the needle eye easily and thread the bobbin as usual.
Don’t start the project with very thick decorative thread because it is a leather project. If the machine is not able to stitch evenly, use a smaller size of thread and create the desired effect with a slightly longer stitch.
Step 3: Attach the Appropriate Presser Foot
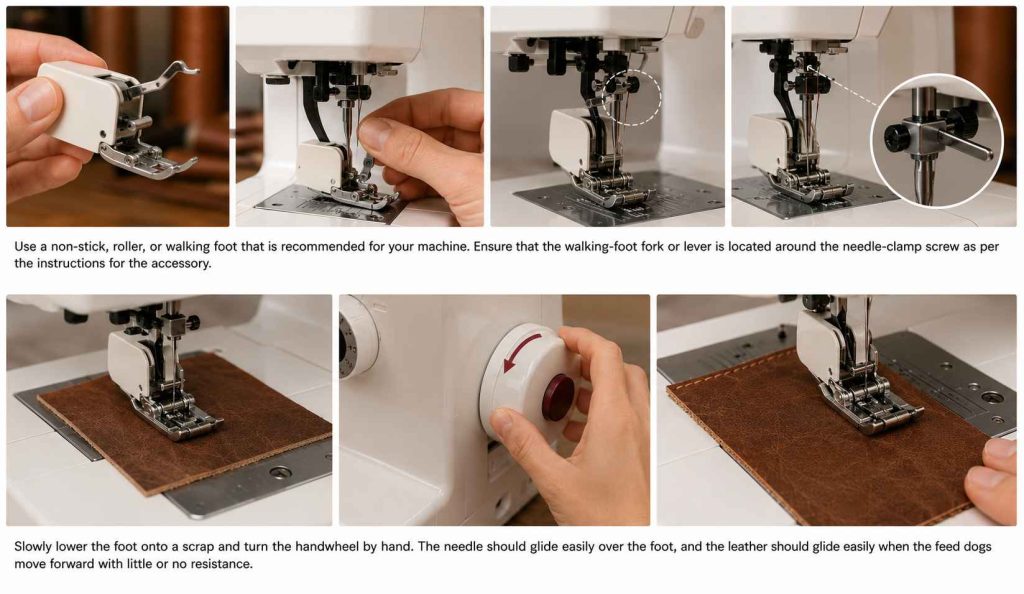
Use a non-stick, roller, or walking foot that is recommended for your machine. Ensure that the walking-foot fork or lever is located around the needle-clamp screw as per the instructions for the accessory.
Slowly lower the foot onto a scrap and turn the handwheel by hand. The needle should glide easily over the foot, and the leather should glide easily when the feed dogs move forward with little or no resistance.
Step 4: Start with a Longer Straight Stitch
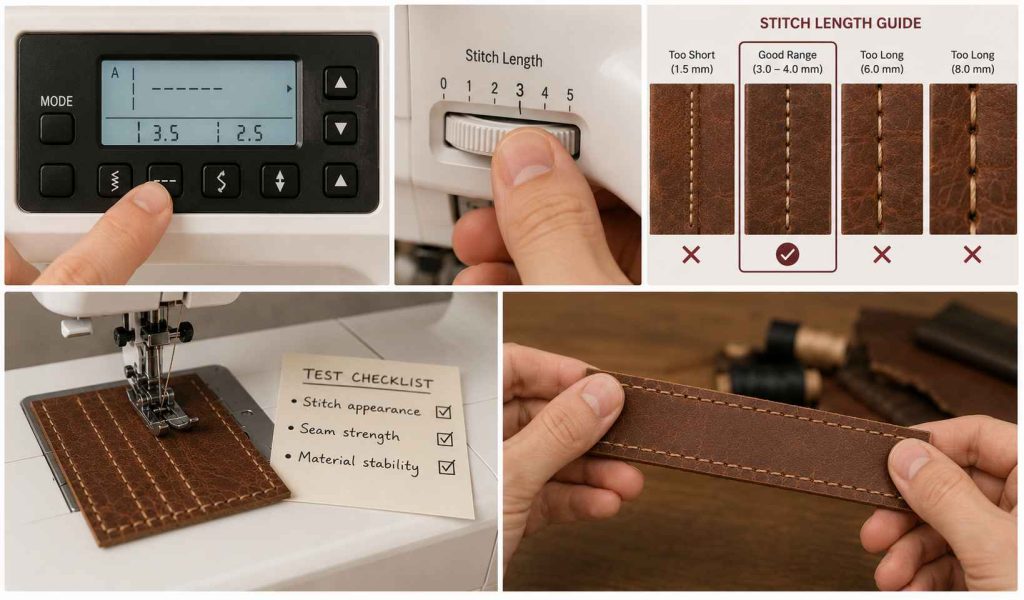
Select a straight stitch and begin around 3.0 to 4.0 mm. Short stitches place holes close together and can create a perforated tear line, while extremely long stitches may not hold small curves or stressed seams securely.
Test stitch appearance and seam strength before deciding on the final length. Decorative topstitching may use a longer setting than construction seams, provided the material and thread remain stable.
Step 5: Set Presser-Foot Pressure and Tension Conservatively
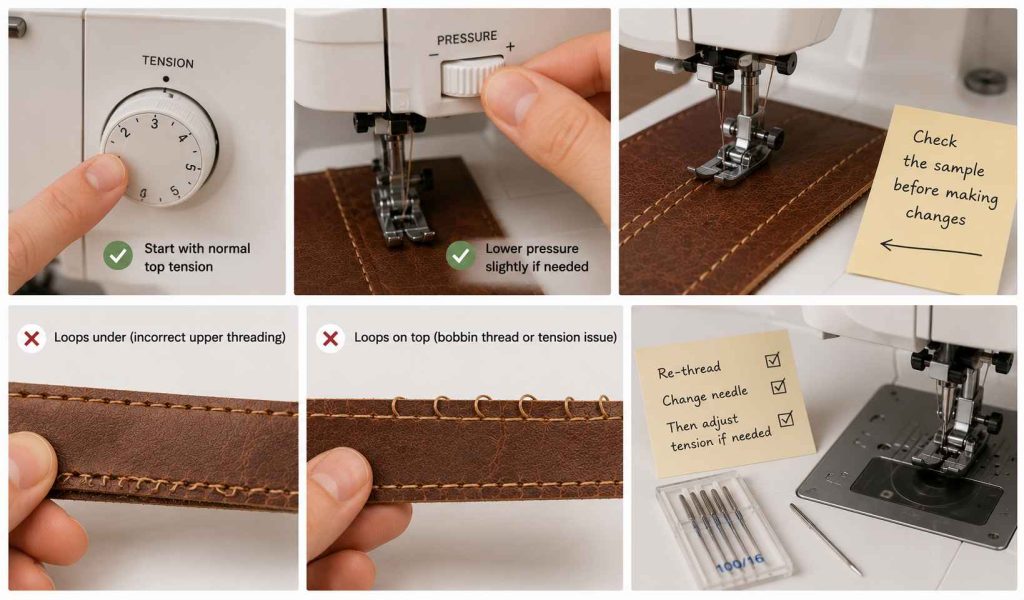
Do not use a higher or lower number than the normal top tension; just start with the machine’s normal top tension. If the machine has a presser-foot pressure adjustment, lower the pressure just a little bit when the foot is marking the surface, or the layers are having trouble feeding.
Check the sample before tension changes. Loops under indicate incorrect upper threading, and loops on top may be due to bobbin-thread or tension problems. Re-thread and change the needle before making big tension changes.
Step 6: Hold Layers Without Pins
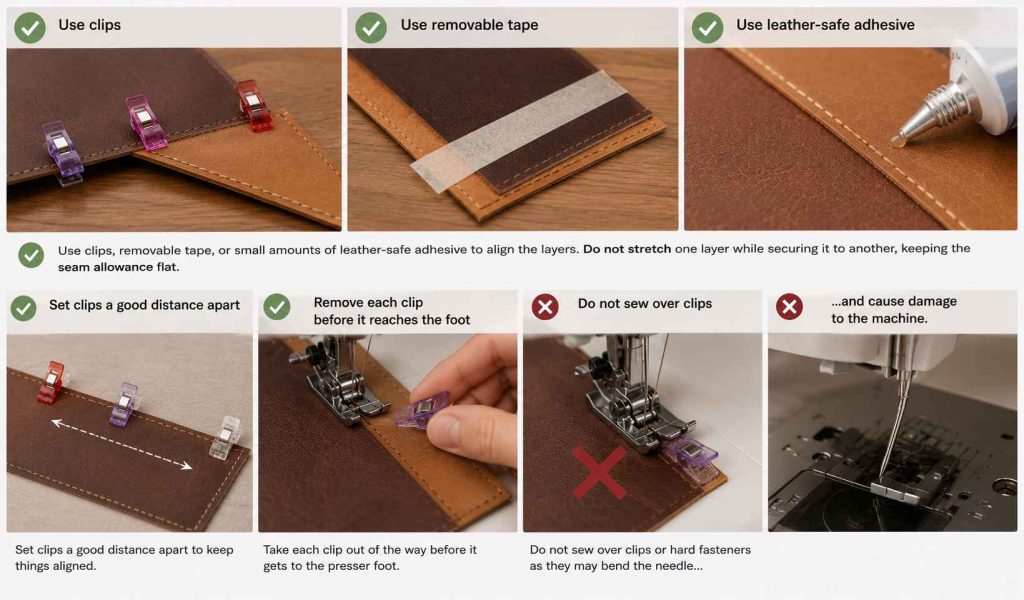
Use clips, removable tape, or small amounts of leather-safe adhesive to align the layers. Do not stretch one layer while securing it to another, keeping the seam allowance flat.
Set clips a good distance apart to keep things aligned, but take each clip out of the way before it gets to the presser foot. Do not sew over clips or hard fasteners as they may bend the needle and cause damage to the machine.
Step 7: Sew Slowly and Support the Project
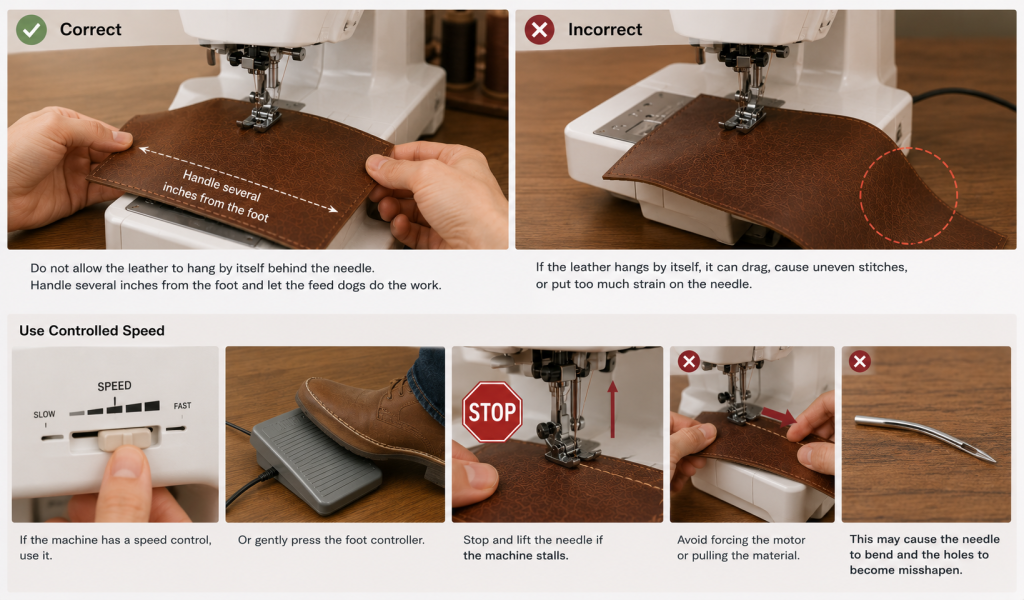
Do not allow the leather to hang by itself behind the needle. Handle several inches from the foot and let the feed dogs do the work.
If the machine has a speed control, use it, or gently press the foot controller. Stop and lift the needle if the machine stalls. Avoid forcing the motor or pulling the material, as this may cause the needle to bend and the holes to become misshapen.
Step 8: Turn Corners with the Needle Down
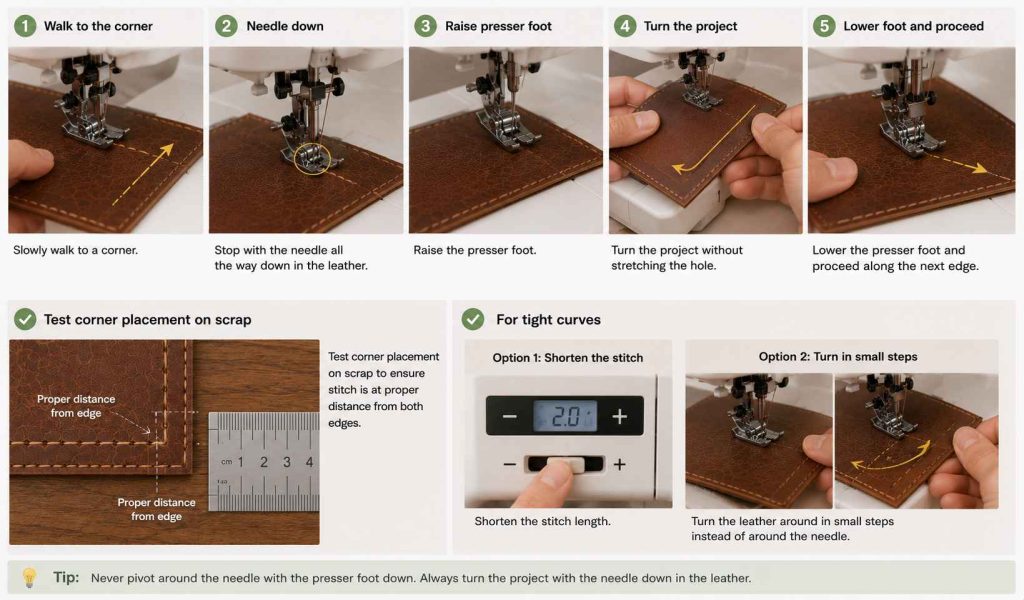
Slowly walk to a corner and stop with the needle all the way down in the leather. Raise the presser foot, turn the project without stretching the hole, lower the presser foot, and proceed along the next edge.
Test corner placement on scrap to ensure stitch is at proper distance from both edges. If you need to make tight curves, shorten the stitch or turn the leather around in small steps instead of around the needle.
Step 9: Manage Thick Intersections Without Forcing Them
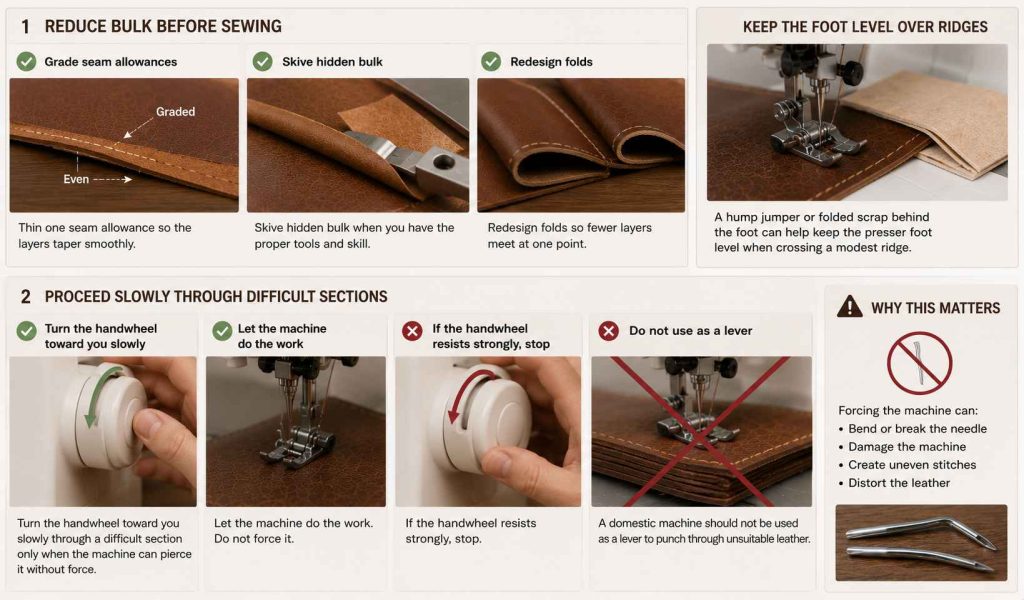
Grade seam allowances, skive hidden bulk when you have the proper tools and skill, or redesign folds so fewer layers meet at one point. A hump jumper or folded scrap behind the foot can help keep the presser foot level when crossing a modest ridge.
Turn the handwheel toward you slowly through a difficult section only when the machine can pierce it without force. If the handwheel resists strongly, stop. A domestic machine should not be used as a lever to punch through unsuitable leather.
Step 10: Secure the Seam Ends
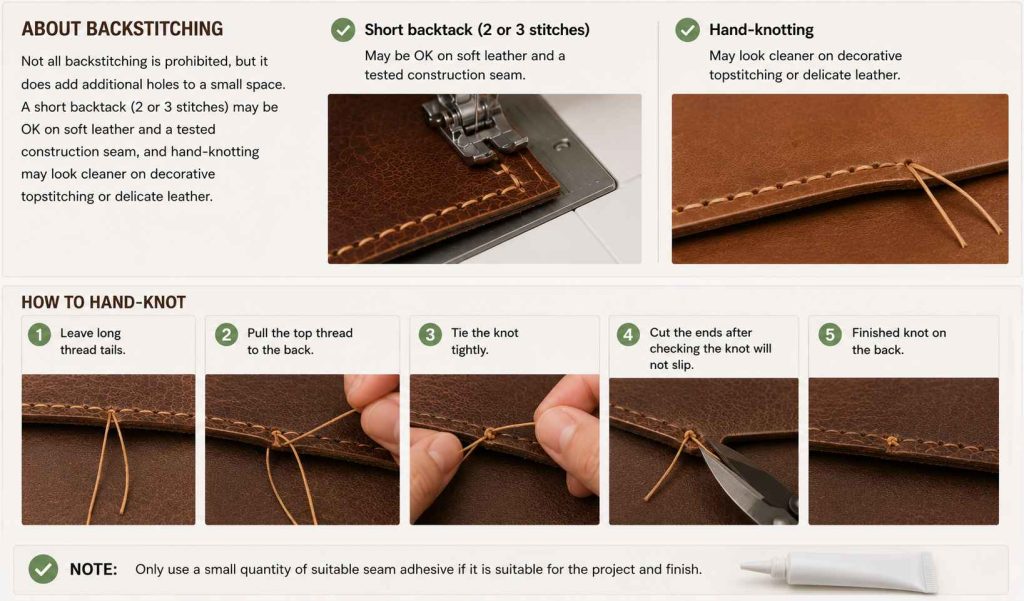
Not all backstitching is prohibited, but it does add additional holes to a small space. A short backtack (2 or 3 stitches) may be OK on soft leather and a tested construction seam, and hand-knotting may look cleaner on decorative topstitching or delicate leather.
If you are tying a knot by hand, leave long thread tails, pull the top thread to the back, tie the knot tightly, and cut the ends after checking that the knot will not slip. Only use a small quantity of suitable seam adhesive if it is suitable for the project and finish.
Recommended Leather Sewing Machine Settings
- Begin with a centered straight stitch.
- Use a 3.0 to 4.0 mm stitch length as a test range.
- Keep normal tension first, then adjust in small increments after rethreading and replacing the needle.
- Reduce presser-foot pressure only if the machine supports the adjustment and the test sample needs it.
- Use a moderate or slow sewing speed for better control and lower needle deflection.
Settings should be treated as test values, not universal rules. Two leathers of the same measured thickness can behave differently because one is softer, one is coated, or one contains denser fibers. Thread size, foot choice, and seam construction also change the ideal setup.
How to Finish Leather Seams and Edges
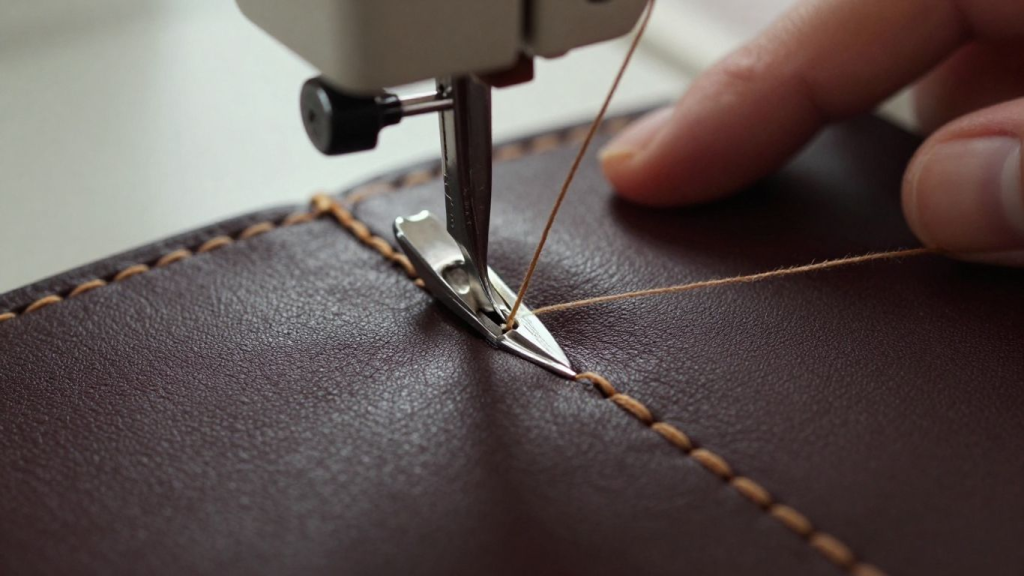
Leather seams do not require the same anti-fraying finish as woven fabric, but they still need bulk control and a deliberate edge treatment. The best method depends on whether the project uses soft garment leather, lined bag leather, raw-edge construction, or firm vegetable-tanned leather.
Test adhesives, edge paint, burnishing compounds, and pressing methods on scrap. Some products darken leather, react with coatings, or remain visible at the edge, and genuine leather should not be ironed at ordinary fabric temperatures without specific care guidance.
Open and Flattened Seams
On soft leather, seam allowances can be opened and held flat with a leather-safe adhesive, double-sided tape placed away from the stitch line, or topstitching on both sides. Avoid heavy pressing unless the leather supplier confirms that low heat is safe.
Use a seam roller or finger pressure through a protective layer to flatten the allowance. Test first because aggressive rolling can mark delicate, embossed, or highly finished leather.
Lapped or Topstitched Seams
Lapped seams place one edge over another and can reduce bulk compared with traditional right-sides-together construction. They are useful for flat panels, decorative lines, and some bag or upholstery designs.
Mark the overlap accurately and secure it with removable tape before stitching. Because the top edge remains visible, cut it cleanly and maintain a consistent topstitching distance.
Raw Edges, Edge Paint, and Burnishing
Soft garment leather and chrome-tanned leather are often left raw, folded, bound, or finished with edge paint. Firm vegetable-tanned leather can sometimes be beveled and burnished, but many soft or heavily coated leathers do not burnish effectively.
Choose an edge method that matches the leather type rather than applying one process to every hide. Practice on offcuts until the color, flexibility, and adhesion remain acceptable after bending.
Troubleshooting Common Leather Sewing Problems
- Replace the needle and rethread before changing multiple settings.
- Confirm that the thread is not too thick for the needle or domestic tension system.
- Use a lower-friction foot when the surface sticks.
- Reduce the number of layers when the motor or handwheel strains.
- Lengthen an overly short stitch when holes begin to form a tear line.
Most leather problems come from a mismatch among material, needle, thread, foot, and machine capacity. Tension is only one part of the system, so turning the tension dial should not be the first response to every skipped or uneven stitch.
Use the troubleshooting table after testing the simplest fixes in order. Change one variable, sew another sample, and record the result. This approach protects the leather from unnecessary holes and makes the true cause easier to identify.
| Problem | Likely Cause | Best First Fix | What to Avoid |
|---|---|---|---|
| Skipped stitches | Dull or wrong needle, thread too heavy, adhesive on needle | Install a fresh correct needle and rethread | Immediately increasing tension |
| Leather will not feed | Sticky surface, pressure too high, project dragging | Use non-stick/roller foot and support the work | Pulling leather from behind |
| Layers shift or creep | Top and bottom layers feeding differently | Use walking foot, clips, or removable tape | Adding permanent pin holes |
| Thread breaks or shreds | Needle eye too small, rough needle, thread too coarse | Use a larger approved needle or finer thread | Forcing industrial thread through a home machine |
| Puckered seam | Stitch too short, tension too high, leather stretching | Lengthen stitch and retest normal tension | Pressing with high heat |
| Needle bends or breaks | Too many layers, pulling, wrong size, foot strike | Stop, reduce bulk, and check clearance | Continuing to power through resistance |
| Uneven topstitching | Fast speed, poor edge guide, project weight | Slow down, support work, and use a seam guide | Watching the needle instead of the guide |
Many stitch problems that appear to be caused by leather actually result from incorrect threading, worn needles, or machine setup. Reviewing the basic sewing machine parts can help you identify the source of the issue more quickly.
Common Leather Sewing Mistakes to Avoid
- Starting with heavy belt or saddle leather on a light domestic machine.
- Using an oversized needle or thread without checking machine limits.
- Pinning through visible areas and leaving permanent holes.
- Selecting a short stitch that perforates the leather like a tear-off line.
- Pulling the project behind the foot or pushing it into the needle.
- Using adhesive directly in the stitch path without testing for needle buildup.
- Ripping out several test seams in the same location.
- Ignoring thick intersections until the final assembly stage.
- Assuming a walking foot turns a domestic machine into an industrial leather machine.
- Applying high heat, steam, or pressure without checking the leather care guidance.
The safest way to improve is to keep labeled scraps showing successful combinations of needle size, thread, stitch length, foot, and layer count. These samples become a personal reference library and reduce guesswork on future leather projects.
Beginner-Friendly Leather Projects
Start with projects that use straight seams, broad curves, and no dense hardware tabs. A successful small project teaches more than a complicated design that repeatedly exceeds the machine’s capacity.
- Flat card holder using thin leather and a few straight seams.
- Zipper pouch with a fabric lining and simple leather outer panels.
- Notebook or passport cover with raw edges and controlled topstitching.
- Key fob or luggage tag made from one or two light layers.
- Leather patch, pocket, or trim added to a fabric bag or garment.
- Small tray or catchall assembled with corner seams or rivets.
Once you’ve mastered these, try making a fabric bag, simple tote bag, or even experiment with the free wallet sewing pattern before progressing to more advanced leather goods.
Leather vs. Faux Leather for Beginner Sewing
Genuine leather and faux leather can look similar from the right side, but they behave differently under the needle. Genuine leather consists of animal hide fibers, while faux leather usually has a coated surface over a woven, knit, or nonwoven backing. That backing changes how the material stretches and which needle point is safest.
- Genuine leather offers natural grain and durability but varies from piece to piece.
- Faux leather is often easier to buy in consistent yardage but may stretch, peel, or react to heat.
- Both materials retain needle holes and may require a low-friction foot.
- Needle selection for faux leather should consider the backing and coating.
Neither material is automatically better for every beginner. Thin, stable faux leather can be useful for practice, while soft garment leather may feed more naturally than a very sticky synthetic coating. Test both the stitch and the finished bend because some faux leather coatings can crack around closely spaced needle holes.
Conclusion
When all decisions are made before permanent holes are punched, it becomes easier to learn to sew leather on a sewing machine. Use a simple pattern and test the full seam stack, select a needle and thread that your machine can handle, and use a foot that solves the feeding issue of the material.
Slow sewing, careful cutting, controlled topstitching, and realistic machine limitations allow beginners to produce sturdy leather accessories and professional decorative details in the home. Retain the successful tests, document the settings, and slowly progress from simple projects to more complex projects as control is gained.
If you’re still building your sewing skills, our guides on how to learn sewing and the best sewing machines for beginners are excellent next reads.
Frequently Asked Questions
Can every regular sewing machine sew leather?
No. Many capable domestic machines can sew thin, soft leather, but machine power, presser-foot clearance, feed system, needle limits, and the number of layers vary. Check the owner’s manual and test the full seam stack without forcing the motor or handwheel.
What is the best needle for sewing genuine leather?
A dedicated leather needle is usually the correct starting point because its cutting point penetrates genuine leather. Choose the size according to material and thread, and stay within the needle sizes approved for your machine.
Should I use a leather needle on faux leather?
Not automatically. Faux leather may have a knit or woven backing that responds better to a sharp, microtex, denim, or universal needle. Follow the material and machine guidance, then compare stitch quality on scrap.
What stitch length should I use for leather?
A straight stitch around 3.0 to 4.0 mm is a useful starting range. Avoid very short stitches because closely spaced holes can weaken leather, but test the final length for seam strength and curve control.
What thread is best for a home machine leather project?
A strong, smooth polyester thread that fits your machine and needle is a practical choice. Very thick bonded nylon or industrial thread may exceed a domestic machine’s needle, tension, or bobbin capacity.
Do I need a walking foot to sew leather?
Not always. A non-stick or roller foot may be better when the main issue is surface drag, while a walking foot helps when layers creep against each other. The foot does not increase the machine’s piercing power.
Why is my sewing machine skipping stitches on leather?
Common causes include a dull or incorrect needle, thread that is too thick for the needle eye, adhesive buildup, poor threading, or material that exceeds the machine’s capacity. Replace the needle and rethread before changing tension aggressively.
Can I backstitch on leather?
A short tested backtack can work on some soft leather construction seams, but it adds holes in a small area. Hand-knotting thread tails is often cleaner for delicate leather, visible topstitching, and raw-edge projects.
How should I hold leather layers together?
Use sewing clips, removable leather tape, or a small amount of tested temporary adhesive. Avoid pins in visible areas because every hole remains in the leather.
How do I sew over a thick leather seam?
Reduce bulk by grading, trimming, skiving when appropriate, or redesigning the intersection. A leveling tool may help with a modest ridge, but stop if the handwheel or motor resists strongly.
Can I press leather seams with an iron?
Only when the leather supplier confirms that low heat is safe. Many leathers can be permanently marked, shrunk, darkened, or damaged by heat and steam, so use a seam roller, finger pressure, or tested adhesive instead.
What is the easiest leather project for a beginner?
A card sleeve, key fob, notebook cover, flat pouch, or leather patch is a good first project. Choose thin, soft material and a design with straight seams and few bulky intersections.

2 Comments