
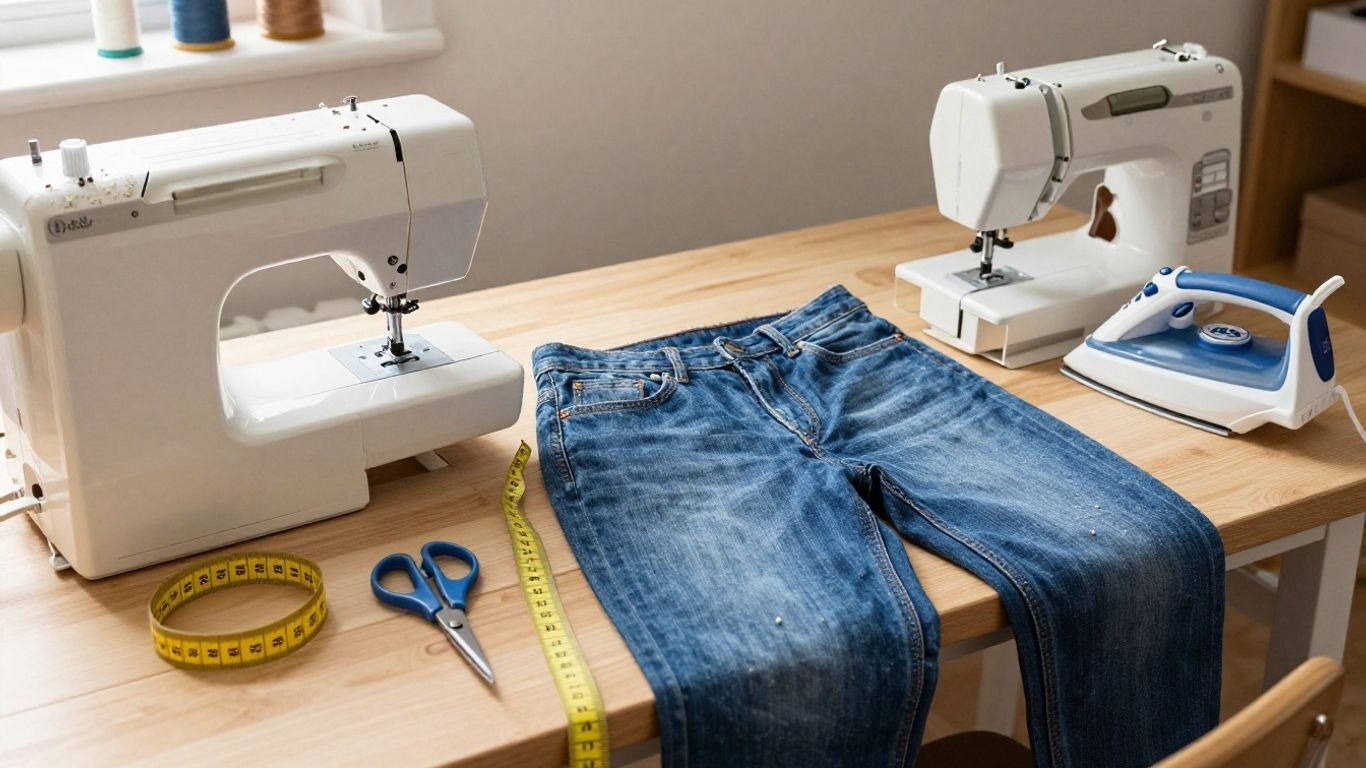
How to Hem Jeans with a Sewing Machine: Step-by-Step Guide for Beginners
Learning how to hem jeans with a sewing machine lets you shorten denim neatly without paying for a professional alteration. The process is beginner-friendly when you measure the finished length carefully, use a denim-compatible needle, press each fold, and slow down over bulky side seams.
This guide explains both the standard double-fold hem and the original-hem method, along with machine settings, troubleshooting, and tips for stretch denim. By testing first and following each step in order, you can create an even, durable hem that looks clean from both sides.
Quick Answer: How Do You Hem Jeans with a Sewing Machine?
Wash and dry the jeans first, try them on with the shoes you plan to wear, and mark the finished length on both legs. Decide whether you want a new double-fold hem or want to preserve the original factory hem, then measure the required allowance before cutting. Press the fold firmly, clip it in place, and sew slowly with a denim needle and a slightly longer straight stitch. At bulky inseam and side-seam intersections, level the presser foot and turn the handwheel manually if the machine begins to struggle.
The most important rule is to test every setting on a scrap made from the cut-off denim. A test sample shows whether the needle is strong enough, the thread forms balanced stitches, and the machine can cross the thick seam without skipped stitches. It also lets you compare thread colors before permanently stitching the garment.
Key Takeaways
- Wash and dry the jeans according to their normal care routine before measuring the final length.
- Try the jeans on with the shoes you expect to wear and mark both legs independently.
- Choose the hem method before cutting because a standard folded hem and an original hem need different allowances.
- Use a fresh denim or jeans needle that matches the fabric weight and a thread your machine can handle reliably.
- Press each fold before sewing, then sew slowly and support the presser foot over bulky crossed seams.
- Test the complete hem construction on offcuts before sewing the actual jeans.
Why Hem Jeans at Home?
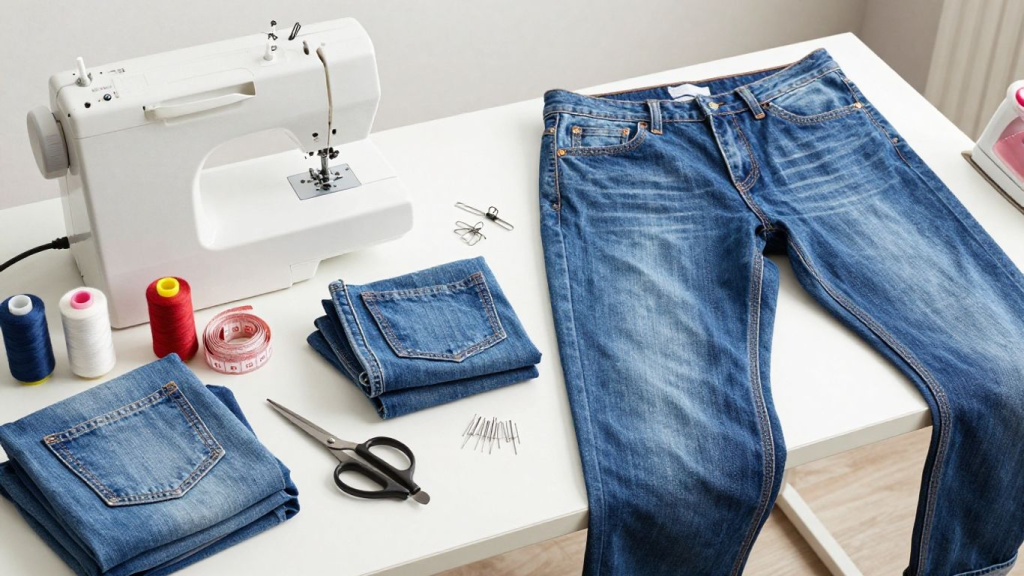
A pair of jeans may fit snugly around the waist, hips, and legs but be too long for the person wearing them or the shoes they like. Extra length can drag on the floor, fray early, bunch around the ankle, or cover up the desired leg shape. Hemming adjusts the length of the garment without altering the overall fit and style.
This change is also a great opportunity to gain experience using the sewing machine with several layers of thick material. Denim teaches the skills of measuring accurately, topstitching, managing seam bulk, selecting the right needle, pressing, and feeding the machine. When you master these skills, a lot of other alterations to the trousers and workwear will be easier.
When you master these skills, a lot of other alterations become easier, including how to sew a hem and how to hand sew a hem for garments that cannot be machine sewn.
Can a Regular Sewing Machine Hem Jeans?
The hem of lightweight to medium-weight jeans can be done on many standard home sewing machines, as long as the machine is in good working order and the operator is using a suitable needle. The challenging part is not typically the flat denim; it is the layers of denim where the folded hem overlaps the inseam or side seam. This thickness can cause the needle to deflect or cause the presser foot to tilt if it is pulled too fast.
A domestic machine should not be subjected to unusually heavy workwear, denim that is too thick for selvedge, more than the machine manual recommends for reinforced seams, or industrial weight topstitching thread. If the handwheel doesn’t glide through the layers, stop, decrease bulk, use a different technique, or take the jeans to a professional instead of risking the needle bar, timing, or motor.
If you’re shopping for a machine capable of handling thicker fabrics, explore our picks for the best sewing machines for beginners or the best Brother sewing machines.
Standard Hem vs. Original Hem: Which Method Should You Choose?
There are two popular methods for cutting jeans at home. A standard double-fold hem is used to cut off the hem and make a new clean edge, and an original hem is used to move the worn hem edge to the back to keep the edge visible and to show the stitching. Either can be effective, but they will give different looks and require different preparation.
A basic hem is typically the easiest to learn, and the depth can be adjusted to make it the desired length. It’s a great choice if the original topstitching is damaged, if the jeans need to be shortened extensively, or if you’re not bothered by replacing the original topstitching with a new one. Topstitching with the same thread as the original hem will make the new hem appear purposeful, though it may not be exactly the same as the factory hem.
- Choose a standard folded hem for the simplest construction and a clean new finish.
- Choose the original-hem method when preserving fading, abrasion, and factory stitching matters more than a perfectly flat interior.
- Use a temporary fold and try the jeans on before committing to either method.
- Do not assume both legs are identical; mark and verify each leg separately.
When the edge that is distressed is an important design element, the original-hem method is useful. It can, however, leave a slight ridge or tuck at the top of the original hem, particularly on thick denim, and is less appealing when a significant amount of hem is to be removed. Test the fold and look before cutting out the excess fabric.
Tools and Materials You Need
Having the right tools before measuring helps to control the alteration and avoid hasty substitutions. While many common jeans do not require industrial equipment, the needle, thread, pressing tools, and bulk-management accessories should be appropriate for the thickness of the finished hem.
Sewing Machine
Use a machine that can produce a balanced straight stitch and lets you control speed around thick seams. Clean lint from the bobbin area before starting, confirm the presser foot is attached securely, and review the manual for maximum recommended needle and thread sizes.
If you’re unfamiliar with your machine, first learn how to thread a sewing machine and review the essential sewing machine parts.
Denim or Jeans Needle
The new denim needle has a stiff shaft and point that can be pushed through a dense woven fabric with less deflection. A 90/14 needle is usually used for lighter denims, whereas 100/16 or 110/18 may be used for heavier layers; however, the needle should be determined by the manual of the machine and test sample.
Thread
The all-purpose polyester thread is good for construction and is compatible with most household machines. If the machine can handle it, topstitching thread can be used in the needle and regular polyester thread in the bobbin for a visible factory-style hem, or very coarse industrial thread can be used in the needle, but may not fit the needle eye or cause tension problems.
Measuring and Marking Tools
Use a flexible measuring tape to measure length on the body and a clear ruler or seam gauge to measure the hem allowance on the table. Use a washable fabric marker (tailor’s chalk) or a removable marking pencil to draw a cutting and folding guide on the denim so that it will not stain the fabric.
Sharp Fabric Scissors or Rotary Cutter
Use sharp shears for good control around curved leg openings and around large seam intersections. A rotary cutter can create a smooth line on a cutting mat, but should only be used when the denim is completely flat, and the path of the blade is free of any loose fabric or fingers.
Clips, Pins, and Pressing Tools
At thick seams, clips are useful since they are not as easily bent as pins, and at flatter sections of the fold, pins can be used. Use a steam iron, pressing cloth, and firm ironing surface to set the hem before stitching and a seam roll or sleeve board to make narrow leg openings easier to press.
Hump Jumper or Folded Card
A hump jumper, jean-a-ma-jig, or firmly folded piece of card supports the back or front of the presser foot when it reaches a bulky seam. Keeping the foot level helps the feed dogs maintain contact and reduces short, uneven stitches at the highest point of the fold.
Preparing Jeans Before Hemming
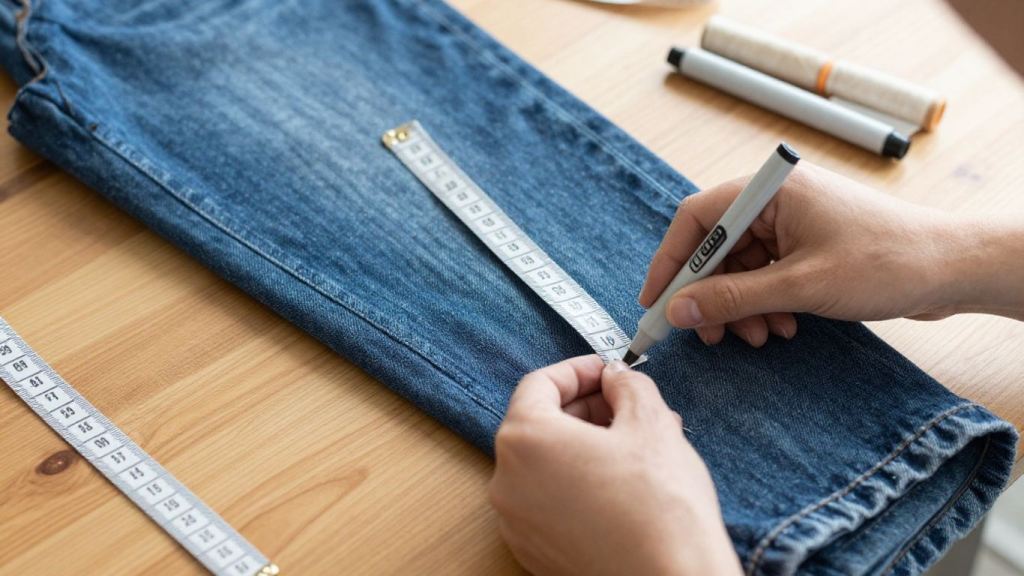
The quality of the hem is dependent on the preparation. Denim may shrink, twist, soften, or relax through the care cycle, which can result in the wrong final length measurement if the jeans are not measured before they are washed. Prepare garment, machine, and test piece before making first permanent cut.
Create a folded denim test piece before sewing the actual garment. It is also a good opportunity to check your sewing machine tension and make any necessary adjustments before working on your jeans.
Wash and Dry the Jeans
Wash the jeans as per the label and how you plan to wash them in the future. This enables normal shrinkage to take place prior to the length being marked, particularly for denim and jeans that have not been washed before.
Check the Existing Fit and Leg Shape
Before adjusting the length of the jeans, ensure that they fit properly through the waist, seat, thighs, and calves. Hemming will not correct a twisted inseam, uneven rise, or a leg opening that is too wide or narrow at the new length, so test the silhouette when fabric is folded up.
Choose the Shoes and Break Length
Test the jeans with the shoes you’re most likely to wear, as these will have an impact on the break. Straight-leg jeans can go just above the shoe, cropped jeans can go just above the ankle, and bootcut jeans will typically need to be long enough to cover the footwear without dragging.
Create a Test Sample
After cutting, only if you are certain of the length, save the offcut and fold it to match the finished number of layers. Use this sample to test needle size, thread, stitch length, tension, presser-foot behavior, and the method for crossing a bulky seam before sewing the actual garment.
Step-by-Step Guide: How to Hem Jeans with a Sewing Machine
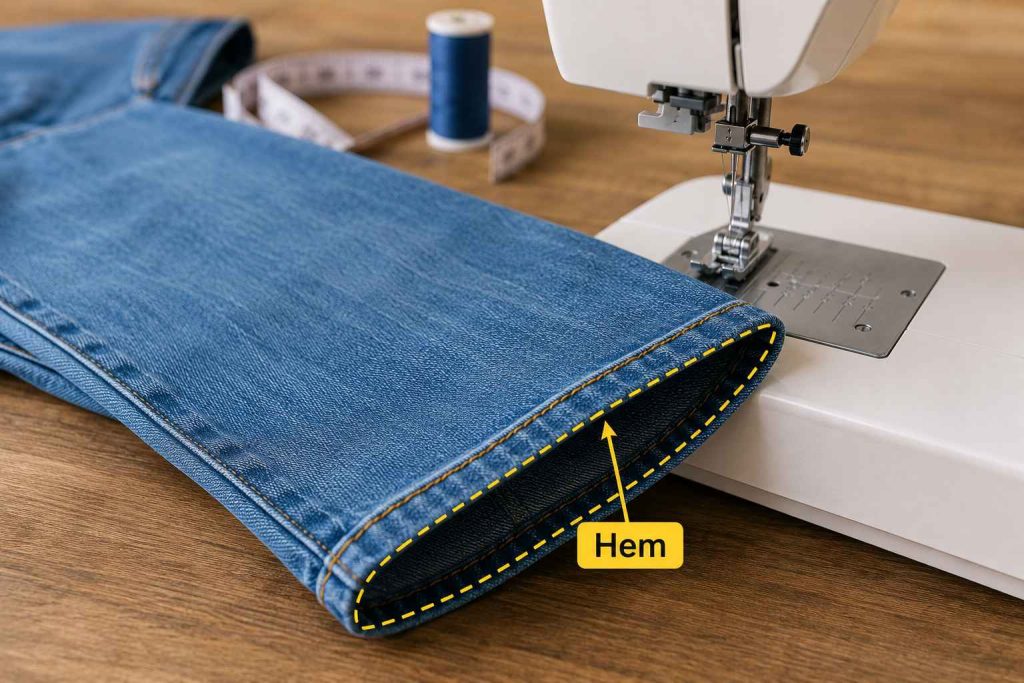
The next method makes a standard double fold hem. Every step has been deliberately spaced to allow you to check the length, fold depth, and machine set-up before proceeding. Wait until the jeans have been tried on, marked, and rechecked on a flat surface before cutting.
Step 1: Try On the Jeans and Mark the Finished Length
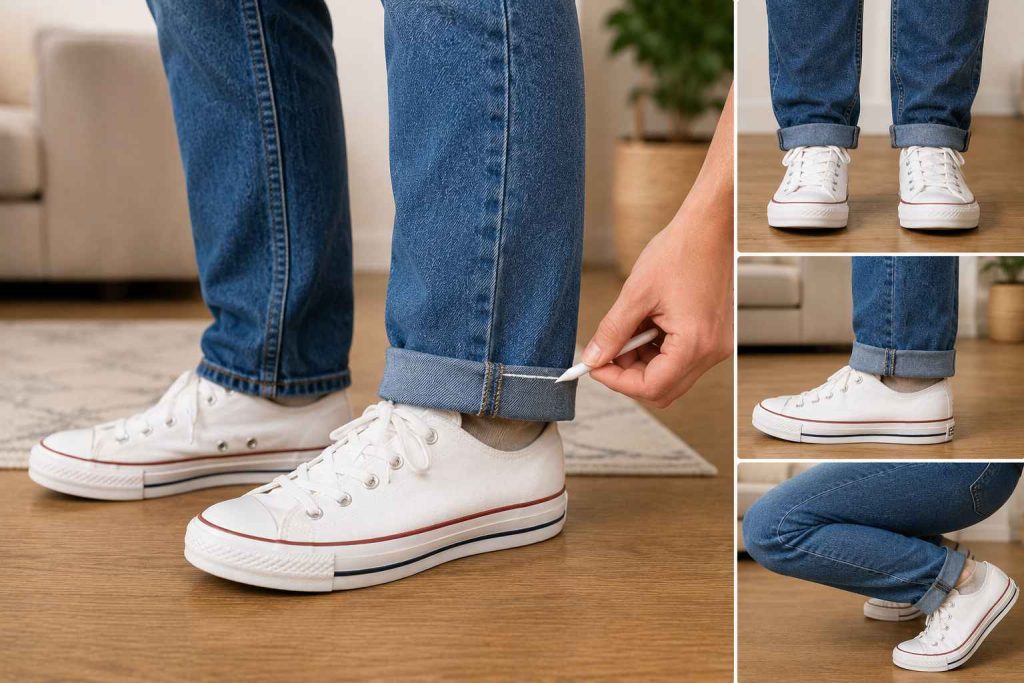
Wear jeans with the desired shoes and tuck the extra length into the inside of the jeans. Mark the length that you want the bottom edge to end at, then walk, sit, and look at the jeans from the front and side to make sure that the length is correct for normal movement.
Step 2: Mark Both Legs Separately
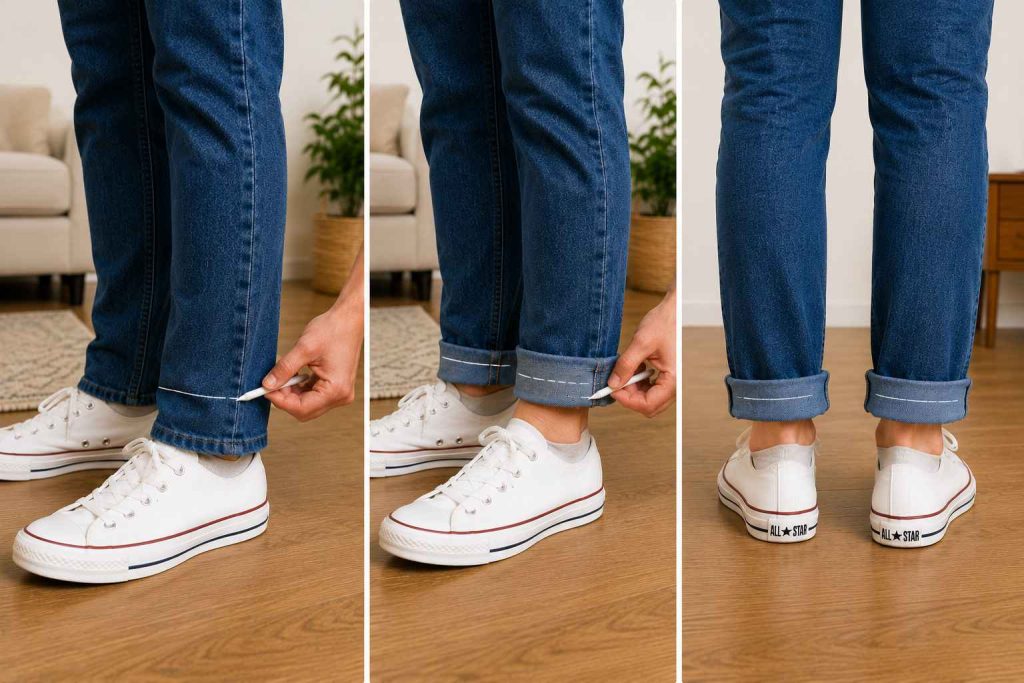
Repeat the fitting process (don’t simply copy the first mark). Bodies, original hems, and legs are not always perfectly symmetrical; therefore, it is not always possible to get a perfectly balanced result with one marking.
Step 3: Decide the Hem Depth and Cutting Allowance
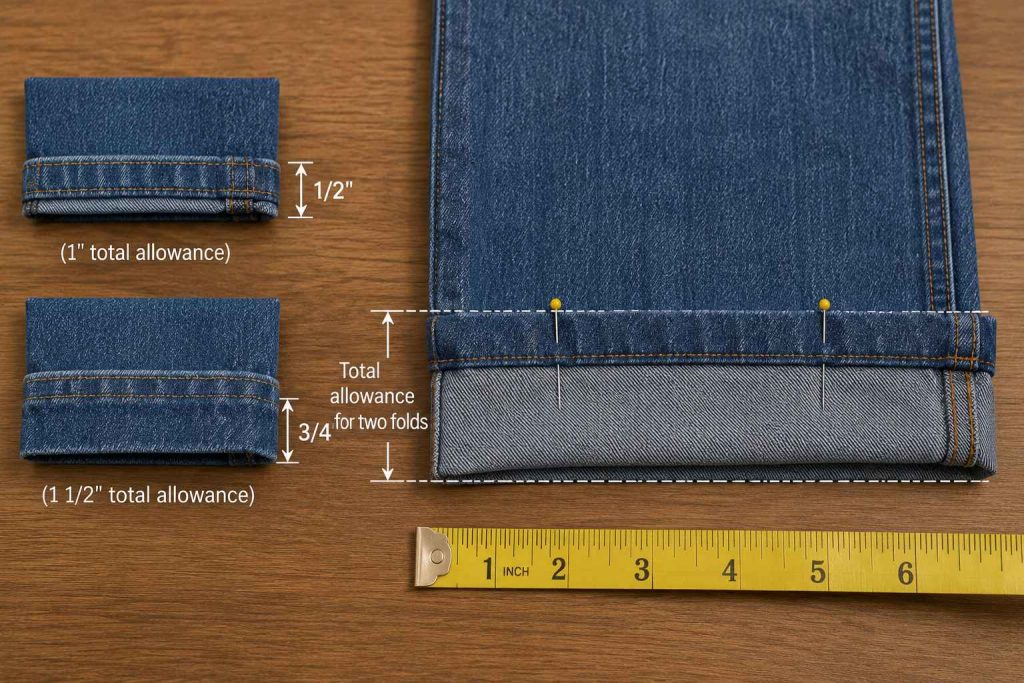
Decide on the desired depth of the finished hem and determine the amount of fabric required for two folds. For instance, a 1/2-inch hem will need about 1 inch of allowance on the bottom of the hem, and a deeper jeans-style hem will need more – check on a test hem before cutting.
Step 4: Draw the Cutting Line
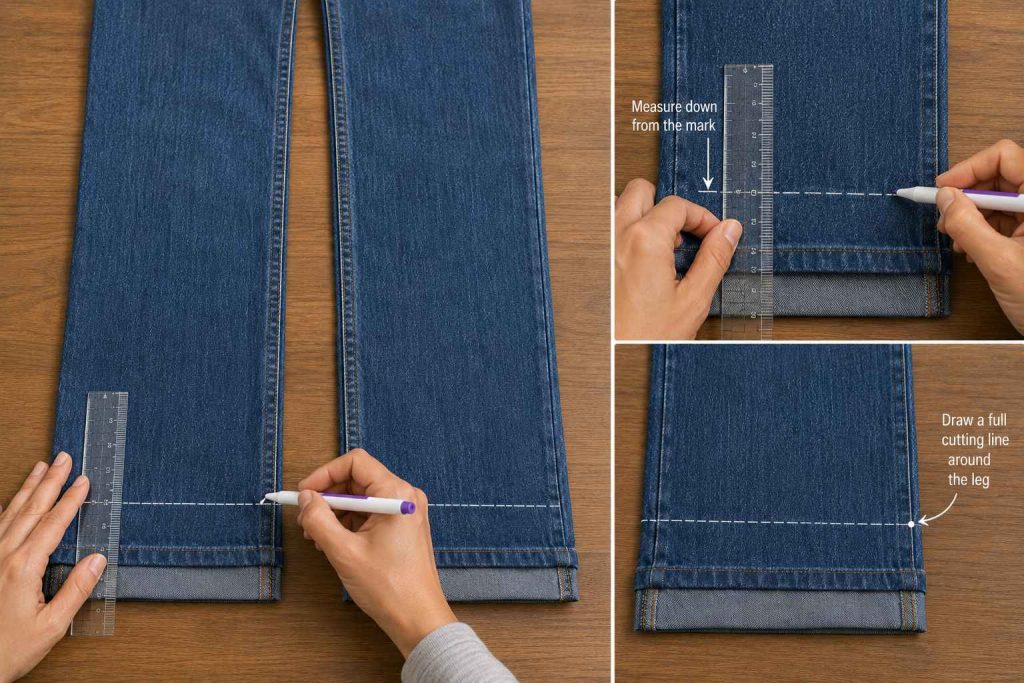
Place the jeans flat, but not stretched, and position each leg in the natural position along the inseam and side seam. Using a removable marker and ruler, measure down from the finished edge marked with the allowance and draw a full cutting line around each leg.
Step 5: Cut the Excess Denim
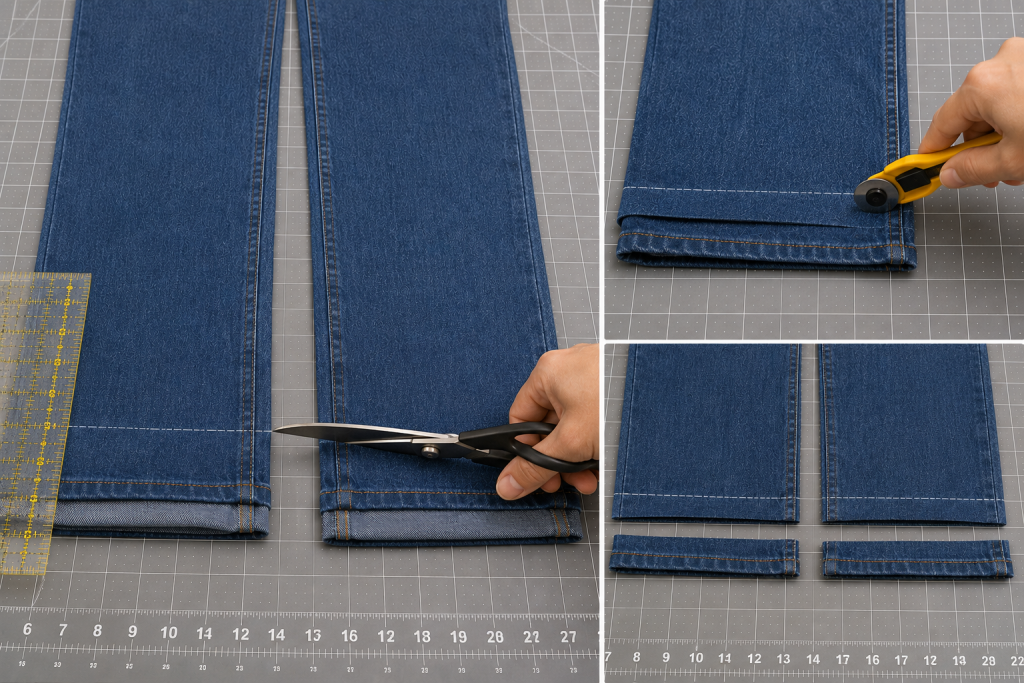
Using sharp shears or a rotary cutter, slowly cut along the marked line on a mat. Do not lift the denim too much; do not compare the two offcuts as the template for the other leg, but as a secondary check.
Step 6: Make the First Fold
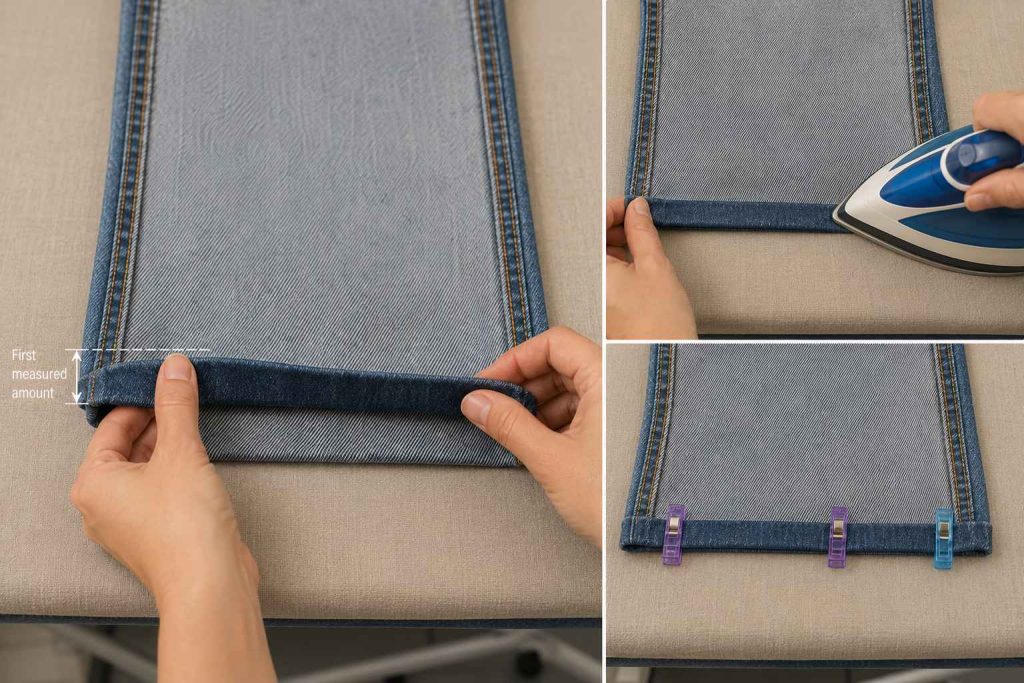
Turn the jeans inside out and fold the raw edge inward by the first measured amount. Press in short sections around the leg so the fold remains consistent, taking care not to stretch the opening or distort the side seams.
Step 7: Make the Second Fold and Secure It
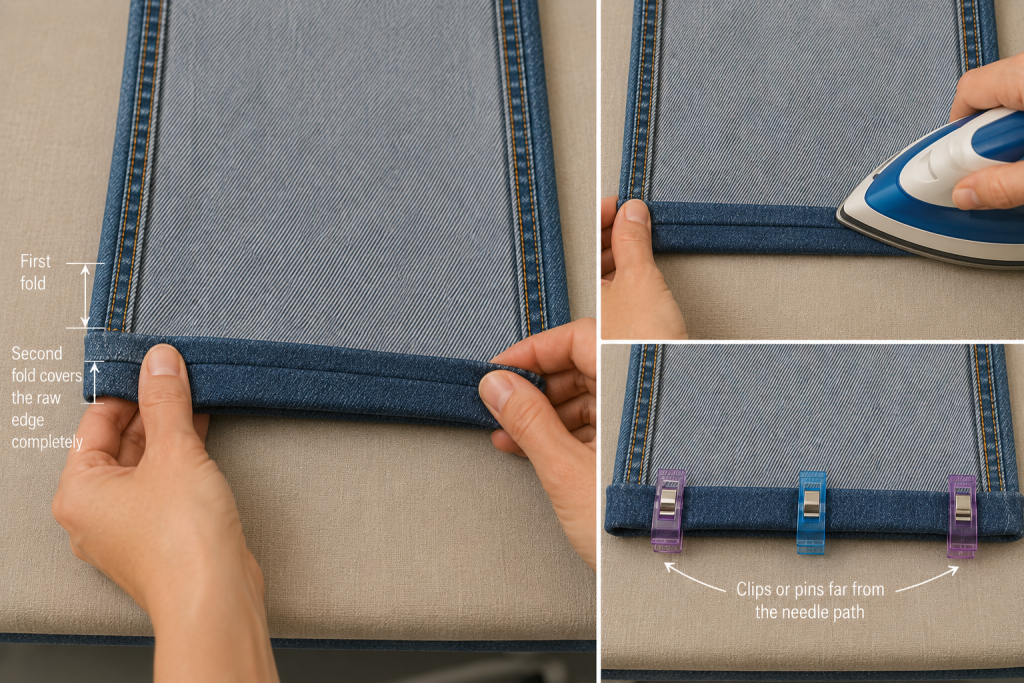
Now fold the edge inwards again to completely cover the raw cut edge. Make sure the second fold is pressed tightly and held with clips or pins far from the needle path so that they can be removed before the presser foot.
Step 8: Set Up and Test the Machine
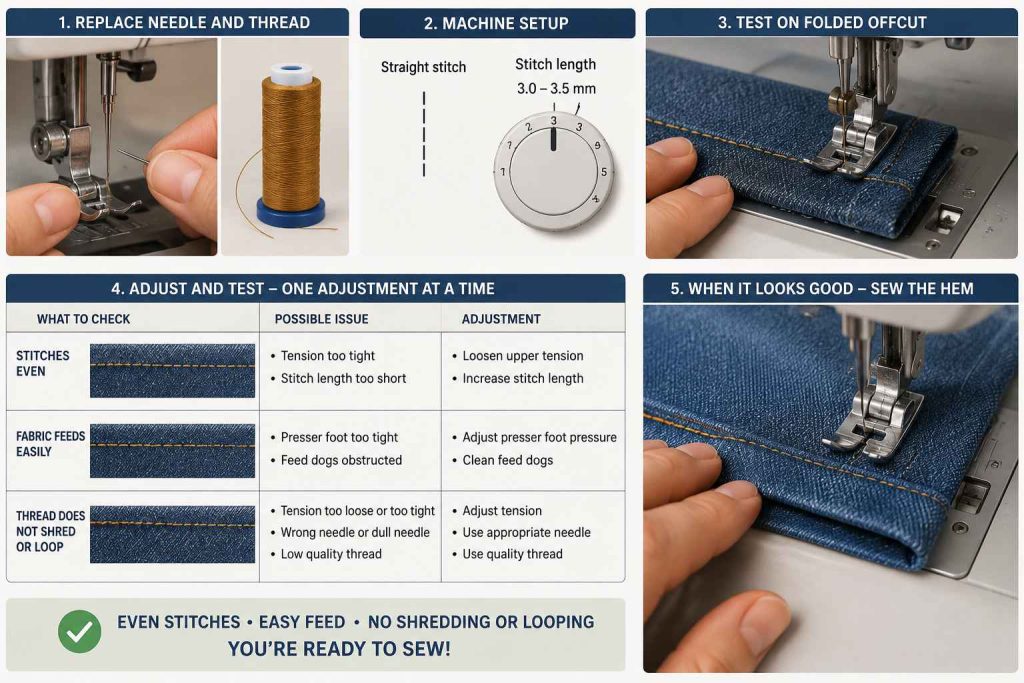
Replace the needle and thread, raise the presser foot,t and start with a straight stitch, length 3.0-3.5 mm. Test on the folded offcut and make one adjustment at a time until the stitches are even, the fabric feeds easily, and the thread does not shred or loop.
If your stitches aren’t balanced, refer to our complete guide on sewing machine tension before continuing.
Step 9: Sew Around the Hem
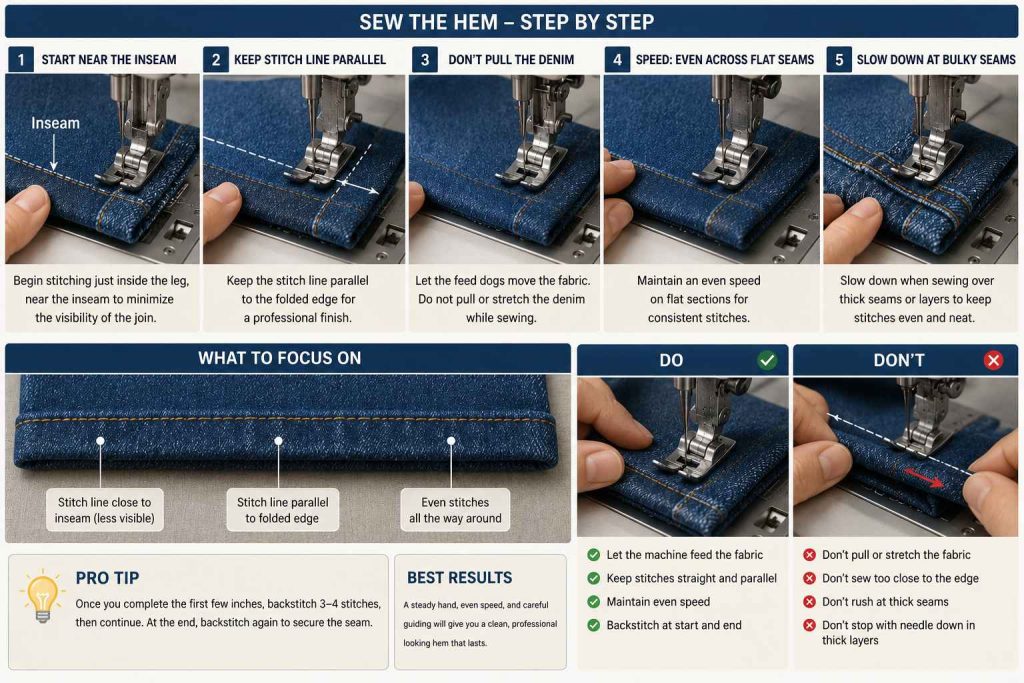
Begin close to the inside of the leg, near the inseam, to minimize the visibility of the join. Do not pull the denim; keep the stitch line parallel to the folded edge, keep the speed even across flat seams, and slow down at bulky seams.
Step 10: Cross Thick Seams Safely
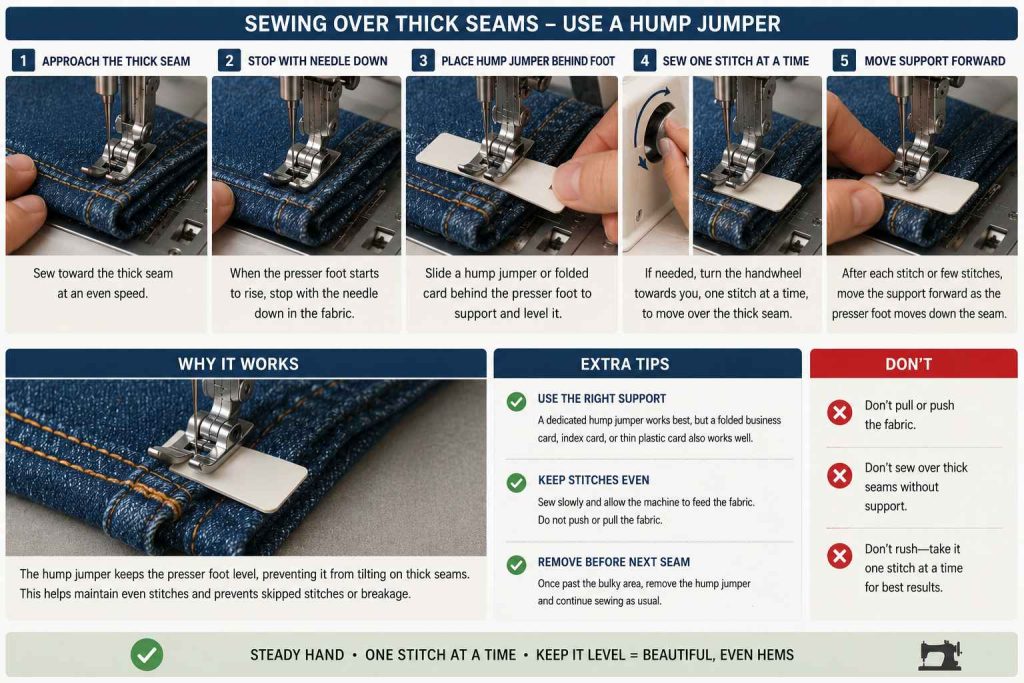
When the presser foot starts to rise over a thick seam, stop with the needle down and position a hump jumper or folded card behind the foot to flatten the presser foot. If needed, turn the handwheel towards you, one stitch at a time, and then move the support forward as it moves down the seam.
Step 11: Secure the Stitching
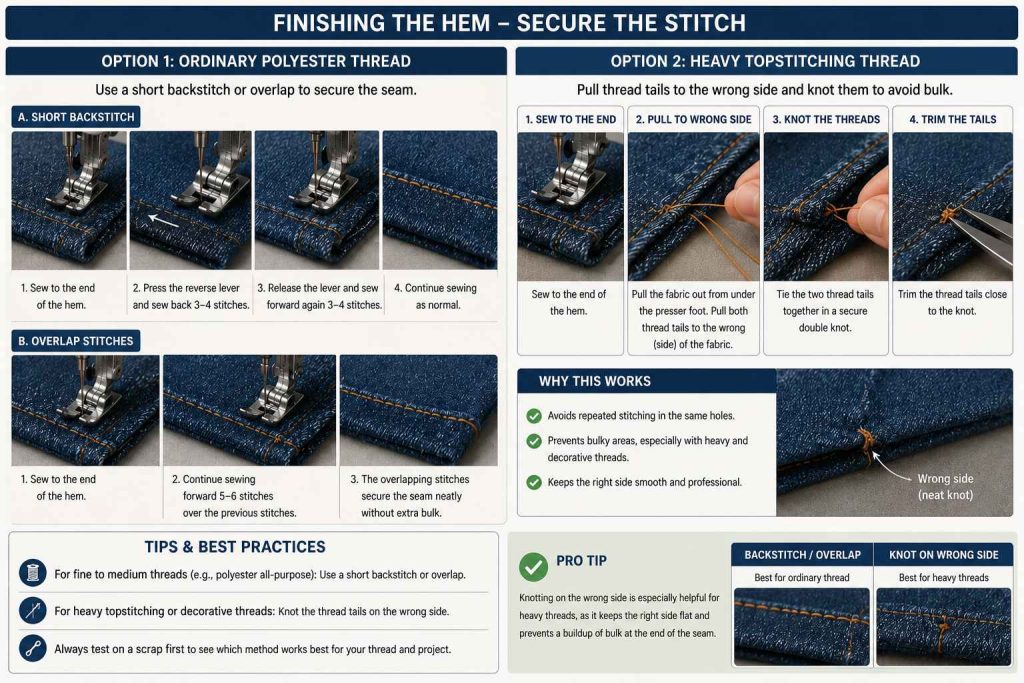
For ordinary polyester thread, a short backstitch or a small overlap of the starting stitches can secure the seam. If heavy topstitching thread creates bulk, pull the thread tails to the wrong side and knot them neatly instead of repeatedly stitching over the same perforations.
Step 12: Press and Check the Finished Hem
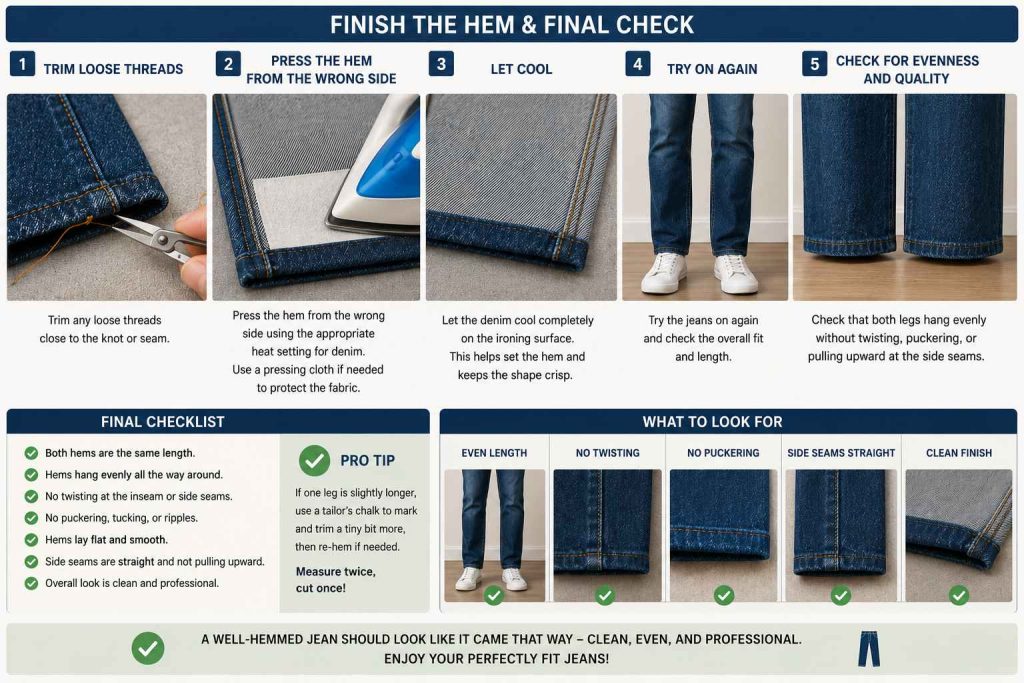
Trim loose threads and press the hem from the wrong side using a suitable heat setting and pressing cloth if needed. Let the denim cool on the ironing surface, then try the jeans on again and check that both legs hang evenly without twisting, puckering, or pulling upward at the side seams.
How to Sew Over Bulky Denim Seams
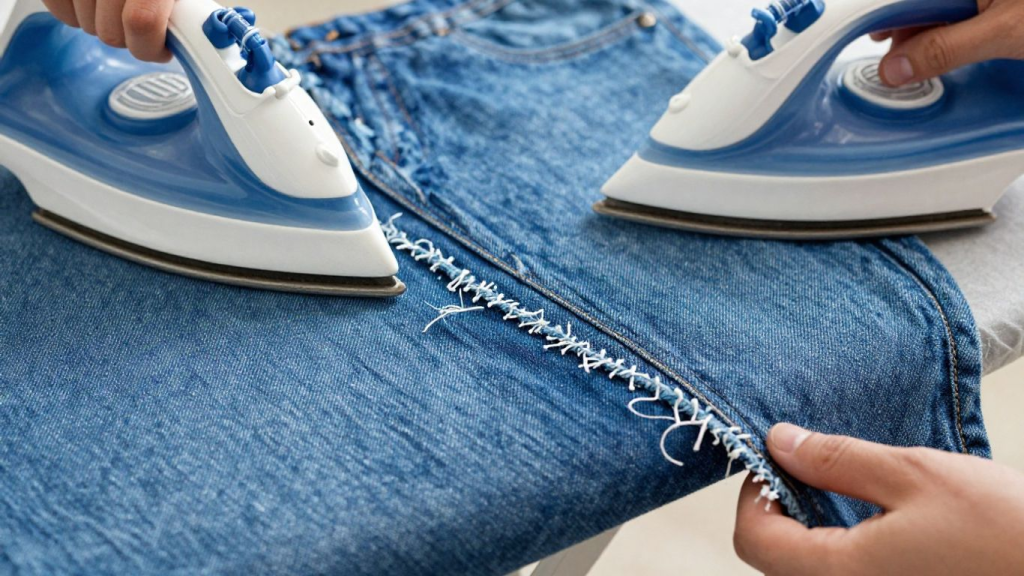
Typically, the inseam and side seam of a jeans hem is the most difficult to work with due to the multiple layers of dense fabric. As the presser foot ascends the ridge, it may not come into contact with the feed, resulting in small stitches, skipped stitches, or a bent needle. Controlling the difference in height is better than trying to make the machine sew faster.
You can minimize extreme bulk by grading only the hidden seam allowance (where applicable); a seam mallet can be used to lightly flatten the ridge, or the ridge can be pressed flat. Avoid cutting through structural stitching and be careful when using a mallet on the table and/or fabric. A hump jumper is generally the best choice for a beginner, since it will support the foot without altering the construction of the garment.
Bulky-Seam Technique
Approach the seam slowly and stop before the foot tilts sharply. Keep the needle down, raise the foot, slide the leveling tool behind it, lower the foot, and continue with the handwheel or minimum speed until the needle has cleared the highest layers.
When to Stop Instead of Forcing the Machine
If the handwheel is locked, the needle is visibly bent, the motor is straining, or the machine is consistently skipping stitches at the same location, stop immediately. If you need to recheck needle size, decrease bulk, use regular weight thread, or use professional alteration equipment instead of trying to push the needle beyond its capacity.
Best Sewing Machine Settings for a Denim Hem
Machine settings vary with denim weight, thread, needle size, fold depth, and the individual machine. Begin with a neutral setup and make changes only after sewing a realistic test sample. Tension-looking problems are often caused by incorrect threading, a damaged needle, or excessive thread thickness rather than the tension dial itself.
- Stitch type: straight stitch for a standard woven-denim hem.
- Stitch length: approximately 3.0 to 3.5 mm for many hems, or slightly longer for visible topstitching if the sample remains secure.
- Needle: fresh denim/jeans needle sized to the fabric and machine instructions.
- Thread: all-purpose polyester or compatible topstitching thread in the needle with regular thread in the bobbin when needed.
- Speed: moderate on flat sections and very slow at bulky seam intersections.
- Presser-foot pressure: reduce slightly only when the machine offers that control and the test sample shows excessive drag.
Once a combination produces even stitches on the offcut, write down the settings before sewing both legs. Consistency between the first and second hem is easier when the machine is not adjusted midway through the alteration.
How to Preserve the Original Jeans Hem
Preserving the original hem keeps the factory fading, abrasion, and thread line at the bottom of the jeans. This method is useful for distressed denim, but it should be planned before any fabric is removed. It works best when the jeans need a modest amount of shortening, and the new fold does not create excessive bulk.
Step 1: Mark the New Finished Length
Try on the jeans and fold the original hem upward until its lower edge sits at the desired finished length. Mark the fold position on both legs, then remove the jeans and verify that the original hem remains level all the way around.
Step 2: Fold the Original Hem Into Position
With the jeans right side out, fold the fabric so the original hem is positioned at the new length and the excess forms a tuck above it. Match the side seams carefully and clip the fold without stretching the leg opening.
Step 3: Stitch Close to the Original Hem
Sew immediately beside the factory hem through the folded layers, using a thread color that blends with the denim rather than trying to duplicate the visible factory topstitching. Test the thickness at the side seams before completing the full circle.
Step 4: Trim and Finish the Excess
Once the length is determined, cut off the excess fabric, leaving a good seam allowance, and if necessary, finish the raw edges with a zigzag or overlock stitch. Push the allowance up so that the original hem goes down and the new hem is less conspicuous from the outside.
Hemming Stretch Denim Jeans
Stretch denim is a denim that has elastane or another elastic fiber that can stretch when cut, pressed, or sewn. Hold the leg opening on the table and move the fabric with the feed dogs – do not stretch the fabric behind the presser foot. The opening in the hem of a pair of jeans is still typically done with a regular straight stitch since the opening doesn’t require a lot of stretch, but the exact fabric should be tested.
A denim needle is generally used on stable stretch denim, and a stretch needle might be the answer to skipped stitches in softer, more elastane-based denim. Moderate heat is used, as too much heat can cause damage to the elastic fibers, and the hem should cool flat after pressing to prevent the opening from growing or rippling.
Tips for a Professional-Looking Jeans Hem
A professional finish comes from keeping the fold, stitch line, and thread appearance consistent rather than trying to sew as quickly as possible. Review the following techniques before beginning the first leg so both hems are completed with the same method and settings.
- Match the visible topstitching color by comparing thread against both the light and dark areas of the denim.
- Use an edge guide, presser-foot marking, or seam guide to keep the stitch line parallel to the fold.
- Begin at the inseam so the overlap or backstitch is less noticeable during wear.
- Support the weight of the jeans on the table instead of letting the garment pull downward from the machine bed.
- Press the completed hem and let it cool before judging whether it lies flat.
- Sew the second leg immediately after the first without changing the successful settings.
Small variations are more visible when the two legs are placed side by side, so perform a final measurement from a consistent reference point after pressing. Correct any unevenness before wearing or washing the altered jeans.
Troubleshooting Denim Hem Problems
When a test seam fails, identify one symptom at a time instead of changing needle, tension, stitch length, and thread simultaneously. Begin with the simplest causes, including a damaged needle, incorrect threading, or a presser foot that is not level over the thick seam.
Skipped Stitches
Replace the needle with a fresh denim needle and confirm it is inserted fully in the correct direction. If the jeans contain substantial elastane, test a stretch needle, and make sure the thread is not too thick for the needle eye or machine hook system.
Puckered or Wavy Hem
Re-thread the machine, reduce handling tension on the fabric, and test a slightly longer stitch. Check whether the fold was stretched during pressing or sewing, and avoid dragging the jeans behind the presser foot.
Tiny Stitches at the Side Seam
The presser foot is probably tilted, and the feed dogs are losing contact. Use a hump jumper or folded card to level the foot, then cross the seam with the handwheel or very low speed.
Needle Breaks at the Thickest Point
Cease pulling or pushing the fabric and check that the needle is straight and properly installed and is suitable for the layers. If the handwheel still does not pass through easily, then the seam is too large for the machine and cannot be pushed through.
Topstitching Thread Loops Underneath
Re-thread the upper path with the presser foot up, so that the thread goes into the tension discs the right way. Make sure the bobbin is loaded with regular thread and test a larger compatible needle, and then adjust the upper tension slowly after verifying the thread is correct and the needle is correct.
Finished Hem Is Uneven
Check whether the problem comes from the stitching line or from the original length marks. Press the hem flat, measure both legs from a consistent point, and resew the affected area before trimming any additional fabric.
Final Jeans-Hemming Checklist
Use this final checklist before cutting and again before sewing. It provides a quick quality-control pause between preparation and irreversible steps, which is especially useful for beginners working on a favorite pair of jeans.
- The jeans have been washed and dried according to their normal care method.
- The final length has been checked with the correct shoes on both legs.
- The standard or original-hem method has been selected before cutting.
- The full fold allowance has been measured below the finished-length line.
- A fresh denim-compatible needle is installed correctly.
- Thread and stitch settings have been tested on a folded offcut.
- A hump jumper or leveling tool is available for the thick seams.
- Both hems have been pressed, measured, and compared after sewing.
Once every item is confirmed, the alteration is ready for normal wear. Keep the cut-off scraps until the jeans have been tried on and the finished hems have been approved, since the scraps are useful for additional testing or small repairs.
Conclusion
The best way to hem jeans is to treat the alteration as a sequence of checks: wash, fit, mark, choose the method, calculate the allowance, cut, press, test, sew, and inspect. Following that order prevents most length and bulk problems before they become permanent. With a suitable denim needle, balanced thread, and a slow approach at the side seams, beginners can create a durable hem that looks neat and feels comfortable in everyday wear.
Frequently Asked Questions
Can I hem jeans with a regular sewing machine?
Yes. Many home machines can hem lightweight and medium-weight jeans with a straight stitch, a suitable denim needle, and careful handling over bulky seams. Stop if the handwheel or motor cannot move through the layers smoothly.
What needle should I use to hem jeans?
Use a fresh denim or jeans needle sized to the fabric. A 90/14 may suit lighter denim, while 100/16 or 110/18 may suit heavier layers, subject to the sewing machine manual and a test sample.
What stitch length is best for a jeans hem?
A straight stitch around 3.0 to 3.5 mm is a practical starting point for many denim hems. Visible topstitching may look better slightly longer, but the sample must remain secure and balanced.
Should I wash jeans before hemming them?
Yes. Wash and dry the jeans according to their normal care routine before measuring so ordinary shrinkage has already occurred.
How much fabric should I leave below the finished length?
Leave enough for the complete fold structure you intend to sew. For two 1/2-inch folds, you need about 1 inch of allowance, but deeper jeans hems require more, so make a test fold before cutting.
Can I keep the original hem when shortening jeans?
Yes. The original-hem method repositions the factory edge at the new length, but it can create a small ridge and is usually best for modest shortening.
Why does my machine make tiny stitches at the side seam?
The presser foot is probably tilted as it climbs the thick ridge, reducing feed-dog contact. Level the foot with a hump jumper or folded card and sew the crossing slowly.
Why are stitches skipping on stretch denim?
A damaged or unsuitable needle is a common cause. Test a fresh denim needle first, then try a stretch needle if the fabric contains significant elastane and skipped stitches continue.
Can I use topstitching thread in the bobbin?
Many domestic machines sew more reliably with regular polyester thread in the bobbin and topstitching thread only in the needle. Follow the machine manual and test before sewing the garment.
Do I need to backstitch a jeans hem?
A short backstitch or overlap is usually suitable with ordinary thread. With heavy topstitching thread, tying the tails on the wrong side may avoid bulky repeated perforations.
How do I stop a denim hem from puckering?
Use a fresh needle, re-thread the machine, lengthen the stitch slightly, avoid stretching the fabric, and test presser-foot pressure if your machine allows adjustment.
When should I take jeans to a professional?
Professional help is sensible for very heavy selvedge or workwear denim, exact chainstitch replication, major leg reshaping, or any seam the home machine cannot cross smoothly without strain.


One Comment