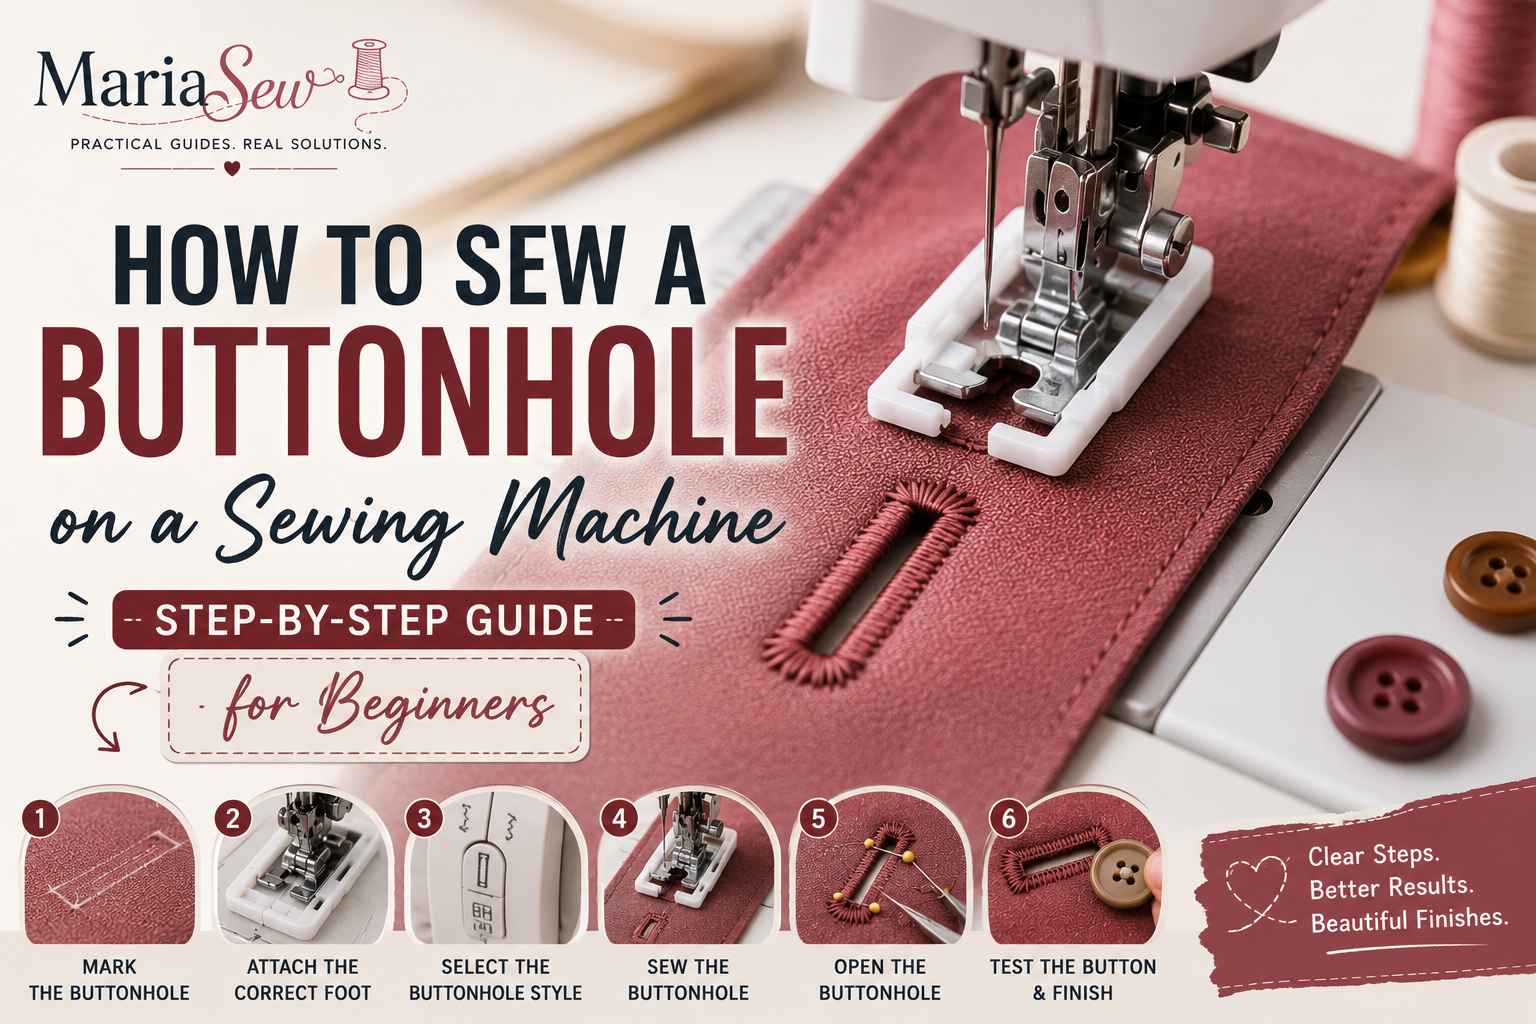
How to Sew a Buttonhole on a Sewing Machine: Step-by-Step Guide for Beginners
A buttonhole is a small detail, but it’s the one that instantly signals whether a garment was made carefully or rushed, evenly spaced, properly reinforced, and sized to actually fit the button. I’ve sewn hundreds of them over the years, and the difference between a clean result and a puckered one almost always comes down to one thing: testing the full cycle on a real scrap before touching the garment.
This beginner-friendly guide explains one-step and four-step buttonholes, accurate sizing, machine setup, stitching, safe opening, and common fixes for puckering or uneven stitches. With a careful test sample and a few simple adjustments, you can create strong, evenly shaped buttonholes on both woven and stretch fabrics.
Quick Answer: How Do You Sew a Buttonhole on a Sewing Machine?
To sew a buttonhole, first interface or stabilize the buttonhole area and mark the exact placement. Install the buttonhole foot specified in your machine manual, select the correct buttonhole stitch, insert the actual button into a one-step foot when applicable, and test the settings on a scrap made from the same fabric layers. Sew the full cycle without pulling the fabric, then place pins across the bartacks and cut the center open carefully with a buttonhole chisel or seam ripper.
The exact sequence depends on whether your machine uses a one-step, four-step, or manual buttonhole system. Some machines require a buttonhole lever to be lowered, while others use a sliding foot or manual dial changes.If you’re unfamiliar with preparing your machine before sewing, our guide on how to thread a sewing machine covers the essential setup steps. Sew the full cycle without pulling the fabric, then place pins across the bartacks and cut the center open carefully with a buttonhole chisel or seam ripper.
Key Takeaways
- Test the full buttonhole cycle on a scrap that includes the same fabric, interfacing, seam allowances, and number of layers as the finished project.
- Use the presser foot and buttonhole setting recommended in your sewing machine manual instead of assuming every machine uses the same system.
- Measure the button itself, including its thickness or shank, rather than relying only on the printed button diameter.
- Stabilize soft, stretchy, loosely woven, or lightweight fabric so dense buttonhole stitches do not pucker or sink into the surface.
- Open the finished buttonhole from each end toward the center, or use a buttonhole chisel, to reduce the risk of cutting through the bartacks.
- Do not pull or push the fabric while the machine sews, because the feed system needs to control the stitch density and direction.
What Is a Machine-Sewn Buttonhole?
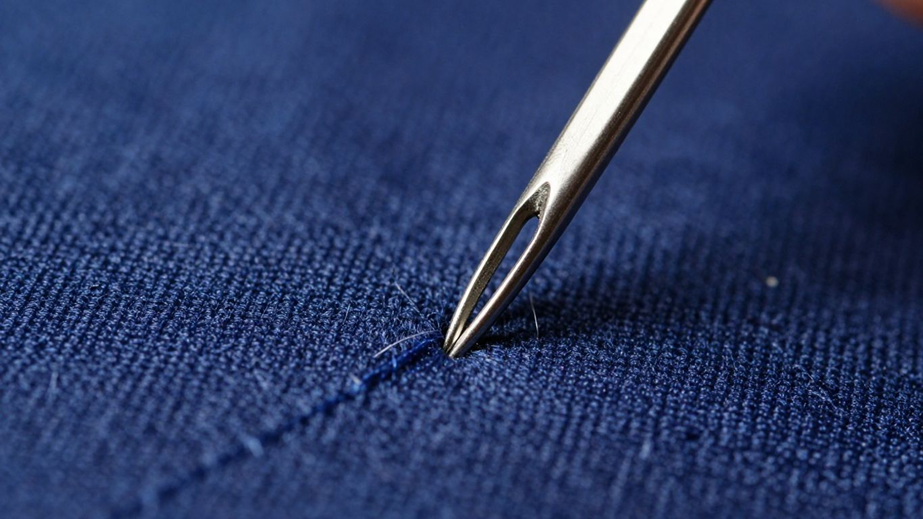
A machine-sewn buttonhole is a reinforced opening surrounded by closely spaced zigzag or satin stitches. Two stitched sides protect the raw fabric edges, while bartacks or rounded ends reinforce the points that receive the most stress when the button passes through the opening. The opening itself is cut only after the stitching is complete.
Modern machines may produce the entire shape in one automated cycle, while simpler machines divide the process into four manual stages. Both methods can produce durable results. The main differences are how the length is measured, how the machine changes sewing direction, and how much control the sewist must provide during the cycle.
Why Learn to Sew Buttonholes?
Buttonholes are useful on far more than tailored shirts. They finish blouses, coats, skirts, waistbands, cuffs, pillow covers, bags, baby clothes, fabric organizers, and home decor projects. Learning the technique also improves broader sewing skills because it combines accurate marking, fabric stabilization, machine control, and safe finishing.
A clean buttonhole makes a handmade garment look intentional and wearable. It also gives you freedom to choose button size, spacing, thread color, and placement instead of being restricted to pre-made closures. Once you can create consistent samples, the technique becomes one of the most practical utility stitches in garment sewing.
If you’re new to sewing, our guide on how to learn sewing provides practical tips for building foundational skills before tackling more advanced techniques like buttonholes.
Types of Machine Buttonholes
The best buttonhole style depends on the machine, fabric, button, and amount of stress the closure will receive. Some styles are designed for everyday shirts, while others are intended for stretch fabrics, coats, or decorative garments. Review the individual types first, then use the comparison table at the end of this section as a quick summary.
Not every machine includes every buttonhole style. A basic mechanical model may offer one four-step rectangular buttonhole, while a computerized model may include stretch, rounded, keyhole, heirloom, or corded variations. Always choose a stitch that your machine can sew reliably on the actual project fabric.
One-Step Automatic Buttonhole
A one-step buttonhole is completed in a single machine cycle. On many machines, the button is placed in a sliding tray at the back of the buttonhole foot so the machine can determine the finished length. A buttonhole lever or sensor then helps control the stopping and direction changes.
This method is convenient when a garment needs several matching buttonholes. Even so, one-step systems can fail if the lever is not lowered correctly, the foot cannot slide freely, or a bulky seam blocks movement. Testing the full cycle is still necessary before sewing the garment.
Four-Step Buttonhole
A four-step buttonhole divides the stitching into two side columns and two bartacks. The sewist changes the dial or stitch setting at each stage, following the sequence shown in the machine manual. This system is common on mechanical machines and allows direct control over the finished length.
The main challenge is stopping each side at the same point. Clear start and end marks are essential, and the machine should be stopped with the needle in the correct position before switching steps. A careful practice sample makes the sequence much easier to remember.
Stretch Buttonhole
A stretch buttonhole uses a stitch structure designed to move with knit fabric. It is useful for stable jersey, knit cardigans, stretch waistbands, and other closures that need limited flexibility without distorting the opening.
Stretch fabric should still be reinforced with suitable knit interfacing or wash-away stabilizer. The buttonhole should not be placed in an unsupported area that will stretch repeatedly, because even a flexible stitch can become misshapen when the fabric lacks structure.
Keyhole Buttonhole
A keyhole buttonhole has a rounded opening at one end to create room for a thick button shank. It is commonly used on coats, tailored jackets, and heavier garments where the button sits away from the fabric surface.
This style needs firm interfacing and accurate placement because the rounded end is more visible than a standard rectangular buttonhole. It should be opened with a sharp chisel or fine scissors so the circular section is not distorted.
Rounded-End Buttonhole
A rounded-end buttonhole offers a softer decorative finish than a rectangular shape. It works well on blouses, dresses, children’s garments, and other projects where the closure is visible and the button has a relatively flat profile.
The curved end needs balanced stitch density and stable fabric. If the fabric shifts or the satin stitches are too dense, the curve can look uneven. A stabilizer underneath the test sample often improves the shape.
Corded Buttonhole
A corded buttonhole is sewn over a fine cord, gimp, or strong thread positioned beneath the buttonhole stitches. The cord adds definition and strength, making the finished edges look fuller on coats, jackets, denim, and tailored garments.
The cord must fit the buttonhole foot and machine instructions. It should be pulled gently after sewing, secured on the wrong side, and trimmed without distorting the fabric. This technique is more reliable than sewing a second automated cycle directly over the first one.
| Buttonhole Type | Best Use | Main Advantage | Main Consideration |
|---|---|---|---|
| One-step automatic | Shirts, dresses, repeated closures | Fast and consistent sizing | Foot and lever must move freely |
| Four-step | Basic mechanical machines | Direct length control | Each stage must stop at matching marks |
| Stretch | Stable knits and stretch garments | More flexible stitch structure | Fabric still needs support |
| Keyhole | Coats and shank buttons | Room for thick button shanks | Needs firm interfacing and careful cutting |
| Rounded-end | Blouses and decorative garments | Soft, polished appearance | Curved end shows imbalance easily |
| Corded | Tailoring, denim, heavier fabrics | Stronger and more defined edges | Cord must be installed and secured correctly |
For a first project, a rectangular one-step or four-step buttonhole on medium-weight woven cotton is usually the easiest choice. Once that result is consistent, move to stretch, rounded, keyhole, or corded styles with fabric-specific stabilizers and test settings.
Essential Tools and Materials
A buttonhole is a small feature, but it concentrates many stitches into a narrow area. Using the correct needle, foot, thread, marking tool, interfacing, and cutting tool prevents distortion and makes the finished opening easier to control.
1. Sewing Machine with a Buttonhole Function
Use a sewing machine that supports a one-step, four-step, or manual buttonhole stitch. The built-in buttonhole function ensures consistent and evenly sized buttonholes.
If you’re still choosing your first machine, explore our recommendations for the best sewing machines for beginners to find models with beginner-friendly buttonhole features.
2. Buttonhole Foot
Attach the buttonhole foot recommended for your sewing machine model. It helps guide the fabric and creates evenly spaced stitches around the buttonhole.
Understanding the different sewing machine parts can also help you install and use specialty presser feet correctly.
3. Fabric-Appropriate Sewing Needle
Choose a fresh needle that matches your fabric type, such as a universal, Microtex, denim, ballpoint, or stretch needle. The right needle prevents skipped stitches and fabric damage.
4. High-Quality Polyester Thread
Use a strong, all-purpose polyester thread for most sewing projects. Quality thread produces smoother stitches and creates a more durable buttonhole.
5. Interfacing
Apply fusible or sew-in interfacing behind the buttonhole area to stabilize the fabric. This prevents stretching, puckering, and distortion during sewing.
6. Marking and Measuring Tools
Keep tailor’s chalk, a removable fabric marker, a ruler, a seam gauge, and fine pins or clips nearby. These tools help you mark and position buttonholes accurately.
7. Buttonhole Cutting Tools
Use a sharp seam ripper or buttonhole chisel with a cutting mat to open the finished buttonhole. Small sharp scissors are also useful for trimming loose threads and achieving a clean finish.
Avoid using unusually thick thread unless the machine, needle, and buttonhole design are intended for it. Dense satin stitching already creates bulk, and oversized thread can cause jams, poor stitch formation, or crowded edges on an ordinary domestic machine.
Choosing the Right Needle, Thread, and Foot
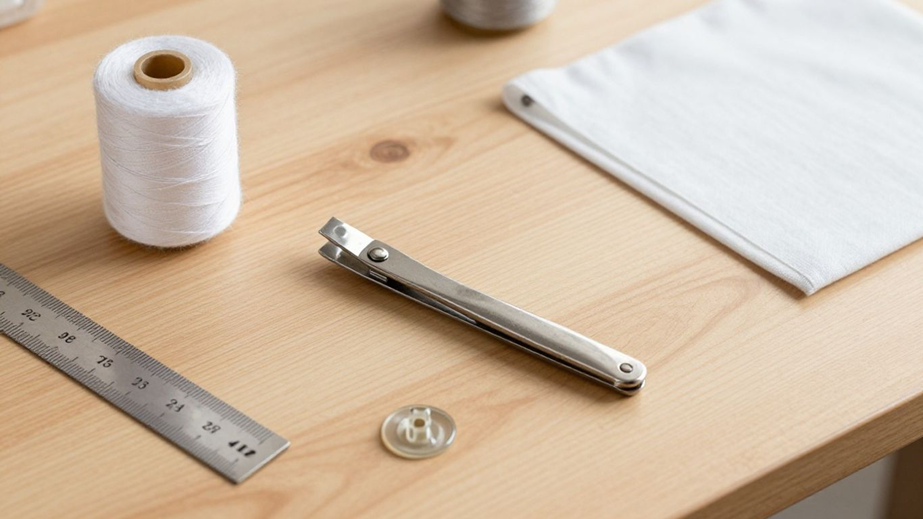
Needle Selection
Use a fresh needle that matches the fabric rather than choosing one based only on the buttonhole stitch. A universal or Microtex needle works well on many woven fabrics, a denim needle supports firm jeans or canvas, and a ballpoint or stretch needle helps prevent skipped stitches on knits. The needle size should be strong enough for the layers without leaving unnecessarily large holes.
If the buttonhole skips stitches, replace the needle before changing several machine settings. A slightly bent, dull, or unsuitable needle can produce gaps that look like a tension problem. Test the new needle on the same layered scrap before returning to the garment.
Thread Selection
All-purpose polyester thread is suitable for most machine-sewn buttonholes because it is smooth, strong, and available in a wide range of colors. Match the thread to the fabric for a subtle finish, or use a contrasting color only after confirming that the stitch density is even and decorative enough to remain visible.
Heavy topstitching thread is not automatically better. It may be too thick for the buttonhole foot, needle eye, bobbin system, or satin-stitch density. When a bolder finish is needed, use a corded buttonhole or a buttonhole style designed for heavier thread rather than forcing coarse thread through a standard cycle.
Buttonhole Foot Selection
Use the foot specified in the sewing machine manual. One-step buttonhole feet usually include a button tray that controls length, while four-step systems may use a shorter sliding foot or, on some machines, another foot approved by the manufacturer. The foot must sit flat and move without catching on seams or bulky fabric layers.
The statement that every buttonhole requires the same dedicated foot is inaccurate. The correct foot depends on the machine design. What matters is that the foot provides enough clearance for the zigzag stitches and allows the feed dogs or sliding mechanism to complete the pattern evenly.
How to Measure Buttonhole Size and Placement
Accurate sizing prevents a buttonhole from being too tight to use or so loose that the closure opens by itself. Measure the actual button rather than relying only on the package label. The thickness, dome, and shank all affect how much opening is needed.
For a manually sized buttonhole, a common starting point is the button diameter plus its thickness, followed by a test. For a one-step foot, place the actual button in the tray and allow the foot to determine the cycle length. Always pass the button through the finished test opening before marking the garment.
Placement should follow the pattern markings and garment overlap. Horizontal buttonholes are often used where fabric tension pulls across the closure, while vertical buttonholes are common on shirt plackets. The final orientation depends on the pattern, garment structure, and design, so do not change it casually without checking how the button will sit under strain.
Preparing the Fabric Before Sewing
Buttonhole preparation should be completed before the fabric goes under the presser foot. The area needs enough structure to support dense stitches, but it should not become so stiff that the garment feels bulky. Prepare the exact layers that will exist in the finished project, including facing, interfacing, seam allowances, and topstitching.
Press the area according to the fabric care requirements, mark placement on the correct garment side, and remove any temporary bulk that may block the foot. If the fabric is slippery, stretchy, sheer, or loosely woven, place a suitable stabilizer beneath the buttonhole area and test whether it should remain, tear away, or wash away after sewing.
Step-by-Step Guide to Sewing a Buttonhole
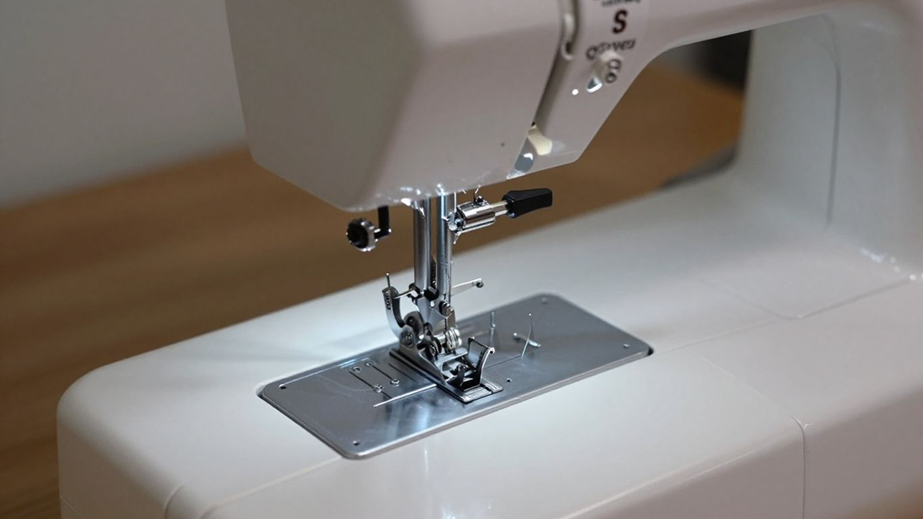
The sequence below works as a general beginner workflow, but the machine manual controls the exact lever position, foot orientation, and stitch order. Complete every setup step on a sample before sewing the garment so you can correct length, density, and balance without damaging the final piece.
Step 1: Complete the Garment Area and Add Interfacing
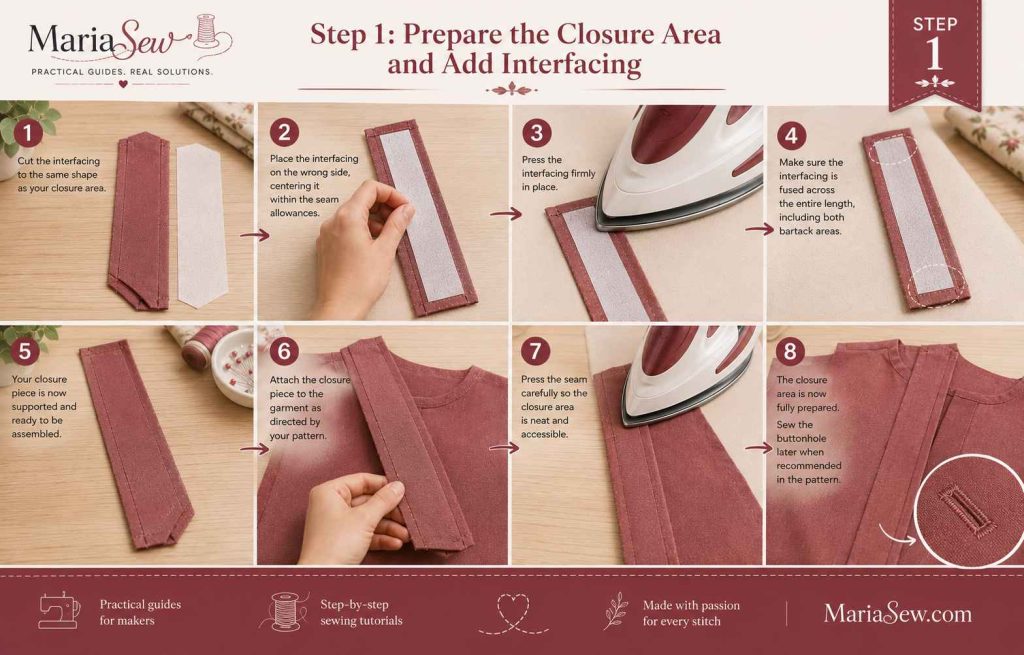
Prepare the placket, facing, waistband, cuff, or closure area until it has the same layers it will have when worn. Add the interfacing specified by the pattern and press it carefully. The buttonhole should be supported across its full length, including both bartacks.
Do not automatically sew every buttonhole at the earliest stage of construction. The best time is when the closure area is fully built and accessible, but before buttons or bulky finishing details make it difficult to position the foot. Follow the pattern sequence when available.
Step 2: Determine the Finished Length
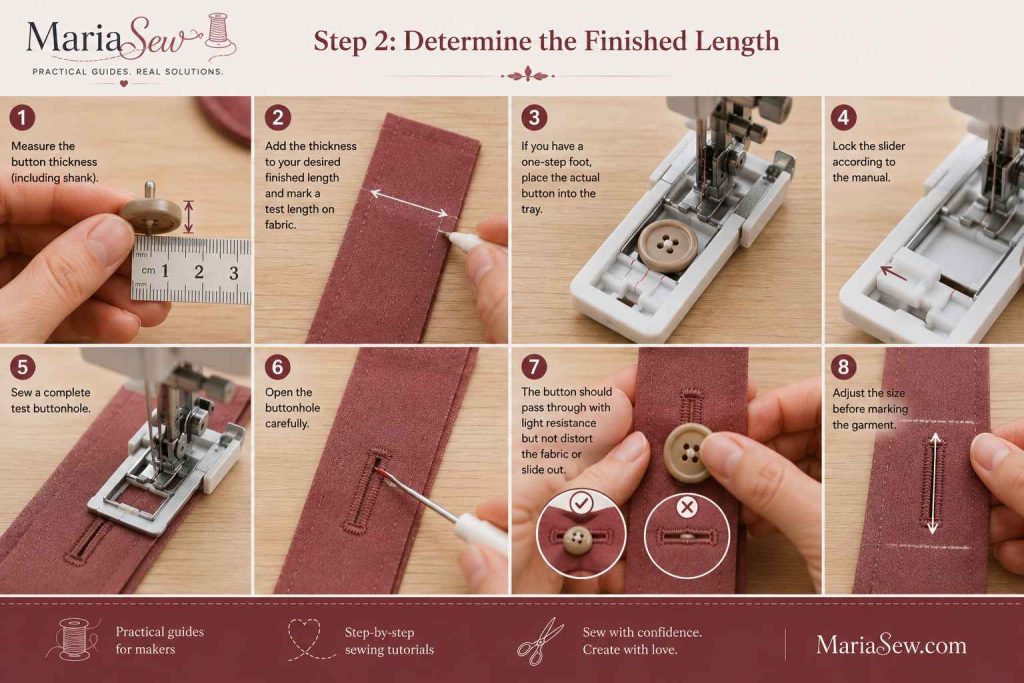
Measure the button and account for its thickness or shank, then create a marked test length. If you have a one-step foot, place the actual button into the tray and lock the slider according to the manual. Do not assume two buttons labeled the same size will need identical openings if their shapes differ.
Sew a complete test buttonhole and open it before finalizing the measurement. The button should pass through with light resistance but should not distort the fabric or slide out by itself. Adjust the size before marking the garment.
Step 3: Mark the Placement Clearly
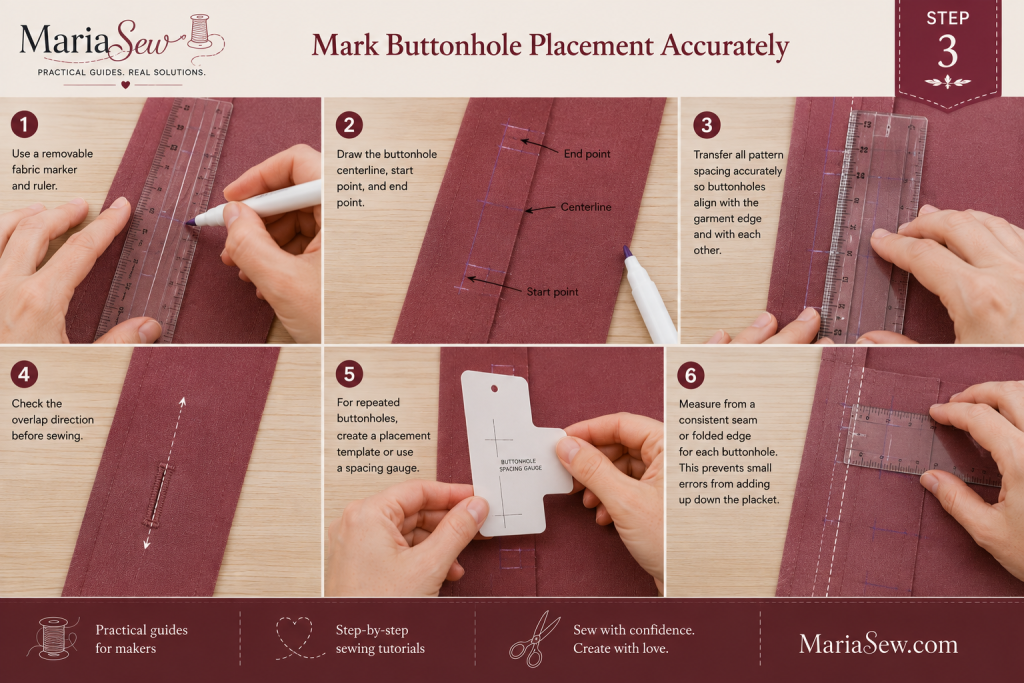
Use a removable marker and ruler to draw the buttonhole centerline, start point, and end point. Transfer all pattern spacing accurately so multiple buttonholes align with the garment edge and with one another. Check the overlap direction before sewing.
For repeated buttonholes, create a placement template or use a spacing gauge. Measure from a consistent seam or folded edge instead of measuring each location from the previous buttonhole, because small errors can accumulate down a long placket.
Step 4: Install a Fresh Needle and Thread the Machine
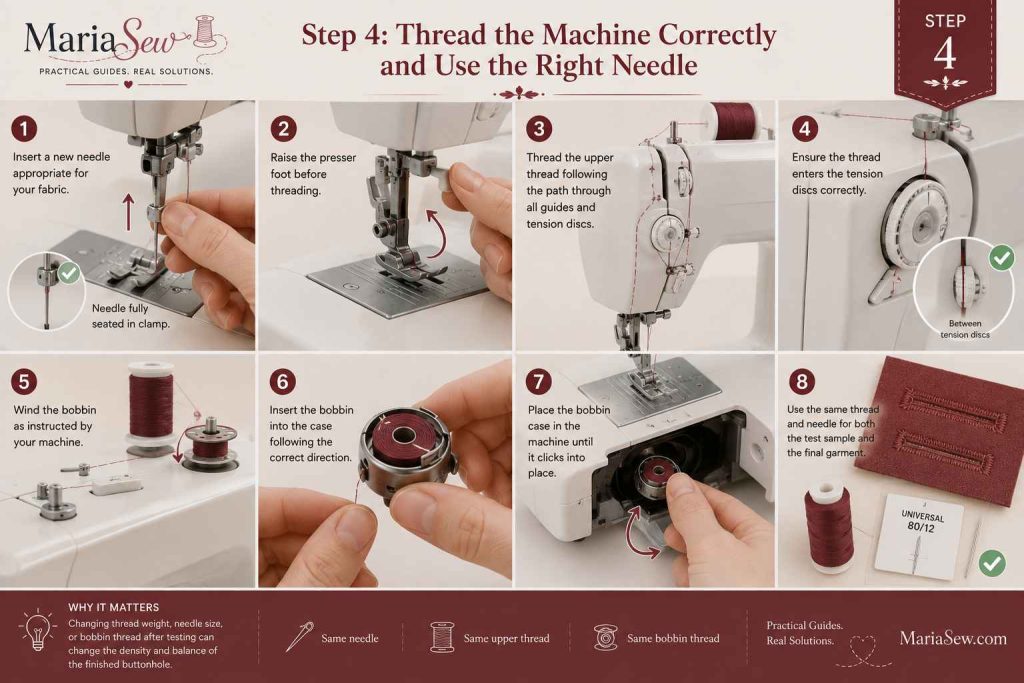
Insert a new needle appropriate for the fabric and make sure it is seated fully in the needle clamp. Thread the machine with the presser foot raised so the upper thread enters the tension discs correctly. Wind and insert the bobbin according to the machine instructions.
Use the same thread and needle on the test sample and final garment. Changing thread weight, needle size, or bobbin thread after testing can change the density and balance of the finished buttonhole.
If you need a refresher, follow our step-by-step guide on how to thread a sewing machine before sewing your test sample.
Step 5: Attach the Correct Buttonhole Foot
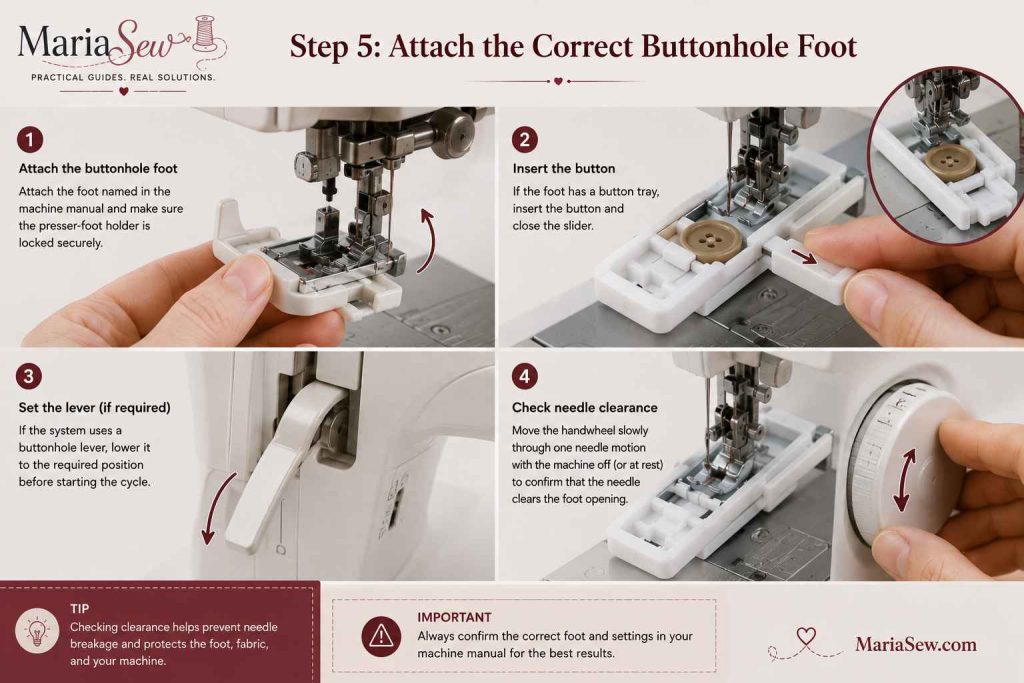
Attach the foot named in the machine manual and confirm that the presser-foot holder is locked securely. If the foot has a button tray, insert the button and close the slider. If the system uses a buttonhole lever, lower it to the required position before starting the cycle.
Move the handwheel slowly through one needle motion with the machine switched off or at rest to confirm that the needle clears the foot opening. This is especially helpful after changing stitch width, needle position, or foot type.
Step 6: Select the Buttonhole Stitch
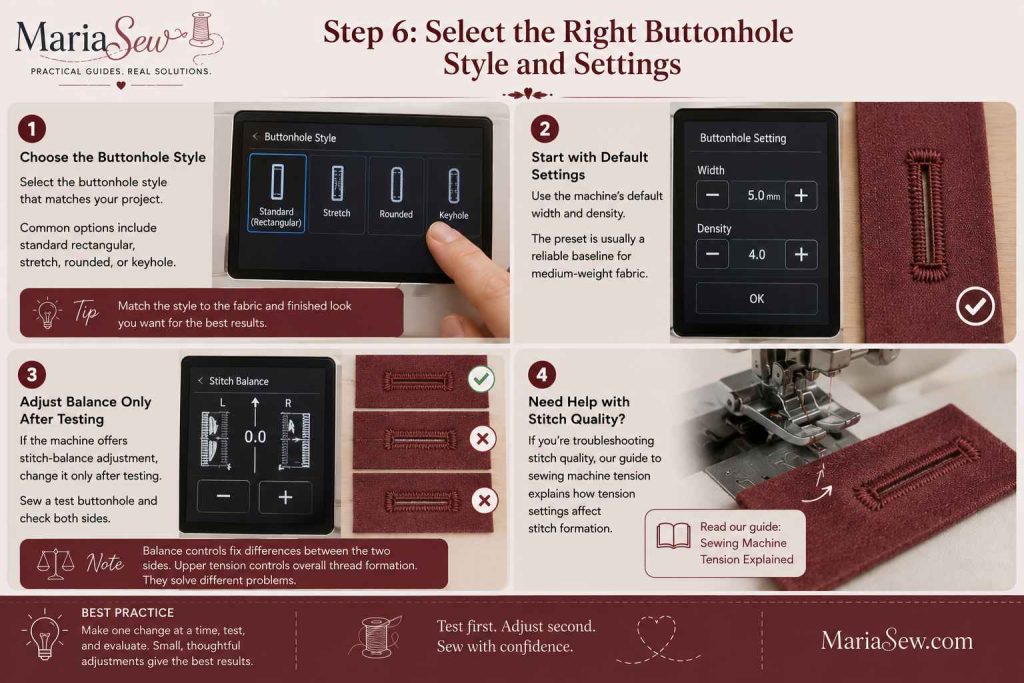
Choose the buttonhole style that matches the project, such as standard rectangular, stretch, rounded, or keyhole. Start with the machine’s default width and density rather than making several changes at once. The preset is usually a reliable baseline for medium-weight fabric.
If the machine offers stitch-balance adjustment, change it only after testing. Balance controls correct differences between the two buttonhole sides, while ordinary upper tension controls overall thread formation. They solve different problems and should not be treated as interchangeable.
If you’re troubleshooting stitch quality, our guide to sewing machine tension explains how tension settings affect stitch formation.
Step 7: Sew a Complete Test Sample
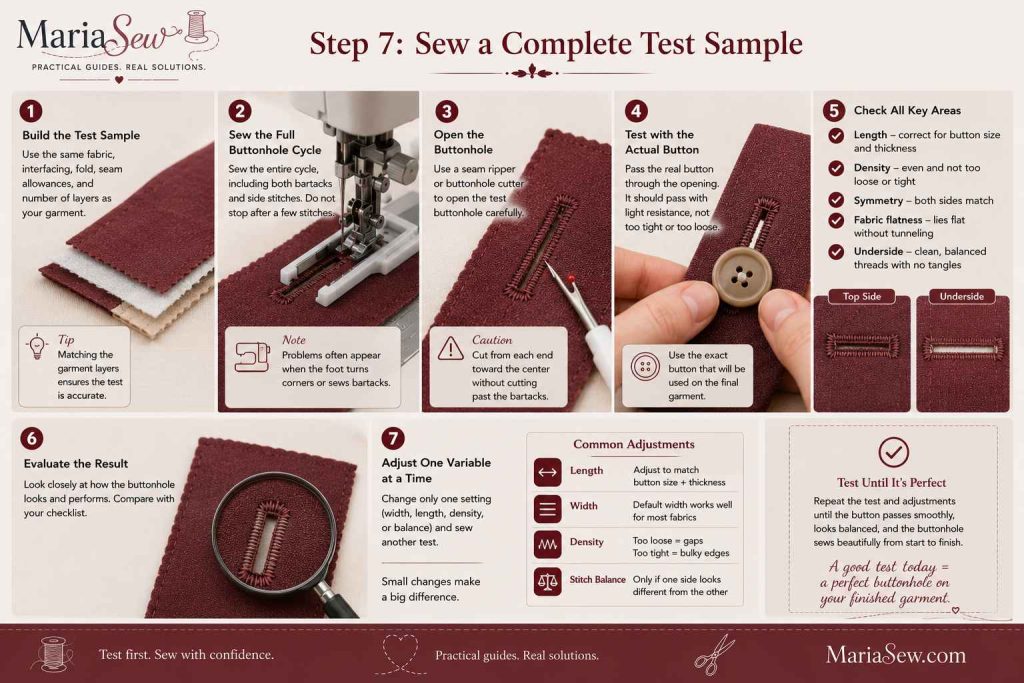
Build the scrap with the same fabric, interfacing, fold, seam allowances, and number of layers as the garment. Sew the entire buttonhole cycle, not just a few stitches, because problems often appear when the foot changes direction or reaches a bartack.
Open the test buttonhole and pass the actual button through it. Check the length, density, symmetry, fabric flatness, and underside. Keep adjusting one variable at a time until the sample works smoothly and looks balanced.
Step 8: Position the Garment Under the Foot
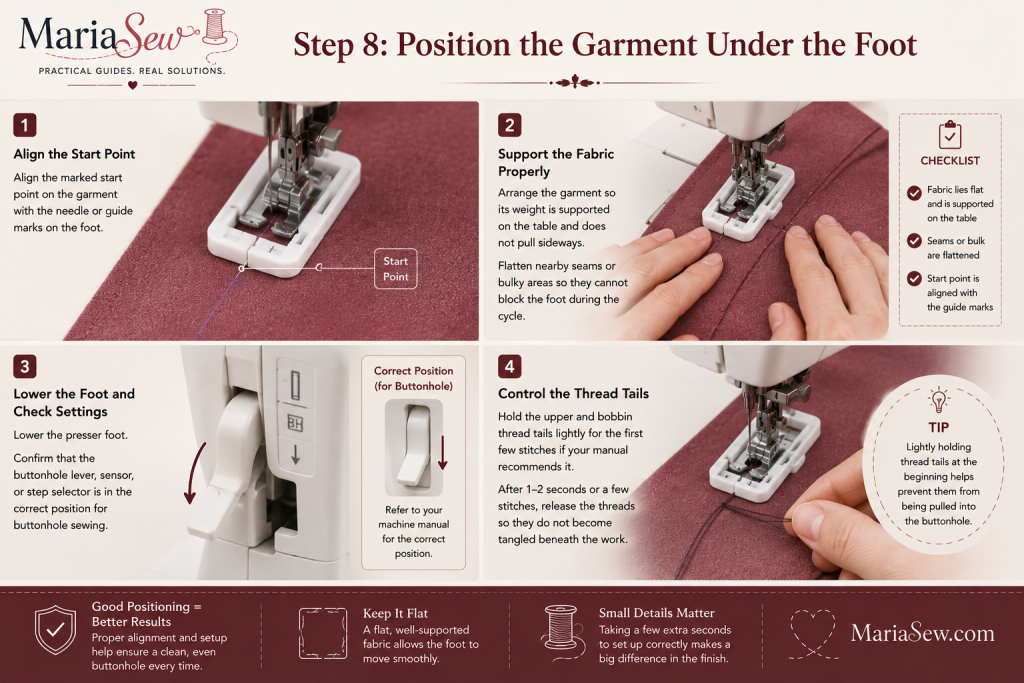
Align the marked start point with the needle or guide marks on the foot. Arrange the garment so its weight is supported on the table and does not pull sideways. Flatten nearby seams or bulky areas so they cannot block the foot during the cycle.
Lower the presser foot and confirm that the buttonhole lever, sensor, or step selector is in the correct position. Hold the thread tails lightly for the first few stitches if your manual recommends it, then release them so they do not become tangled beneath the work.
Step 9: Sew Without Pulling the Fabric
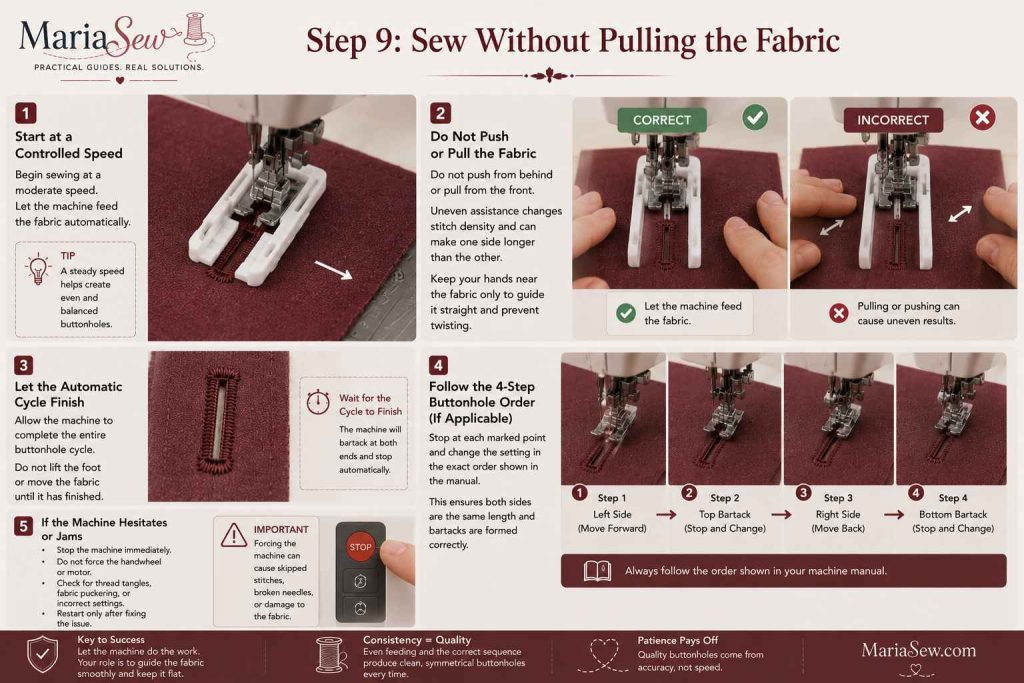
Start at a controlled speed and allow the feed system to move the fabric. Do not push from behind or pull from the front, because uneven assistance changes stitch density and can make one side longer than the other. Keep your hands near the fabric only to prevent twisting.
Let an automatic cycle finish fully before lifting the foot. On a four-step buttonhole, stop at each marked point and change the setting in the exact order shown in the manual. If the machine hesitates or jams, stop immediately instead of forcing the handwheel or motor.
Step 10: Secure the Threads
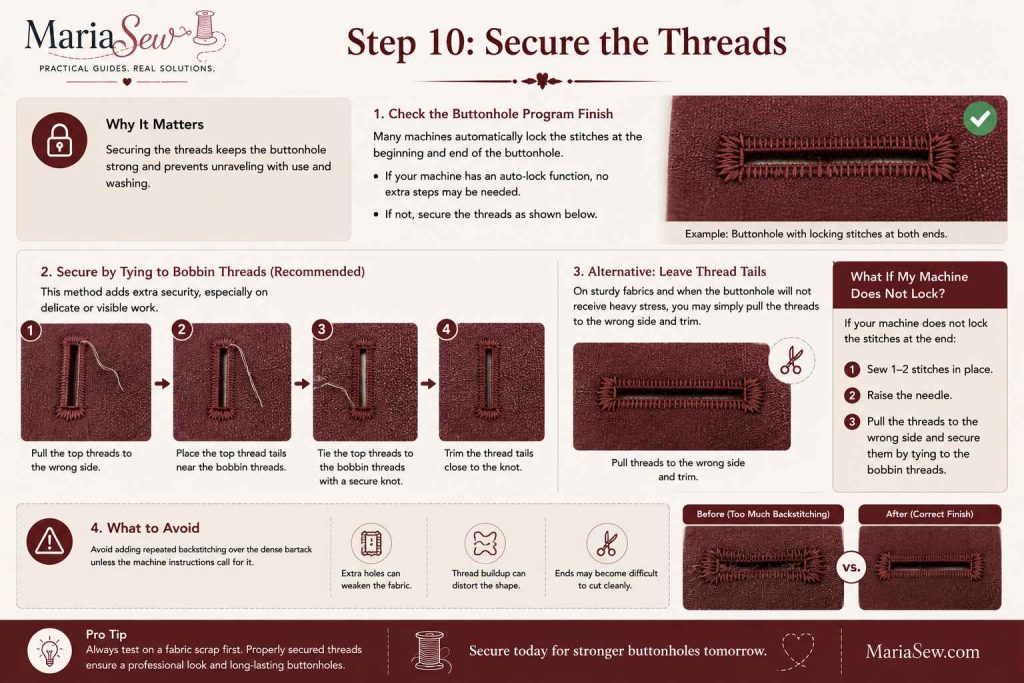
Many buttonhole programs finish with locking stitches. If yours does not, follow the manual for securing the end. You can pull the top threads to the wrong side and tie them to the bobbin threads when extra security is needed, especially on delicate or visible work.
Avoid adding repeated backstitching over the dense bartack unless the machine instructions call for it. Extra holes and thread buildup can weaken the fabric, distort the shape, or make the end difficult to cut cleanly.
Step 11: Open the Buttonhole Safely
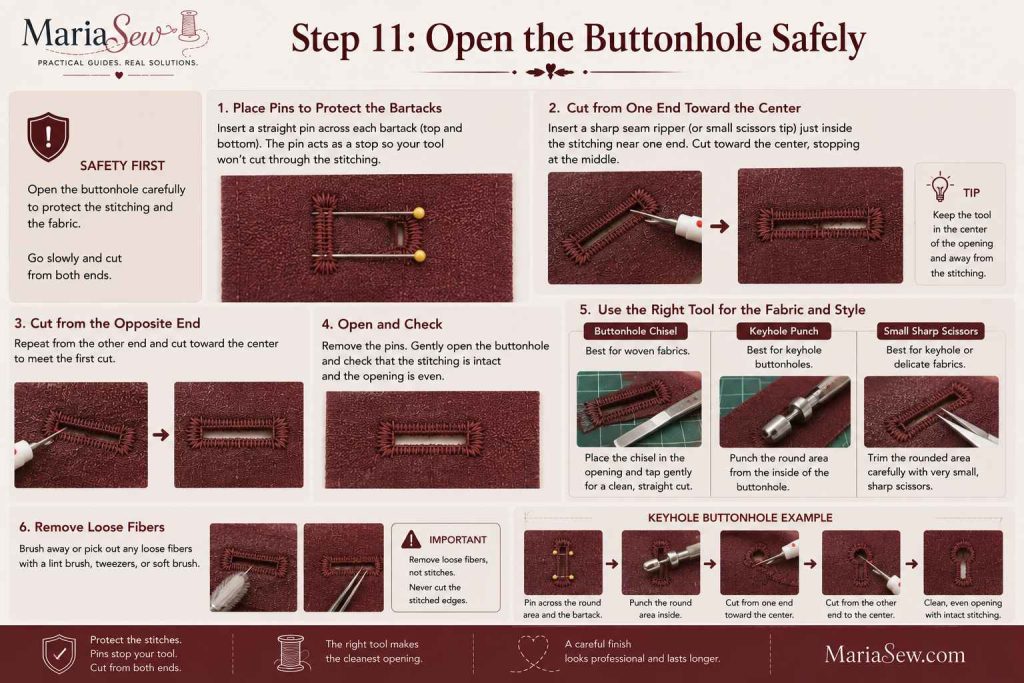
Place a pin across each bartack to create a physical stop, then insert a sharp seam ripper near one end and cut toward the center. Repeat from the opposite end. Cutting from both ends reduces the chance of the tool traveling through the bartack.
A buttonhole chisel on a cutting mat creates the cleanest straight opening on many woven fabrics. For keyhole buttonholes, use a keyhole punch or very small sharp scissors for the rounded area. Remove loose fibers without cutting the stitched edges.
Step 12: Test the Button and Finish the Opening
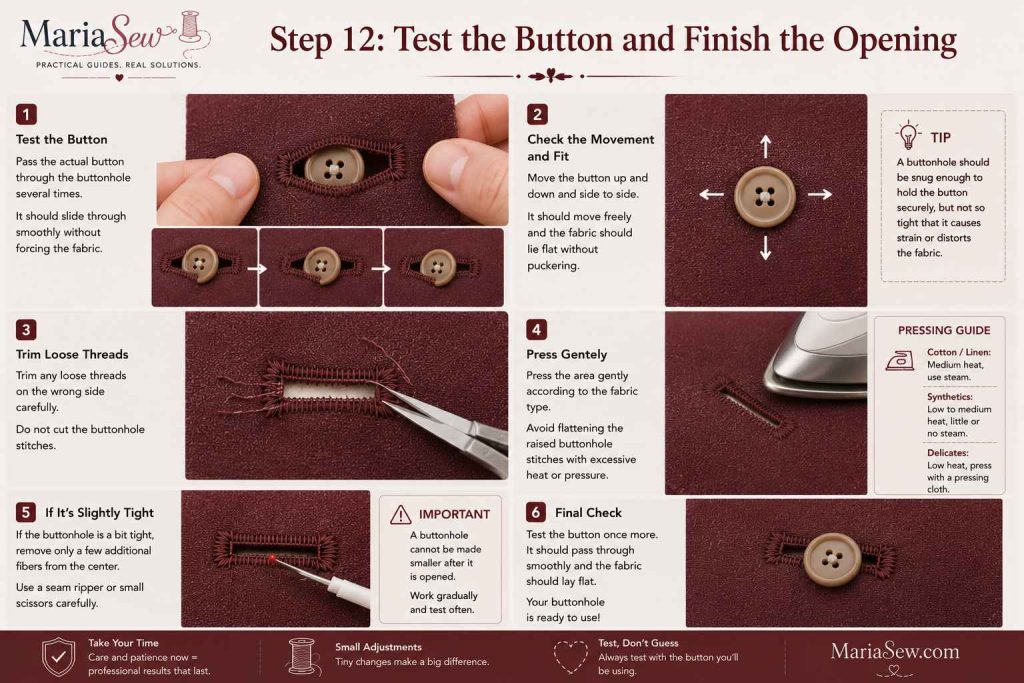
Pass the actual button through the opening several times and check that it moves without forcing the fabric. Trim any loose threads on the wrong side and press the area gently according to the fabric type. Avoid flattening raised buttonhole stitches with excessive heat or pressure.
If the opening is slightly tight, remove only a few additional fibers from the center instead of cutting the stitched edges. A buttonhole cannot be made smaller after it is opened, so work gradually.
How to Sew Multiple Matching Buttonholes
Repeated buttonholes reveal small differences in length and alignment, so consistency needs a deliberate system. Sew all samples first, then mark every garment position before beginning. Keep the same foot, stitch, needle, thread, interfacing, and machine settings for the full set.
1. Use a Spacing Guide or Template
Use a spacing gauge, paper template, or your pattern markings to position each buttonhole accurately. This helps keep every buttonhole evenly aligned.
2. Measure from the Same Reference Point
Measure each buttonhole from the same garment edge, such as the neckline or center front. Avoid measuring from the previous buttonhole, as small errors can add up.
3. Sew All Buttonholes in the Same Direction
Sew each buttonhole in the same direction whenever possible. This allows the fabric to feed consistently and produces a more uniform finish.
4. Clean Your Machine Before Sewing
Remove lint from the feed dogs and bobbin area before sewing multiple buttonholes. A clean machine helps maintain smooth stitching and prevents thread issues.
5. Inspect Before Cutting Open the Buttonholes
Check the size, spacing, and placement of every finished buttonhole before opening any of them. This gives you a chance to correct any mistakes before making permanent cuts.
After all buttonholes pass the visual check, open them one at a time and test each with its intended button. This prevents one cutting mistake from being repeated across the entire garment.
Buttonholes on Different Fabrics
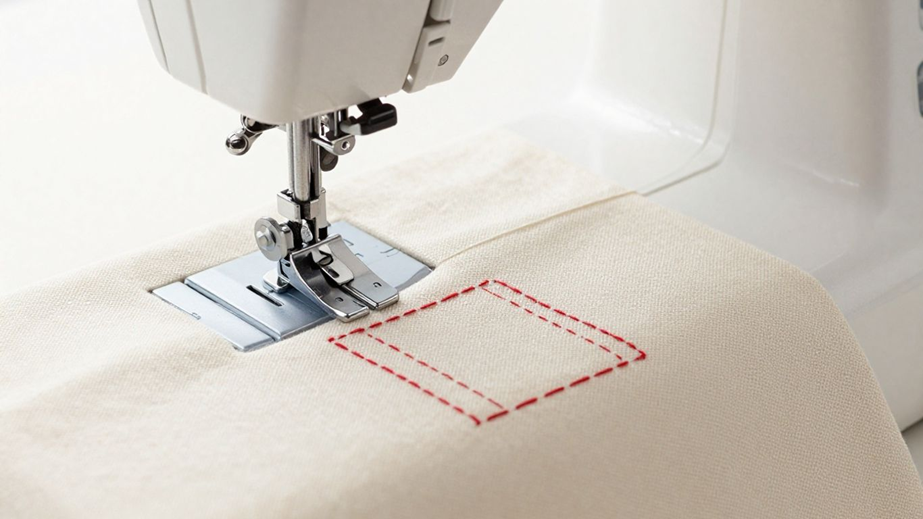
Medium-Weight Woven Cotton
Medium-weight woven cotton is the easiest fabric for learning because it feeds evenly and supports dense stitches well. Use a universal or Microtex needle, all-purpose polyester thread, and the interfacing recommended by the pattern.
The buttonhole should lie flat without excessive stabilizer. A standard rectangular one-step or four-step buttonhole is usually suitable for shirts, dresses, pillow covers, and craft projects.
Lightweight or Sheer Fabric
Lightweight fabric needs extra support so the feed dogs do not gather it and the satin stitches do not pull it inward. Use fine interfacing inside the garment and, when needed, temporary wash-away or tear-away stabilizer underneath the buttonhole area.
Choose a fine needle and ordinary lightweight polyester thread. Test whether the stitch density should be slightly reduced, because very dense stitching can create a stiff patch or visible puckering on delicate fabric.
Knit and Stretch Fabric
Knit buttonholes need stable support and a stitch style that tolerates movement. Use a stretch or ballpoint needle as appropriate, reinforce the area with knit interfacing, and select a stretch buttonhole if the machine provides one.
The closure area should not be allowed to stretch while sewing or opening. Support the garment on the table and avoid pulling the knit under the foot. A test sample is essential because different knits recover differently.
For additional techniques, see our guide on how to sew stretch fabric.
Denim and Heavy Woven Fabric
Denim buttonholes often cross several layers, so bulk management is as important as needle strength. Use a fresh denim needle, appropriate thread, and a hump jumper or folded scrap behind the foot when it approaches a thick seam ridge. A walking foot can also help feed thick, layered denim more evenly if your machine’s standard buttonhole foot struggles to move smoothly across the ridge.
A corded or keyhole buttonhole may improve strength and appearance on jackets or jeans, but it should match the machine’s capabilities. Avoid simply sewing the same automatic buttonhole twice, because a second pass may not track precisely over the first.
Coating and Tailored Fabric
Coats and tailored jackets usually require firm interfacing and a buttonhole designed for a shank button. Keyhole or corded buttonholes distribute stress more effectively and look proportionate beside thick buttons.
Bulky seam allowances may need grading or repositioning so the buttonhole foot can stay level. Test through the exact number of layers, including interfacing and facing, before sewing the garment.
Common Buttonhole Mistakes to Avoid
Most failed buttonholes come from skipped preparation, unsuitable machine setup, or changing several settings without a controlled test. The following mistakes are common, but each can be prevented before permanent stitches are placed in the garment.
1. Skipping a Test Buttonhole
Always sew a test buttonhole on a fabric scrap with the same layers and interfacing. Testing first helps you adjust the settings before sewing on the actual garment.
2. Measuring Only the Button Diameter
Measure both the button’s diameter and its thickness or shank. This ensures the finished buttonhole is large enough for the button to pass through easily.
3. Not Using Interfacing or Stabilizer
Lightweight and stretchy fabrics need interfacing or stabilizer to support dense stitches. Skipping this step can lead to puckering or distorted buttonholes.
4. Using the Wrong Foot or Forgetting the Buttonhole Lever
Always use the correct buttonhole foot and engage the buttonhole lever if your machine requires it. Also, avoid sewing over bulky seams that can interfere with the foot’s movement.
5. Pulling the Fabric While Sewing
Let the feed dogs move the fabric naturally. Pulling or pushing the fabric can result in uneven stitches and misshapen buttonholes.
6. Changing Multiple Settings at Once
Adjust only one setting at a time, such as tension or stitch density. This makes it easier to identify and fix the actual cause of any sewing issues.
If uneven stitches continue after testing, our article on sewing machine tension can help you diagnose common tension-related problems.
7. Opening the Buttonhole Too Quickly
Use a seam ripper or buttonhole chisel carefully and cut toward the center from each end. This helps prevent accidentally cutting through the bartacks.
8. Sewing Over an Existing Buttonhole
Avoid running a second automatic buttonhole cycle over the first unless the stitches will align perfectly. Doing so can create uneven stitching and ruin the finished buttonhole.
A buttonhole is difficult to remove without marking fabric, so prevention is more reliable than repair. Keep a scrap beside the machine throughout the project and repeat the test whenever fabric thickness, seam bulk, thread, or needle changes.
Buttonhole Troubleshooting
When a buttonhole looks uneven, diagnose the fabric support, needle, threading, foot movement, and machine setup before making major tension changes. A problem that appears to be tension-related may actually come from a dull needle, blocked foot, incorrect lever position, unstable fabric, or thread that has not entered the tension discs.
Start with the simplest correction and change one variable at a time. Rethread the machine with the presser foot raised, insert a fresh needle, clean the feed area, confirm the correct foot and stitch, then sew a new sample. Only after those checks should you make small density, balance, or tension adjustments.
- For puckering, add suitable stabilizer, reduce excessive stitch density, and check that upper tension is not too tight.
- For skipped stitches, replace the needle, match the needle to the fabric, rethread, and stabilize stretchy or soft material.
- For unequal sides, confirm the buttonhole balance setting and make sure the fabric is not being pulled.
- For a cycle that will not reverse or stop correctly, verify the buttonhole lever, button tray, sensor, and foot position.
- For bunched thread underneath, stop, remove the fabric carefully, clear the bobbin area, and rethread the upper path with the foot raised.
- For a short or tight opening, remeasure the actual button and test the complete opened sample before changing the garment.
| Problem | Likely Cause | First Fix to Try |
|---|---|---|
| Puckered fabric | Insufficient support, dense stitches, or tight upper tension | Add stabilizer, rethread, and test a slightly more open density |
| Skipped stitches | Dull or wrong needle, unstable fabric, or threading issue | Install a fresh fabric-appropriate needle and rethread |
| Unequal buttonhole sides | Balance issue, fabric drag, or foot obstruction | Check balance control and clear bulk around the foot |
| Thread nests underneath | Upper thread not seated in tension path | Raise presser foot, remove thread, and rethread completely |
| Automatic cycle stops incorrectly | Lever, sensor, or button tray not set correctly | Reset the foot and lever according to the manual |
| Opening is too small | Button thickness not included in sizing | Increase test length and retest with the actual button |
| Bartack cut accidentally | Opening cut in one uncontrolled direction | Use pins and cut from both ends toward the center |
If several new needles, correct threading, stable scraps, and manual-recommended settings still produce the same fault, the machine may need cleaning, timing service, or professional inspection. Do not force repeated dense cycles through a machine that is striking, stalling, or breaking needles.
Professional Tips for Cleaner Buttonholes
Small refinements can make a basic buttonhole look more precise without adding unnecessary complexity. Use the following techniques only after the standard test sample is working correctly.
- Place a removable stabilizer under soft fabric even when permanent interfacing is already inside the garment.
- Use a hump jumper or folded scrap to keep the foot level near thick seams.
- Sew all buttonholes before attaching the buttons, then position each button through its finished opening for accurate alignment.
- Use a buttonhole chisel for woven fabrics when a perfectly straight opening is important.
- Keep the successful test sample and write the machine settings on it for future projects.
- Consider a corded buttonhole rather than a second stitched pass when heavier reinforcement is needed.
A professional result is not defined by the densest possible stitching. The best buttonhole is balanced, flat, correctly sized, securely reinforced, and easy to use without stretching or tearing the surrounding fabric.
A sturdy sewing machine extension table or one of the best sewing machine tables can also improve fabric support when sewing long garment sections.
Final Buttonhole Checklist
Before sewing into the garment, pause for a final review. This short checklist catches the most common setup errors while they can still be corrected on a scrap.
- The closure area contains the correct interfacing and finished fabric layers.
- The actual button has been measured and tested through an opened sample.
- Placement, orientation, spacing, start points, and end points are marked accurately.
- The correct needle, thread, foot, stitch, lever, and button tray are installed.
- The complete cycle has been tested without puckering, skipped stitches, or unequal sides.
- The garment is supported on the table and the foot has room to move through the full cycle.
- Pins or a chisel are ready so the finished opening can be cut safely.
When every item on the checklist is confirmed, sew the garment buttonhole using the same controlled speed and handling as the successful test. Consistency between the sample and final project is what produces repeatable results.
Conclusion
A clean buttonhole comes from accurate measurement, stable fabric, correct machine setup, and a complete test sample. Learn the sequence on medium-weight woven fabric first, then apply the same preparation habits to knits, denim, coats, and decorative projects. By following the machine manual, guiding the fabric without pulling, and opening the finished stitches safely, beginners can create durable buttonholes that look polished and function reliably.
Frequently Asked Questions
Can every sewing machine sew a buttonhole?
Many domestic sewing machines include a one-step or four-step buttonhole function, but not every model uses the same foot or controls. Check the manual to confirm the available stitch, approved foot, and required sequence.
Do I always need a buttonhole foot?
Use the foot specified by the machine manufacturer. Most one-step systems require a dedicated sliding buttonhole foot, while some four-step systems use a different approved foot. The answer depends on the machine design.
How long should a buttonhole be?
A manually measured buttonhole generally starts with the button diameter plus enough room for its thickness or shank. A one-step foot often measures the actual button placed in its tray. Always confirm the final length by opening a test sample.
Should I use interfacing under every buttonhole?
Most garment buttonholes need some form of support, especially on lightweight, stretchy, loosely woven, or soft fabric. The exact interfacing or stabilizer depends on the fabric and pattern. Test the combination before sewing.
Why is my buttonhole puckering?
Puckering can result from insufficient stabilization, excessive stitch density, tight upper tension, fabric being pulled, or a foot that cannot feed evenly. Add support, rethread, and test one small adjustment at a time.
Why does my automatic buttonhole stop halfway?
The buttonhole lever may not be lowered correctly, the button tray may be loose, the foot may be blocked by a seam, or the machine may not have reset after the previous cycle. Reinstall the foot and follow the reset instructions in the manual.
Can I sew over a buttonhole twice?
A second automated pass can misalign and create excessive thread buildup. When more strength or definition is needed, use a corded buttonhole, heavier buttonhole style, or the method recommended by the machine manual.
How do I open a buttonhole without cutting the stitches?
Place pins across the bartacks and cut from each end toward the center with a sharp seam ripper. A buttonhole chisel on a cutting mat is another controlled option for straight woven buttonholes.
Should buttonholes be sewn before or after garment construction?
Sew them after the closure area, facing, and interfacing are prepared, but while the section is still accessible under the presser foot. Follow the pattern order because the ideal stage varies by garment.
What needle should I use for buttonholes?
Match the needle to the fabric. Universal or Microtex needles suit many wovens, denim needles suit heavy woven layers, and ballpoint or stretch needles suit knits. Use a fresh needle and test the full cycle.
Can I make buttonholes on knit fabric?
Yes, but the area needs suitable knit interfacing or stabilizer and may benefit from a stretch buttonhole stitch. Prevent the fabric from stretching while the machine sews and test the opened sample with the actual button.
Where should I sew the buttons after making the buttonholes?
Close the garment overlap, pass a removable marker through the finished buttonhole, and mark the button position on the layer underneath. This aligns each button with the actual opening more accurately than relying only on printed pattern dots.
Maria Sew is a lifestyle platform created for people who value thoughtful living, practical skills, and well-researched guidance. Founded by Maria, a lifelong maker with over 12 years of hands-on experience in sewing, garment construction, and DIY projects, this platform was built out of a simple frustration: too much content online looks helpful on the surface but falls apart the moment you try to follow it. Topics are mixed without structure, advice is repeated without testing, and readers are left sorting through noise. Maria Sew exists to offer clarity across everyday interests by focusing on usefulness, depth, and real-world application.
Every article published on Maria Sew is written or directly supervised by Maria. There are no anonymous contributors, no outsourced content, and no articles published without genuine knowledge behind them. When Maria recommends a sewing machine, she has used it personally. When she explains a technique, she has tested it under real conditions. That standard does not change, regardless of the topic.