How to Sew a Zipper: Easy Step-by-Step Guide for Beginners
Sewing a zipper becomes much easier once you stop treating it as one difficult step and break it into preparation, alignment, and controlled stitching. For a basic centered zipper, the cleanest method is to prepare the seam, press the allowances flat, center the zipper teeth under the opening, attach a zipper foot, and sew an even line close enough to the teeth without touching them.
The exact zipper, foot, needle, stitch length, and stabilizer should match the fabric, because a denim jacket, chiffon dress, knit skirt, and zippered pouch all behave differently under the presser foot. This beginner guide shows the full process I use, explains the major zipper types, and includes the machine settings and troubleshooting checks that make zipper installation more repeatable.
Quick Answer: How Do You Sew a Zipper Step by Step?
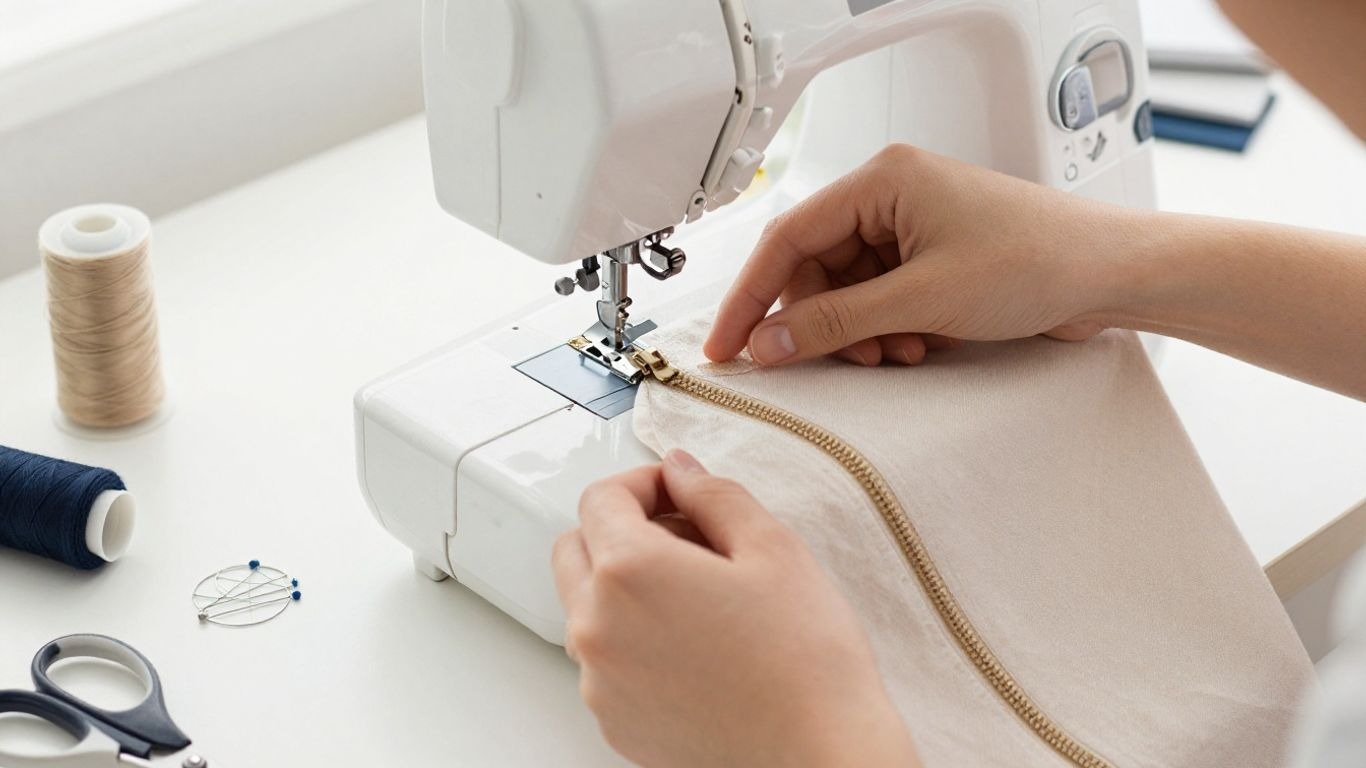
To sew a basic centered zipper, sew the garment seam normally up to the zipper opening, baste the opening closed, press the seam allowances open, center and baste or pin the zipper underneath, then use a zipper foot to stitch along one side, across the lower end, and up the other side.
Stop with the needle down and move the zipper slider whenever it approaches the presser foot so the stitching line stays straight. Remove the temporary basting, test the zipper several times, and correct any fabric caught near the teeth before finishing the project.
Key Takeaways
A professional-looking zipper is usually decided before the first permanent stitch. Accurate marking, pressing, and test sewing matter more than trying to fix a crooked zipper after it is already attached.
- Choose the zipper type, weight, length, and opening style based on your fabric and pattern.
- Use a zipper foot to sew close to the zipper teeth without hitting the slider.
- Prepare and press the seam before stitching to improve alignment and reduce puckering.
- Test your stitch settings on scrap fabric using the same materials as the project.
- Stop with the needle down and move the zipper slider instead of sewing around it.
- Never sew directly over metal zipper teeth to avoid damaging the needle or zipper.
- Open and close the zipper several times before finishing the seam to catch problems early.
For a first attempt, I recommend stable woven cotton and an ordinary coil zipper. Once that feels comfortable, invisible zippers, lightweight fabric, stretch garments, and bulky outerwear become much easier to approach.
What You’ll Need to Sew a Zipper
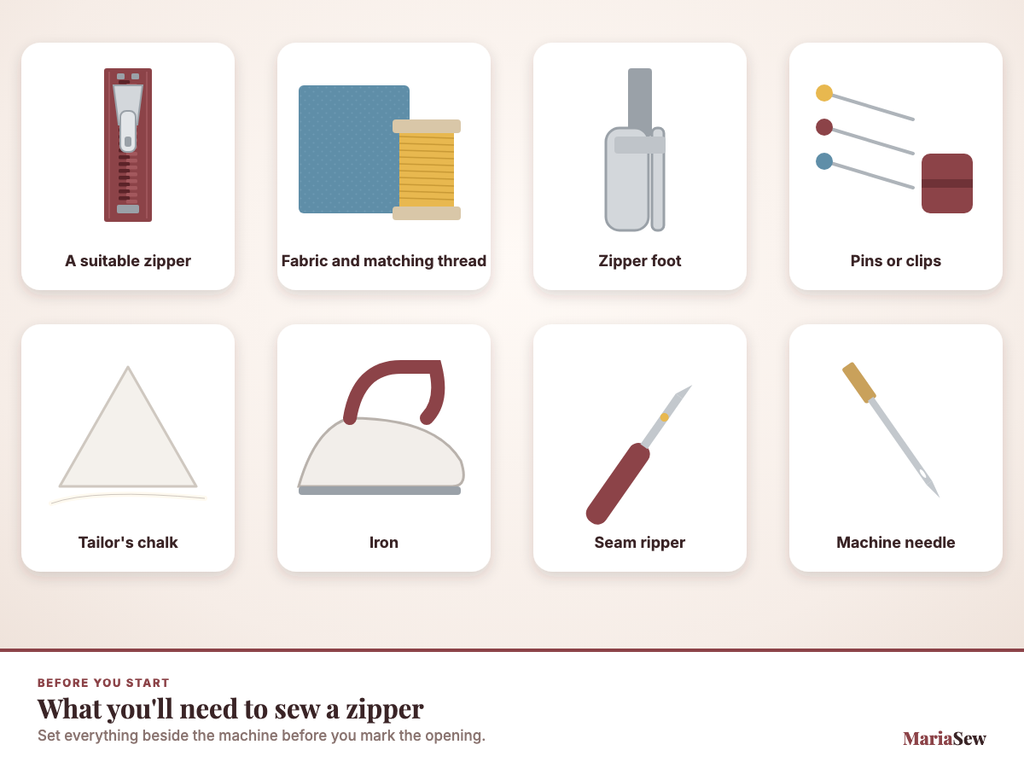
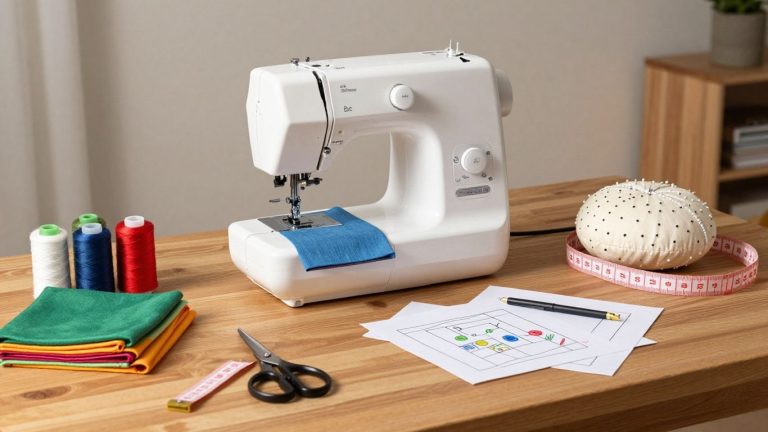
You do not need a complicated toolkit, but each item has a specific job. I set everything beside the machine before I mark the opening so I do not have to improvise halfway through the installation.
- A suitable zipper. Check the finished opening length, zipper style, weight, color, and whether the project needs a closed-end or separating zipper.
- Fabric and matching thread. Use the same thread you plan to use in the finished seam unless the pattern specifies decorative topstitching.
- Zipper foot. A standard adjustable or snap-on zipper foot is the main attachment for centered, lapped, and exposed zipper installations.
- Pins, clips, or basting thread. Choose the holding method that keeps the zipper tape flat without distorting the fabric.
- Fabric marker or tailor’s chalk. Mark the top and bottom of the opening, seam line, and any pattern matching points.
- Iron and pressing surface. Pressing the seam allowances before topstitching is one of the fastest ways to improve alignment.
- Seam ripper. Use it to remove temporary basting and to correct small alignment errors if necessary.
- Correct machine needle. Match the needle type and size to the fabric, not to the zipper alone.
If you are still learning the basic machine controls, MariaSew’s beginner guide to sewing machine parts explains the presser foot, feed dogs, needle plate, bobbin, and other parts involved in zipper sewing.
Understanding Zipper Types Before You Sew
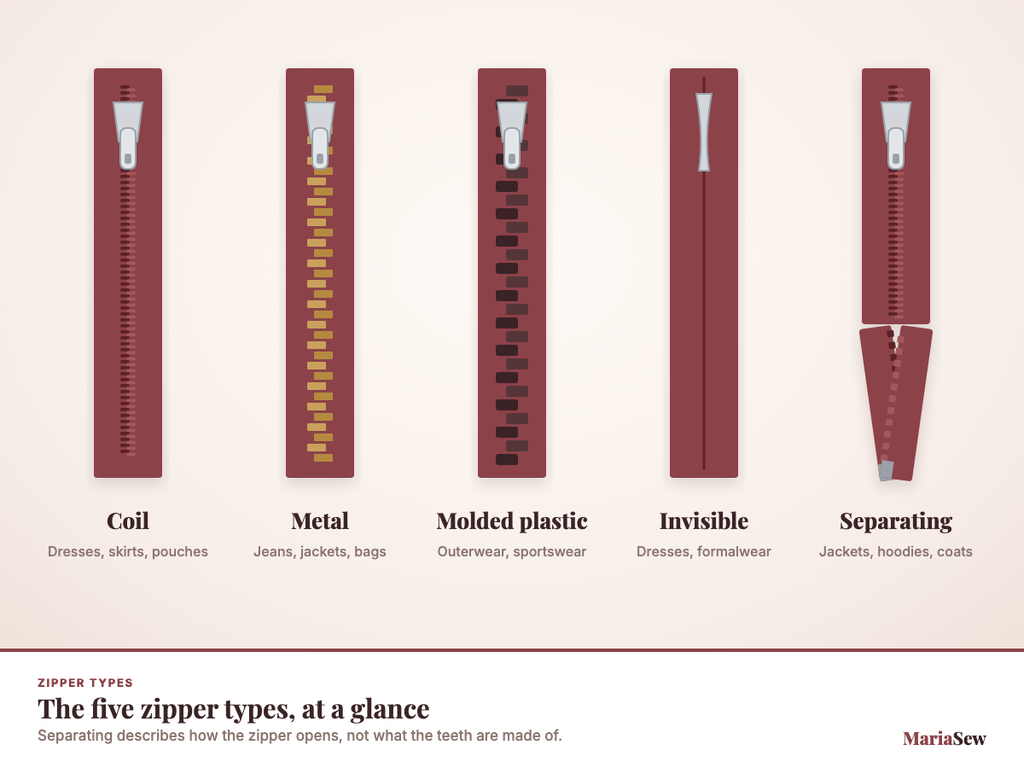
Zippers can be classified in two useful ways: by the material and construction of the elements, and by the way the zipper opens. YKK groups the main element constructions into metal, coil, and molded-plastic or injection-molded styles. Invisible zippers are typically a concealed coil design, while separating zippers describe an opening style rather than a different element material.
That distinction fixes one common terminology problem. ‘VISLON’ is YKK’s product name for its molded plastic zipper family, so I use the broader term molded plastic zipper when explaining the category.
Coil Zippers
Coil zippers use a flexible continuous coil sewn to the zipper tape. They bend easily and are common in dresses, skirts, trousers, bags, cushions, and many everyday projects because the elements are less bulky than many metal or molded-plastic styles.
Metal Zippers
Metal zippers use individual metal elements and create a firmer, more visible closure. They are common in jeans, jackets, bags, and projects where the zipper is part of the design. I sew close to the teeth but never deliberately stitch across them.
Molded Plastic Zippers
Molded plastic zippers use individual plastic elements molded onto the tape. They are common in outerwear, bags, sportswear, and utility projects because they are visually substantial and available in separating and closed-end constructions.
Invisible Zippers
An invisible zipper is designed so the coil rolls to the back and the closure disappears into the seam when installed correctly. An invisible zipper foot has grooves that guide the coils so I can stitch very close without sewing through them.
Separating Zippers
Separating zippers open completely at the bottom and are used for jackets, hoodies, coats, and other garments that need two sides to disconnect. They can be coil, metal, or molded plastic, so separating describes the function rather than the element material.
Quick Zipper Type Comparison
The descriptions above are more important than the table because pattern instructions and zipper packaging should always take priority. The table is only a quick way to narrow down the category before you buy.
I also check the zipper tape width, pull size, color, and exact finished opening. A zipper that is technically the right type can still look wrong if its scale is too bulky or too delicate for the fabric.
| Zipper Type | Construction | Common Uses | Typical Fabric Weight |
|---|---|---|---|
| Coil | Flexible continuous coil | Dresses, skirts, pouches, cushions, general sewing | Light to medium |
| Metal | Individual metal elements | Jeans, jackets, bags, visible design details | Medium to heavy |
| Molded plastic | Individual molded elements | Outerwear, sportswear, bags, utility projects | Medium to heavy |
| Invisible | Concealed coil | Dresses, skirts, formalwear, fitted seams | Light to medium |
| Separating | Opens completely at bottom | Jackets, hoodies, coats | Depends on element type |
For most beginner centered-zipper practice, a medium-weight coil zipper paired with stable woven fabric is the easiest combination to control.
How I Test Sewing Machines for Sewing Zippers
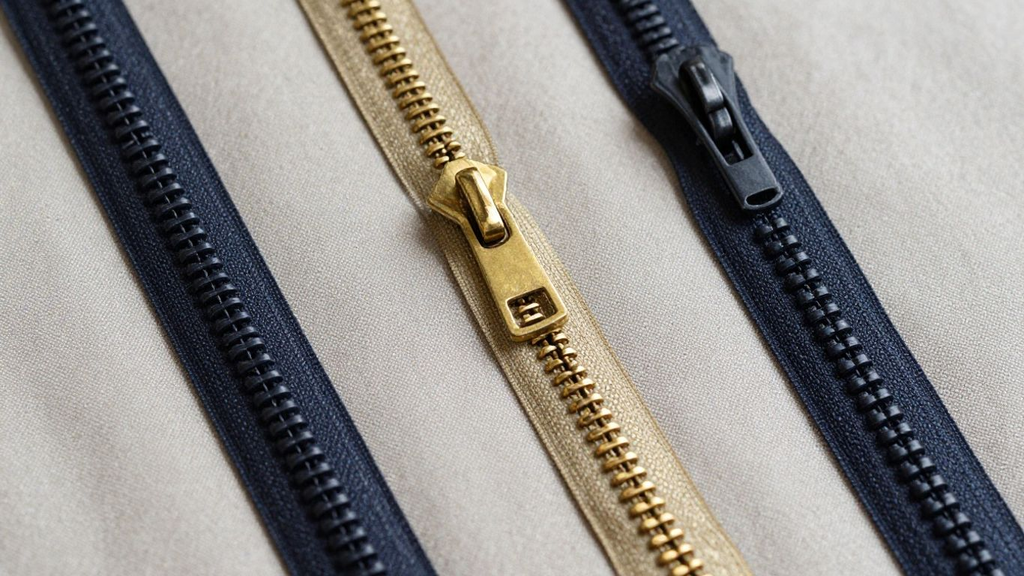
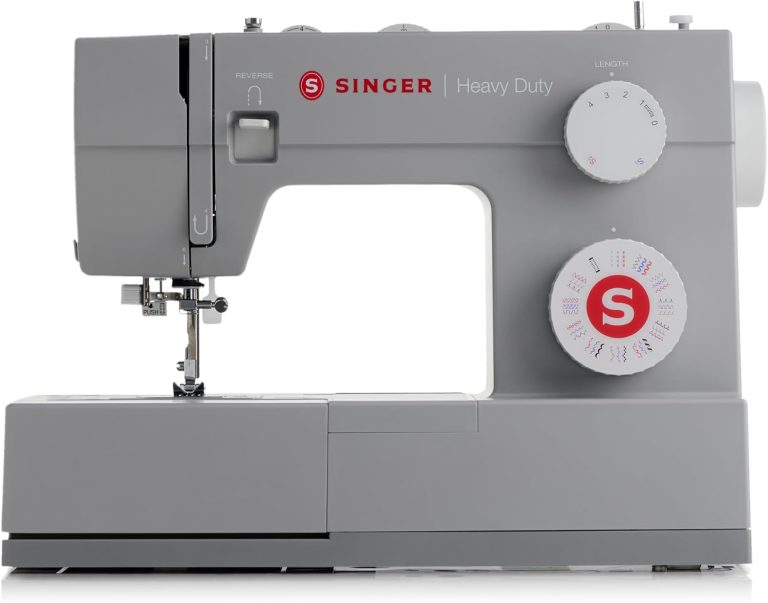
I personally use the sewing machines I recommend before I publish a verdict, and zipper insertion is one of the garment tasks I use to judge control. I start with a regular zipper foot, check how easy it is to attach on the left and right sides, then sew centered and edge-stitched zipper samples at low and moderate speed. I am looking for a machine that lets me approach the zipper teeth closely without the fabric wandering or the foot blocking my view.
I also test needle-position adjustment, foot-pedal response or speed control, needle up/down when the model includes it, stitch consistency beside the zipper tape, and how smoothly the feed dogs handle changes in thickness near the lower zipper stop. On lightweight fabric I watch for puckering; on denim and heavier layers I check whether the needle deflects or the machine struggles when the seam crosses a bulky area.
- Zipper-foot access. I check whether the foot attaches securely on either side and gives enough visibility to follow the zipper tape.
- Low-speed control. Zipper work rewards slow, predictable movement more than maximum sewing speed.
- Needle position. Fine left-right needle adjustment can help me place the stitch line accurately without forcing the zipper foot into an awkward angle.
- Stitch balance. I inspect the top and underside for loose loops, puckering, skipped stitches, and inconsistent length near the zipper.
- Fabric handling. I repeat the task on stable woven cotton, lightweight fabric, denim or canvas, and stretch fabric when the machine is designed for that range.
- Recovery from mistakes. I deliberately stop near the slider, reposition the zipper, and restart so I can see whether the controls make those small corrections easy.
MariaSew’s editorial standard is that sewing techniques and machine recommendations are based on real hands-on use and testing. Zipper installation is also part of the garment-task testing I use when comparing mechanical and computerized machines.
Sewing Machine Features That Make Zipper Installation Easier
You can sew a zipper on a very simple home sewing machine. The features below are not all mandatory, but each one can make alignment, stopping, and stitch placement easier.
Zipper Foot
This is the essential presser foot for most zipper installations. Its narrow shape lets the needle sew close to the zipper teeth while the body of the foot stays beside the zipper tape rather than directly over the teeth.
Adjustable Needle Position
Left-right needle adjustment lets me fine-tune the distance between the stitching line and the zipper teeth. It is especially useful when the zipper foot has limited physical adjustment.
Needle Up/Down
Needle-down is convenient when I need to stop, lift the presser foot, move the slider, and continue without losing the exact seam position. If the machine lacks this feature, I turn the handwheel manually to lower the needle before repositioning.
Speed Control
A speed-limiting slider makes it easier to keep zipper topstitching steady, especially near the slider, zipper stop, curves, or bulky seam intersections. On a mechanical machine, I create the same control by easing off the foot pedal.
Adjustable Stitch Length
A normal construction stitch around 2.5 mm is a useful starting point for many medium woven projects, while temporary basting should be much longer and easy to remove. Fabric and pattern instructions should override any generic starting value.
Reverse or Lock Stitch
Backstitching or a locking stitch secures the beginning and end of permanent zipper stitching. I keep reinforcement short so a bulky knot of thread does not build up beside the zipper tape.
Presser-Foot Pressure
Adjustable foot pressure can help when lightweight fabric puckers or thick fabric feeds unevenly. It is not required for zipper sewing, but it gives me another way to control difficult fabric before changing thread tension.
Clear Needle Plate Markings
Visible seam guides help keep the topstitching parallel with the center seam or zipper edge. For centered zippers, consistent distance is what makes both sides look balanced.
Recommended Zipper-Sewing Machine Setup
The settings below are starting points for a basic centered zipper in stable woven fabric. They are not universal machine specifications, because needle size, tension, stitch length, and foot pressure must change with fabric, thread, zipper weight, and the specific machine.
I always test the exact layers first. If a setting works on one layer of cotton but the real seam includes interfacing and two seam allowances, the test has not reproduced the actual sewing conditions.
If the seam loops, puckers, or skips, do not immediately change several settings. Rethread the machine, inspect the needle, check the bobbin, and then make one small adjustment at a time.
| Feature / Setting | Beginner Starting Point | Why It Matters |
|---|---|---|
| Presser foot | Zipper foot | Lets the needle sew close to the teeth |
| Permanent stitch | Straight stitch | Standard centered-zipper topstitching |
| Starting stitch length | About 2.5 mm on medium woven fabric | Adjust for fabric weight and topstitching look |
| Temporary basting | Longest practical straight stitch | Easy to remove after zipper is secured |
| Needle position | Adjusted to clear the foot and zipper teeth | Controls stitching distance |
| Thread tension | Start at normal machine setting | Change only after threading and needle checks |
| Needle | Match fabric weight and fiber | Prevents skipped stitches and fabric damage |
| Sewing speed | Slow to moderate | Improves control near slider and lower stop |
| Handwheel check | Always after foot or needle changes | Confirms needle clears the foot and zipper |
MariaSew’s sewing machine tension guide explains the troubleshooting order in more detail.
How to Prepare Fabric and Zipper Before Sewing
A neat zipper installation is mostly decided before the needle moves. I check the opening length, stabilize the area if the fabric is soft, finish raw edges that will be hard to reach later, and press everything flat.
Measure the Zipper Opening
Follow the pattern’s opening length and seam allowance when one is provided. If you are working without a pattern, measure the usable opening carefully and make sure the zipper is long enough to close it without forcing the fabric.
Mark the Top and Bottom of the Opening
Transfer the zipper stop point and any waist, pocket, or seam-matching marks to both fabric pieces. Matching marks help prevent one side from creeping higher than the other during stitching.
Finish Raw Edges Before Insertion
If the seam allowances will fray or become difficult to reach later, finish them before the zipper goes in. Use the method that suits the fabric, such as a zigzag, overcast stitch, serger, binding, or clean-finish technique.
Press the Seam Allowances Flat
Pressing creates the straight reference line that guides zipper placement. For a centered zipper, I usually sew the lower seam permanently, baste the zipper opening closed, then press the seam allowances open before positioning the zipper.
If you are still learning pressing, marking, threading, and basic seam control, the how to learn sewing guide gives a useful beginner foundation.
How to Sew a Centered Zipper Step by Step
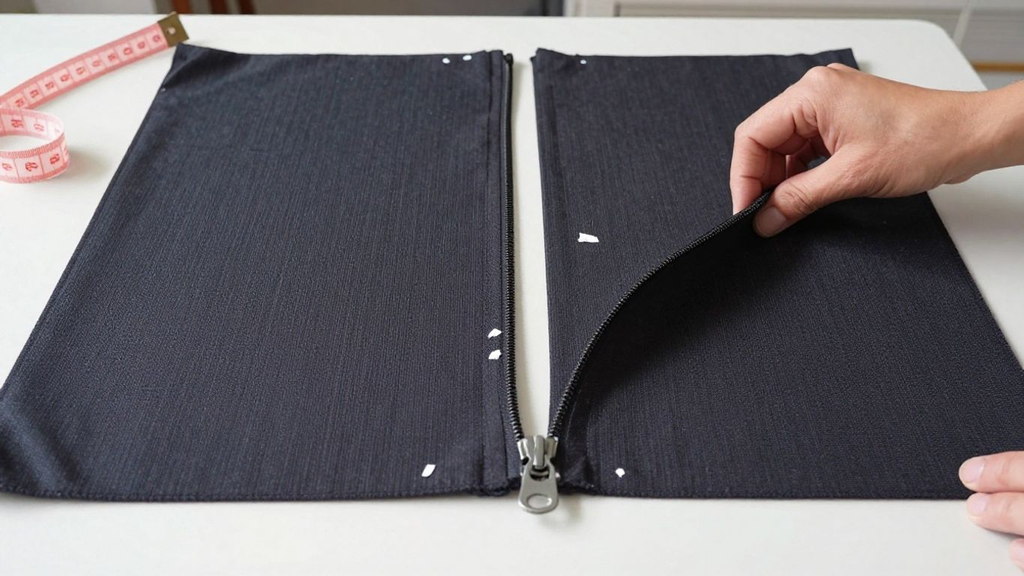
This method is for a standard centered zipper concealed beneath two evenly folded seam edges. A pattern may use a different construction order, so follow the pattern when its instructions conflict with this general technique.
The goal is symmetry. I want the zipper teeth centered under the basted seam, the top stops at the same height, and both visible topstitching lines the same distance from the center.
Step 1: Sew the Seam to the Zipper Opening
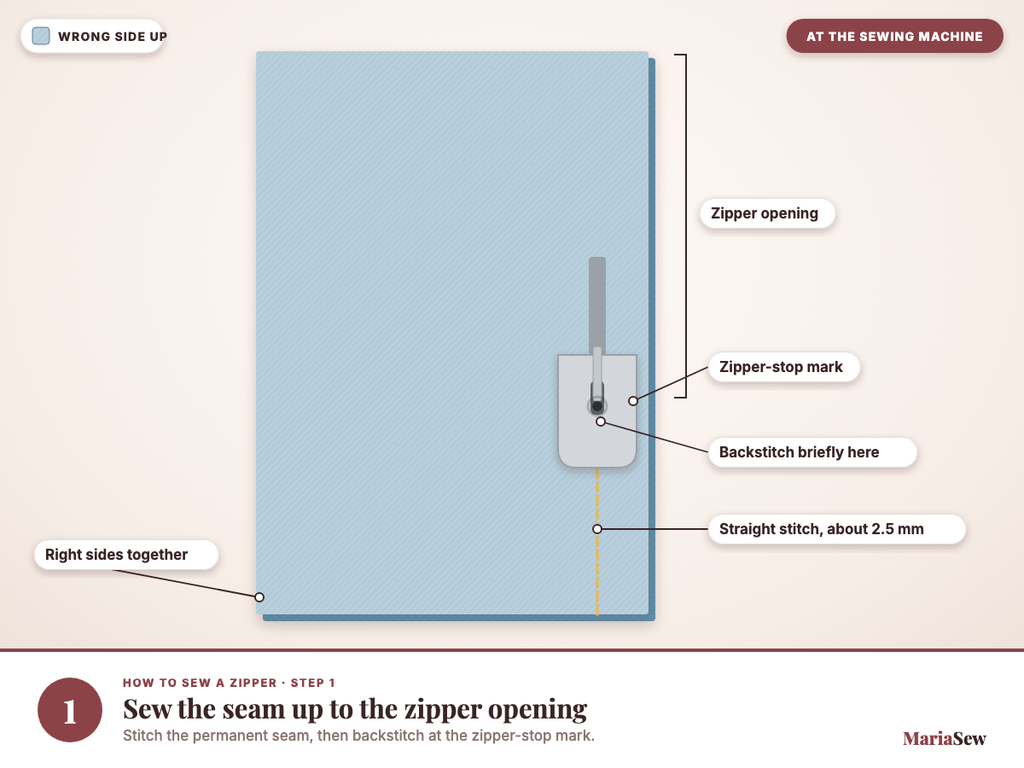
Place the fabric right sides together and sew the permanent seam up to the point where the zipper opening begins. Backstitch briefly at that point so the permanent seam is secure.
Step 2: Baste the Zipper Opening Closed
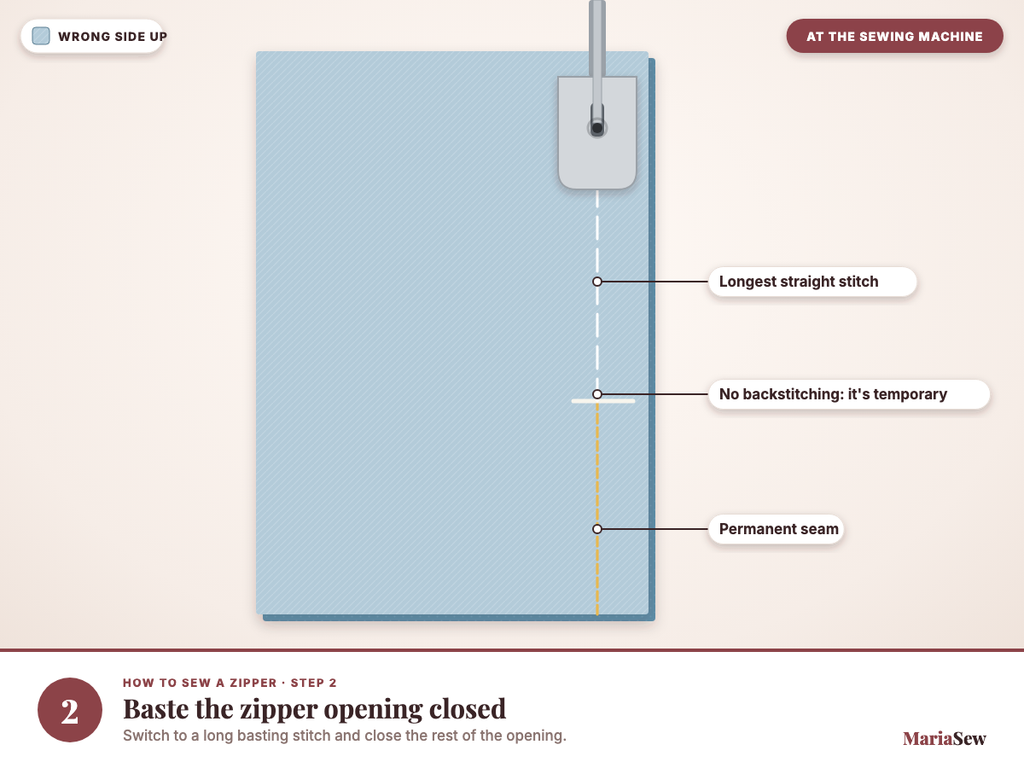
Switch to a long basting stitch and sew the rest of the opening closed. Do not reinforce this temporary section because you will remove it after the zipper is attached.
Step 3: Press the Seam Allowances Open
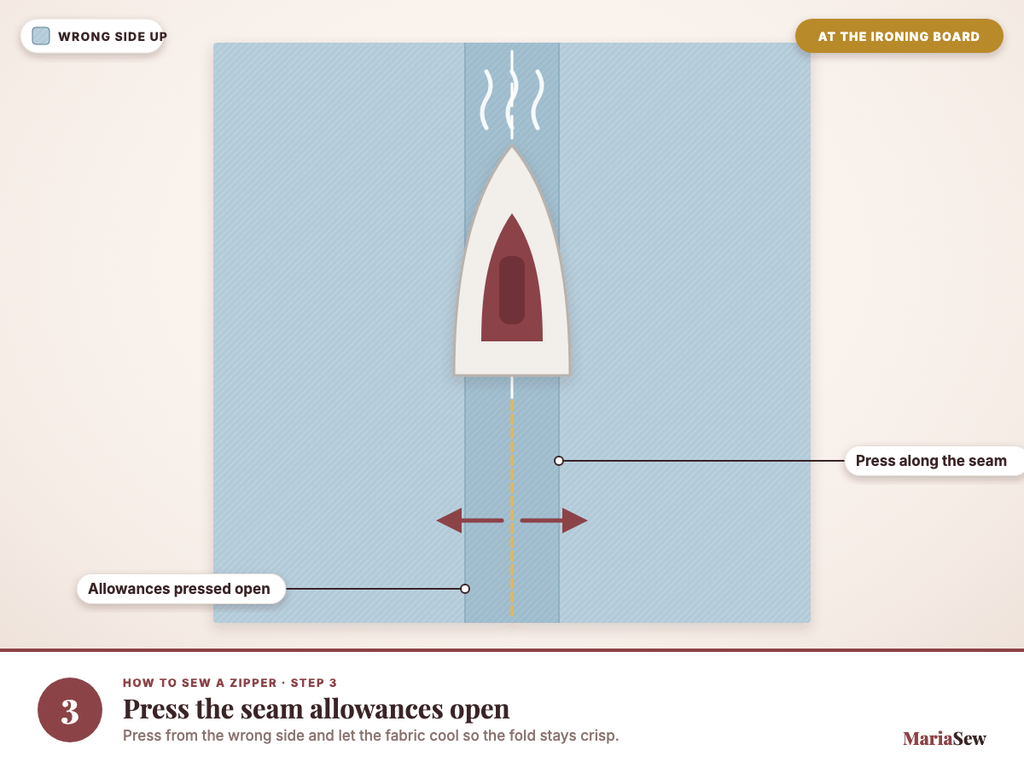
Press the seam flat, then press both allowances open from the wrong side. Let the fabric cool so the pressed line stays crisp before you position the zipper.
Step 4: Center the Closed Zipper Under the Seam
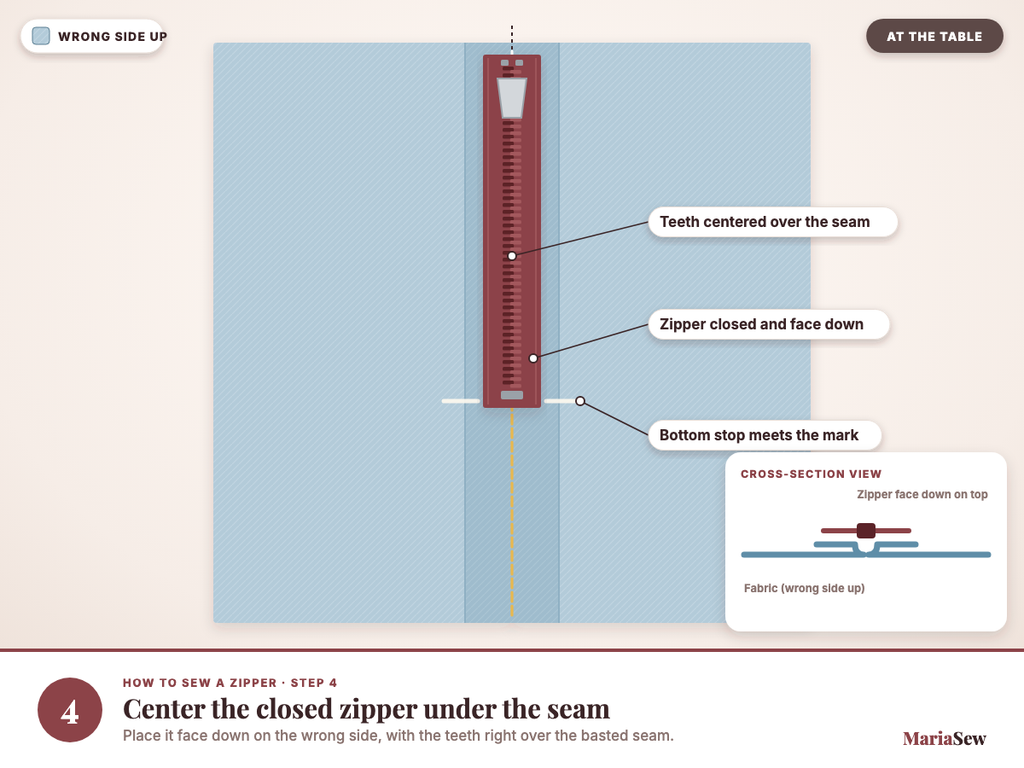
Place the closed zipper face down on the wrong side with the teeth directly beneath the basted seam. Match the top and bottom marks and make sure the tape is flat rather than stretched.
Step 5: Baste, Pin, or Tape the Zipper in Place
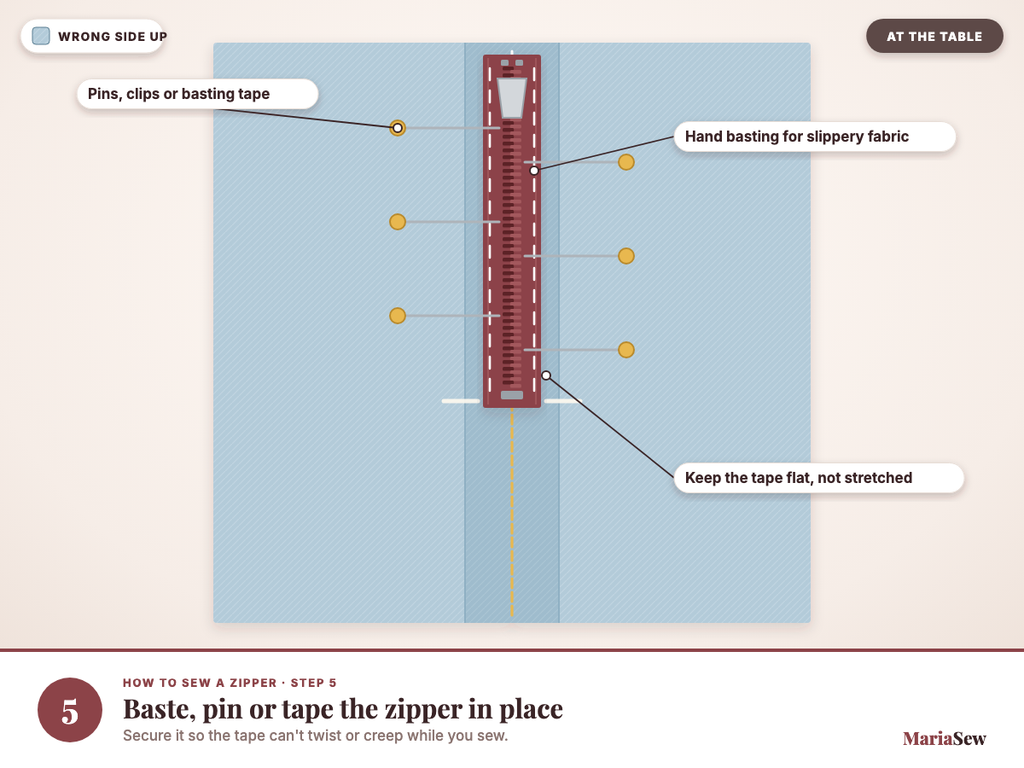
Secure the zipper so it cannot twist while you sew. I prefer hand basting for slippery or expensive fabric because it holds the tape flat without creating bumps near the stitch line.
Step 6: Attach the Zipper Foot and Check Needle Clearance
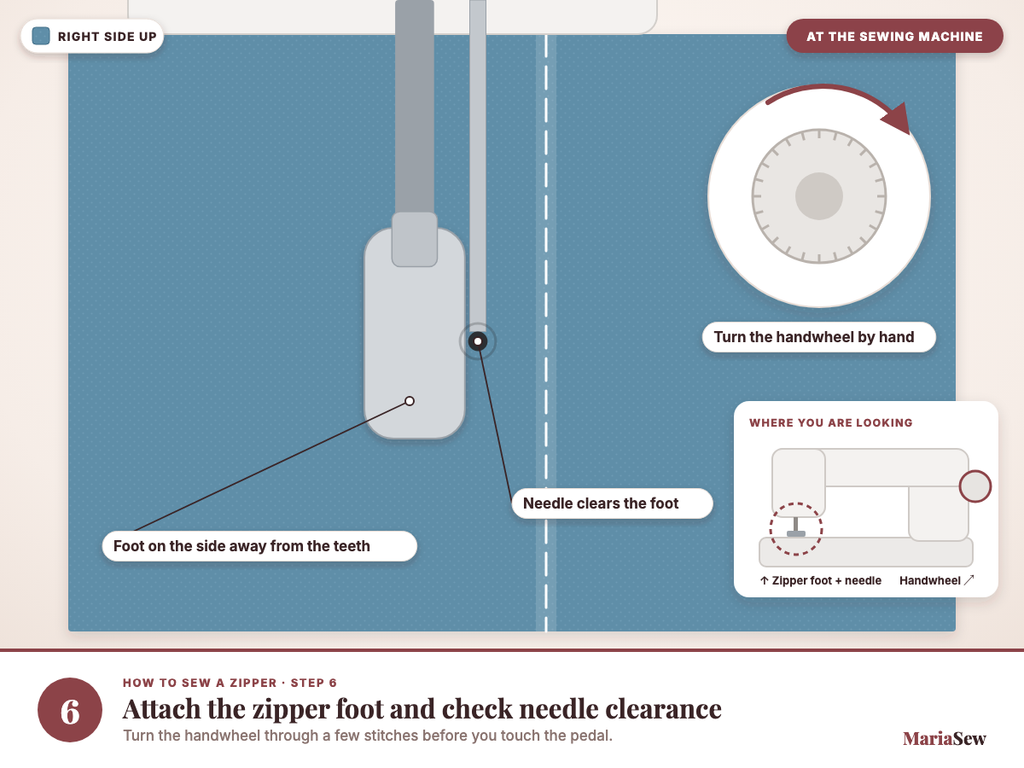
Attach the zipper foot on the side that lets the needle sew close to the teeth. Turn the handwheel manually through a few stitches before using the pedal, especially if you changed needle position.
Step 7: Sew the First Side
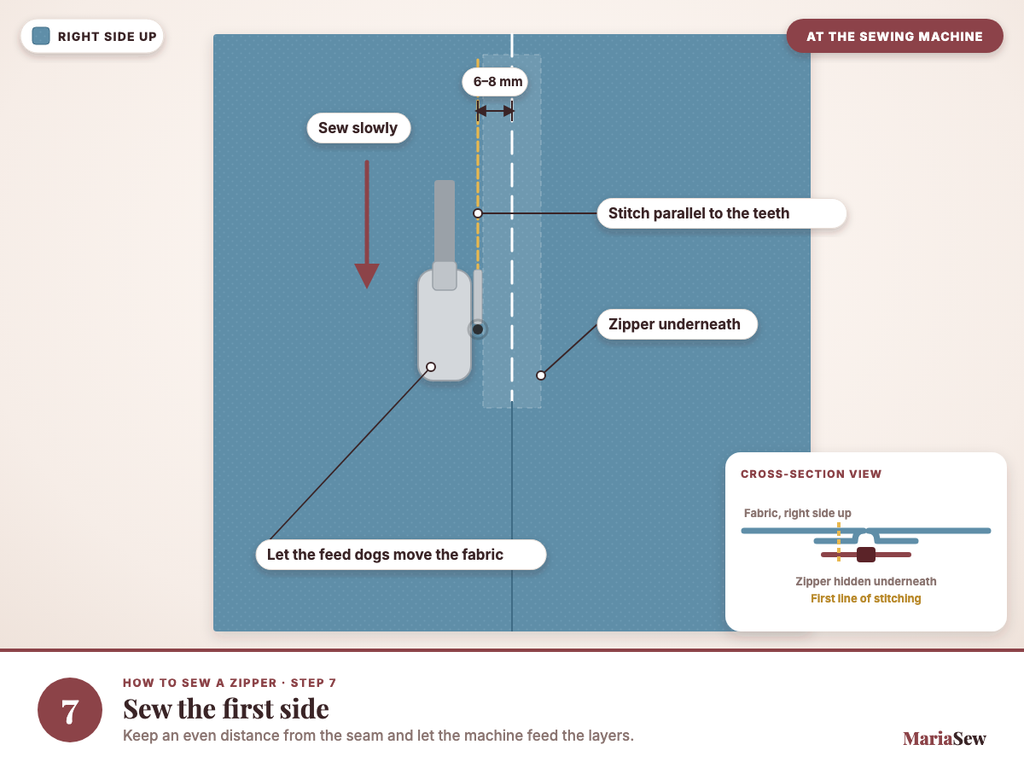
Start near the top or bottom according to the pattern and machine setup, then sew an even line parallel to the zipper teeth. Keep the tape and fabric flat and let the feed dogs move the layers.
Step 8: Move the Slider Out of the Way
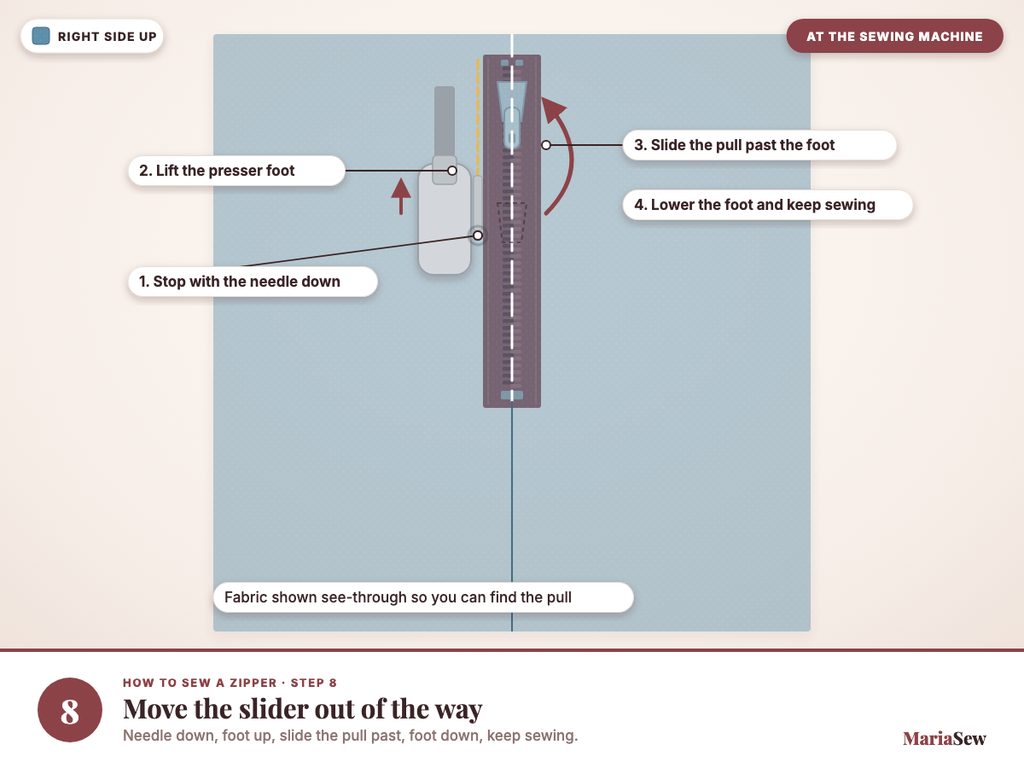
When the zipper pull approaches the foot, stop with the needle down. Lift the presser foot, move the slider past the needle area, lower the foot, and continue without changing the seam line.
Step 9: Sew Across the Bottom and Up the Second Side
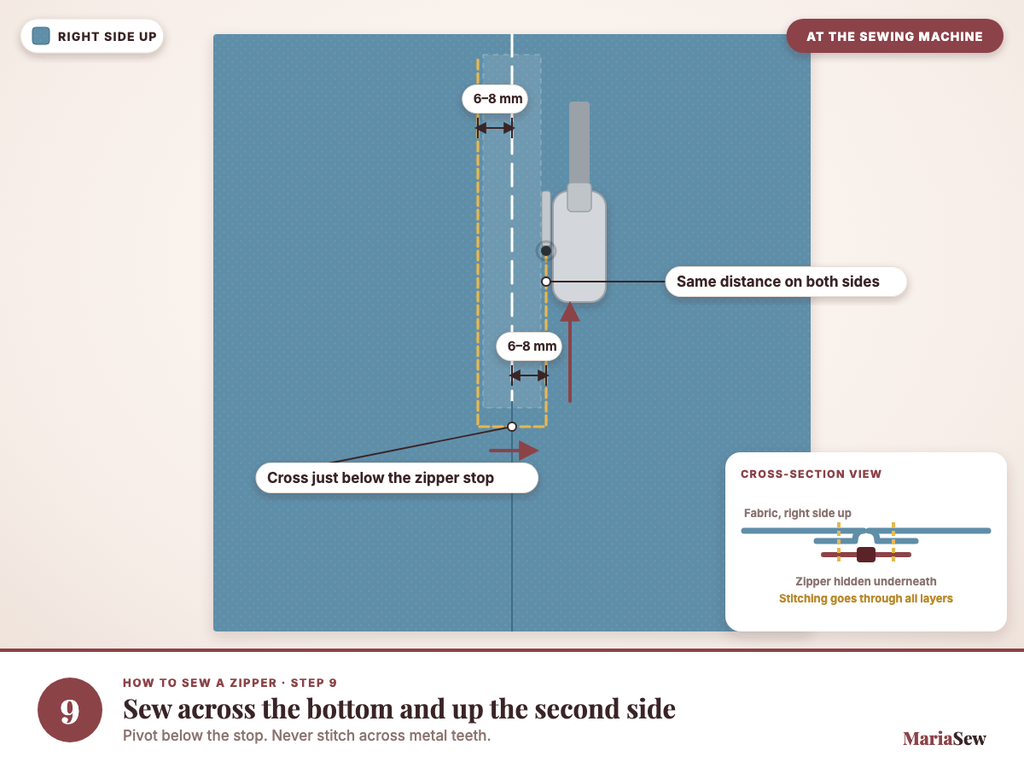
For a centered application, sew across the lower end below the zipper stop, then stitch the second side at the same distance from the center seam. Never intentionally stitch through metal teeth.
Step 10: Remove Basting and Test the Zipper
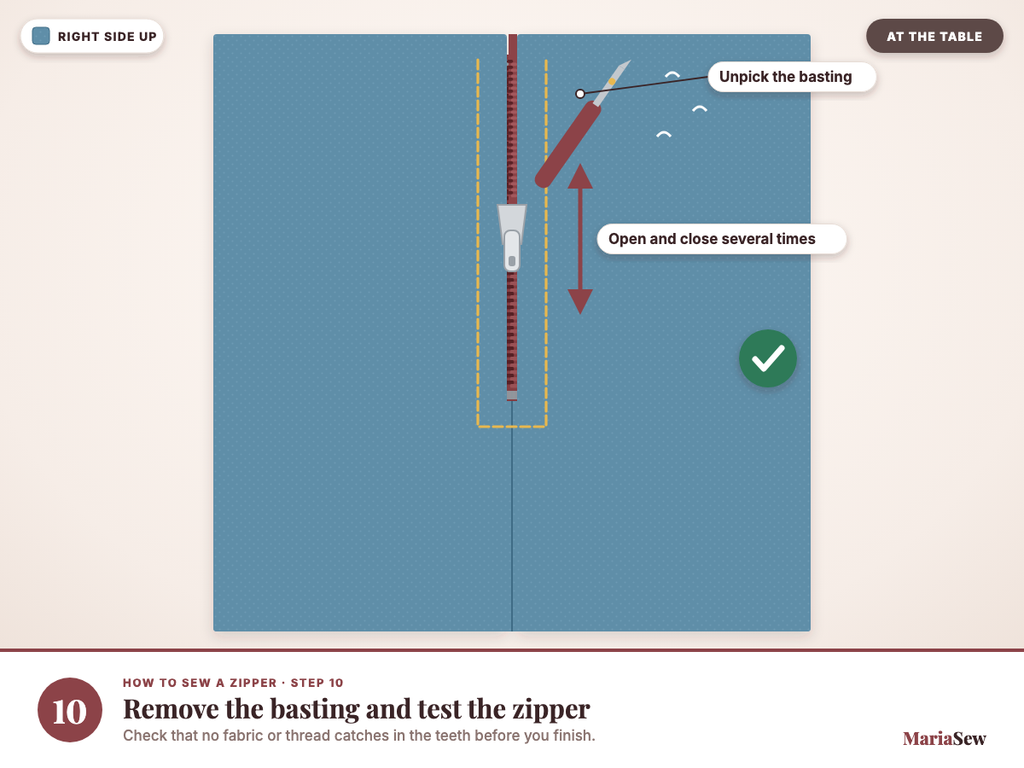
Use a seam ripper carefully to remove the temporary center basting. Open and close the zipper several times and check that no fabric or stitching catches in the teeth.
How to Sew an Invisible Zipper
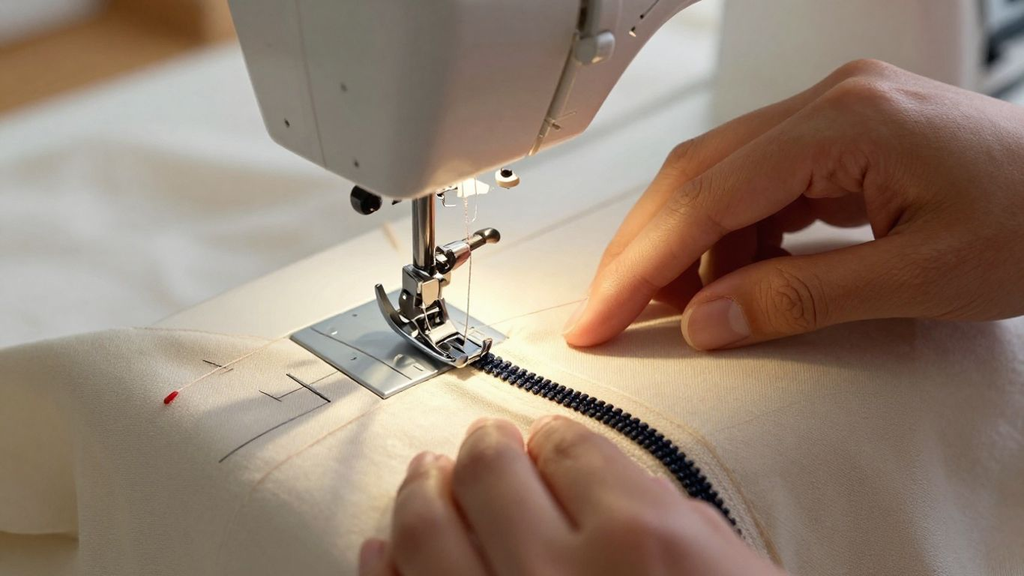
Invisible zippers use a concealed coil that rolls inward, so the correct foot and construction order are different from a centered zipper. The cleanest result comes from sewing the zipper to the flat seam allowances before the lower garment seam is completely closed.
- Press the zipper coils gently if the manufacturer permits. The goal is to expose the stitching groove without melting or flattening synthetic elements.
- Place the open zipper right sides together with the fabric. Align the tape edge and top stop with the pattern marks.
- Use an invisible zipper foot. The grooves under the foot guide the coil and let the needle sew very close to it.
- Sew each side separately. Stop at the lower zipper mark rather than forcing the foot past the bottom of the coil.
- Close the zipper and finish the seam below it. Use a regular zipper foot if necessary to connect the lower seam as closely as possible to the invisible-zipper stitching.
After pressing, only the zipper pull should be obvious from the right side. If the seam opens and reveals tape, the stitching is probably too far from the coil; if the zipper binds, it may be too close.
For very lightweight garment fabrics, review MariaSew’s how to sew chiffon guide before installing an invisible zipper into a sheer or slippery seam.
How to Sew a Separating Zipper
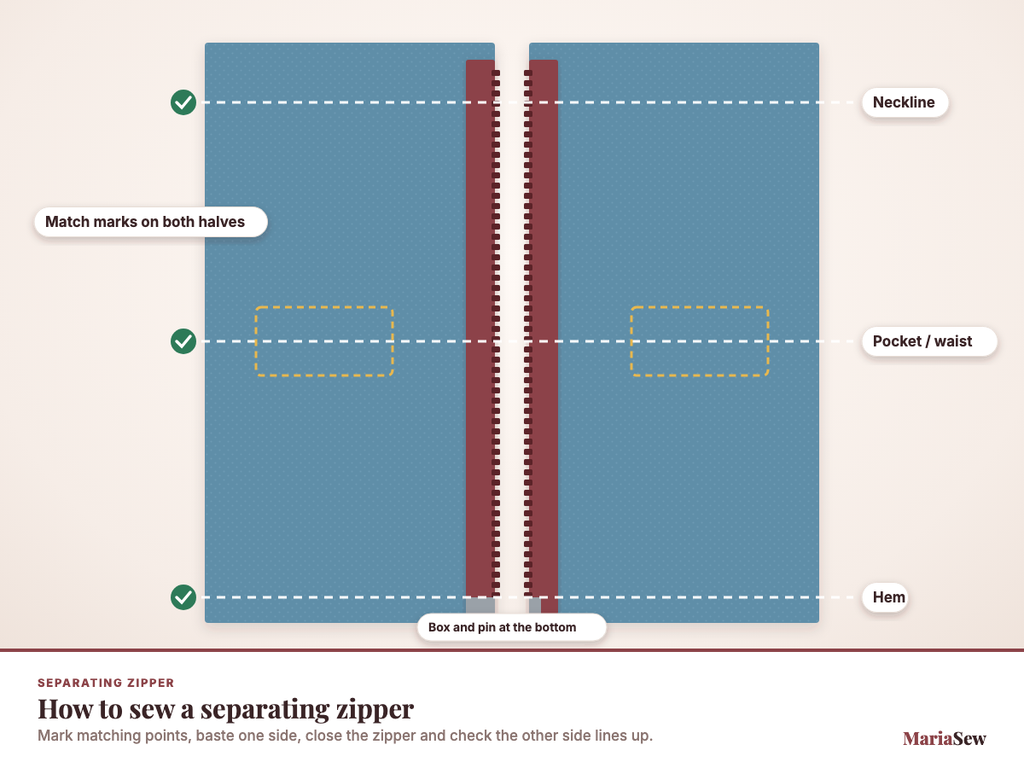
A separating zipper is usually installed into a front opening rather than hidden under a closed seam. The most important requirement is that both halves finish at exactly the same height so the neckline, hem, waistband, or jacket edges match when the zipper is closed.
- Mark matching reference points. Transfer neckline, waist, pocket, stripe, or seam intersections to both zipper tapes.
- Baste the first side before permanent stitching. This gives you a stable reference before you position the second half.
- Close the zipper to check alignment. Compare top edges and horizontal design lines before sewing the second side.
- Topstitch at an even distance. Use the zipper foot and seam guides to keep both sides visually balanced.
If the project is bulky, support the garment on the table so its weight does not pull one zipper half lower than the other during stitching.
How to Sew Zippers in Different Fabrics
The zipper technique stays similar, but fabric behavior changes the setup. I adjust the needle, stabilization, basting method, stitch length, and feeding rather than blaming every problem on the zipper.
Lightweight and Slippery Fabrics
Use a fine sharp or Microtex-style needle when appropriate, stabilize the zipper area, and baste carefully before permanent stitching. Slow speed and a flat work surface reduce rippling and layer shifting.
Stretch and Knit Fabrics
Stabilize the zipper opening so the knit does not stretch longer than the zipper tape. The zipper seam itself is often sewn with a straight stitch because the tape is stable, but the surrounding garment construction may still need stretch-friendly stitches.
Denim, Canvas, and Heavy Fabric
Use the correct heavy-fabric needle, lengthen the stitch if the project calls for visible topstitching, and slow down at seam intersections. A level presser foot and good fabric support help reduce needle deflection near bulky areas.
Fabric That Shifts Easily
Use hand basting, fine pins, clips, wash-away tape, or temporary stabilizer to control layers before inserting the zipper. A walking foot can help with general straight seams on shifting layers, but it is not the right foot for the actual zipper insertion because the zipper foot provides the needed clearance.
For knit preparation and stabilization ideas, see how to sew stretch fabric. For difficult shifting layers, MariaSew’s walking foot guide explains when an even-feed foot helps and when the zipper foot is the better choice.
Troubleshooting Zipper Sewing Problems
If the finished zipper looks wrong, identify whether the problem is alignment, feeding, tension, or slider clearance before ripping out the whole seam. Small corrections are easier when the garment is still partly assembled.
The Zipper Looks Crooked
The tape probably shifted or the opening marks were uneven. Remove the affected stitching, realign the zipper against the seam line, baste more securely, and resew.
The Fabric Puckers Beside the Zipper
Check for stretched fabric, too-short stitches, excessive tension, or missing stabilization. Press carefully and test the same fabric layers before resewing.
The Zipper Catches After Sewing
Look for fabric, seam allowance, or stitches sitting too close to the teeth. Do not force the slider; remove the problem stitches and resew slightly farther away.
The Two Sides Finish at Different Heights
This usually comes from poor reference marking or fabric stretch. Match top and horizontal reference points before stitching the second side.
The Needle Hits the Zipper Foot
Stop immediately. Recheck foot position, needle position, stitch width, and handwheel clearance before using the pedal.
The Underside Has Loops or Thread Nests
Rethread the upper path with the presser foot raised, check the bobbin and needle, then adjust tension only if the basic setup is correct.
If looping or puckering looks like a general machine issue rather than a zipper-placement issue, use the sewing machine tension troubleshooting guide before making large tension changes.
Common Zipper Sewing Mistakes to Avoid
Most zipper problems come from rushing the preparation or trying to compensate at the sewing machine for an alignment problem that already exists. The safest approach is to stop and fix the cause before adding more permanent stitches.
- Skipping the scrap test. A test seam reveals tension, needle, stabilization, and stitch-length problems before they reach the project.
- Using a regular presser foot for close zipper stitching. A zipper foot gives much better clearance beside the teeth and slider.
- Sewing with the slider directly under the foot. The pull changes the foot angle and often pushes the seam sideways. Stop, move it, and continue.
- Pulling the fabric from behind the machine. Let the feed dogs move the layers or the zipper opening can stretch and the stitches can become uneven.
- Sewing over pins. Remove pins before they reach the needle to reduce needle breakage and fabric damage.
- Sewing across metal zipper teeth. Metal elements can break or deflect a needle. Follow the pattern or zipper-manufacturer method for shortening and stops.
- Changing tension before checking threading. Loops and nests are often caused by threading, bobbin, needle, or lint problems rather than the tension setting.
- Ignoring the pattern’s construction order. Centered, lapped, invisible, fly-front, and separating zippers are not sewn in exactly the same sequence.
- Finishing the project before testing the zipper. Open and close the zipper several times while access is still easy.
My best beginner habit is to stop after each major stage and check alignment from the right side. A ten-second inspection is much faster than unpicking an entire zipper after the lining or waistband has been attached.
What Sewing Machine Is Best for Sewing Zippers?
You do not need a special zipper machine. Almost any well-functioning domestic sewing machine can install ordinary zippers if it accepts a zipper foot and gives you enough control to sew a straight line beside the teeth.
- For beginners. Prioritize clear threading, a stable straight stitch, an included zipper foot, good low-speed control, and simple stitch selection.
- For garments. Adjustable needle position, free-arm access, one-step buttonholes, and precise low-speed control are useful alongside the zipper foot.
- For denim and bags. Look for stable feeding, presser-foot clearance, a strong frame, compatible heavy-fabric needles, and good control over bulky seam crossings.
- For frequent dressmaking. Needle up/down, speed control, automatic thread cutting, and fine needle-position adjustment can make repeated zipper work faster.
If you are still choosing a machine, MariaSew’s current best sewing machines for beginners guide focuses on practical controls and includes models suitable for everyday garment skills such as zipper installation. If you are deciding between control styles, compare mechanical vs computerized sewing machines as well.
Final Verdict: The Easiest Way to Sew a Zipper
The easiest way to sew a zipper is to make the preparation more precise than the sewing. Choose the correct zipper, mark the opening, press the seam allowances, hold the zipper flat, attach the proper zipper foot, and test your machine on matching scraps before the permanent topstitching begins.
At the machine, slow down and protect the stitch line. Move the slider instead of steering around it, keep the needle clear of the teeth and foot, and test the zipper before finishing the garment or bag. After a few practice samples, zipper insertion becomes a repeatable construction skill rather than a stressful final step.
Frequently Asked Questions
What zipper is easiest for a beginner to sew?
A standard coil zipper in medium-weight woven fabric is usually the easiest starting point because the zipper is flexible and the fabric is stable. Practice a centered insertion before moving to invisible or very bulky zippers.
Do I need a zipper foot to sew a zipper?
A zipper foot is strongly recommended because it lets the needle sew close to the teeth while the foot stays beside the zipper. Foot designs differ, so check your machine manual for attachment and needle-position limits.
What stitch should I use to sew a zipper?
A straight stitch is the normal choice for most zipper insertion and topstitching. Around 2.5 mm is a useful starting point on medium woven fabric, but the pattern, fabric, thread, and machine should determine the final setting.
How close should I sew to zipper teeth?
Close enough that the closure looks neat and the tape is secure, but not so close that the stitches catch the teeth or prevent the slider from moving. The correct distance varies by zipper and foot.
How do I sew past the zipper slider?
Stop before the slider with the needle down, lift the presser foot, move the slider past the needle area, lower the foot, and continue along the same stitch line.
Should I sew a zipper open or closed?
For a basic centered zipper, it is usually easiest to align and secure it while closed, then move the slider during stitching. Invisible zippers are normally sewn while open so the coils can sit in the foot grooves.
Can I sew a zipper by hand?
Yes. Hand sewing can work for repairs or some specialty projects, though machine stitching is usually faster and easier to keep even.
How do I stop fabric from puckering beside the zipper?
Stabilize the opening, press the seam allowances, use the correct needle, avoid stretching the fabric, and test stitch length and tension on matching scraps.
Why does my zipper catch after I sew it?
Fabric, seam allowance, or stitches may be too close to the teeth. Inspect the problem area, avoid forcing the slider, and remove or reposition any stitches that interfere with movement.
Can I sew an invisible zipper with a regular zipper foot?
It is possible on some projects, but an invisible zipper foot is designed to guide the concealed coils and usually makes it easier to stitch close enough for a truly hidden finish.
Can I use a walking foot to sew a zipper?
A walking foot can help feed shifting layers during other parts of a project, but it is not the preferred foot for zipper insertion. A zipper foot gives the clearance needed to stitch close to the zipper teeth.
Can I sew a zipper into stretch fabric?
Yes, but stabilize the zipper opening so the knit does not stretch longer than the zipper tape. Use the appropriate needle and follow the garment pattern for the surrounding stretch seams.