How to Sew a Button by Hand: Two-Hole, Four-Hole & Shank Buttons
Written by Maria
Learning how to sew a button by hand is one of the fastest clothing-repair skills you can master, and you only need a needle, thread, scissors, and the correct button. The basic method is simple: place the button accurately, stitch through the holes or built-in shank several times, leave enough room for the fabric to pass through the buttonhole, and secure the thread on the wrong side of the garment.
The exact technique changes slightly for two-hole, four-hole, and shank buttons, especially when a thick coat or waistband needs extra clearance under the button. In this guide, I show the method I use for everyday repairs, explain single versus doubled thread, and cover the mistakes that make buttons crooked, too tight, or easy to pull off.
Quick Answer: How Do You Sew a Button by Hand?
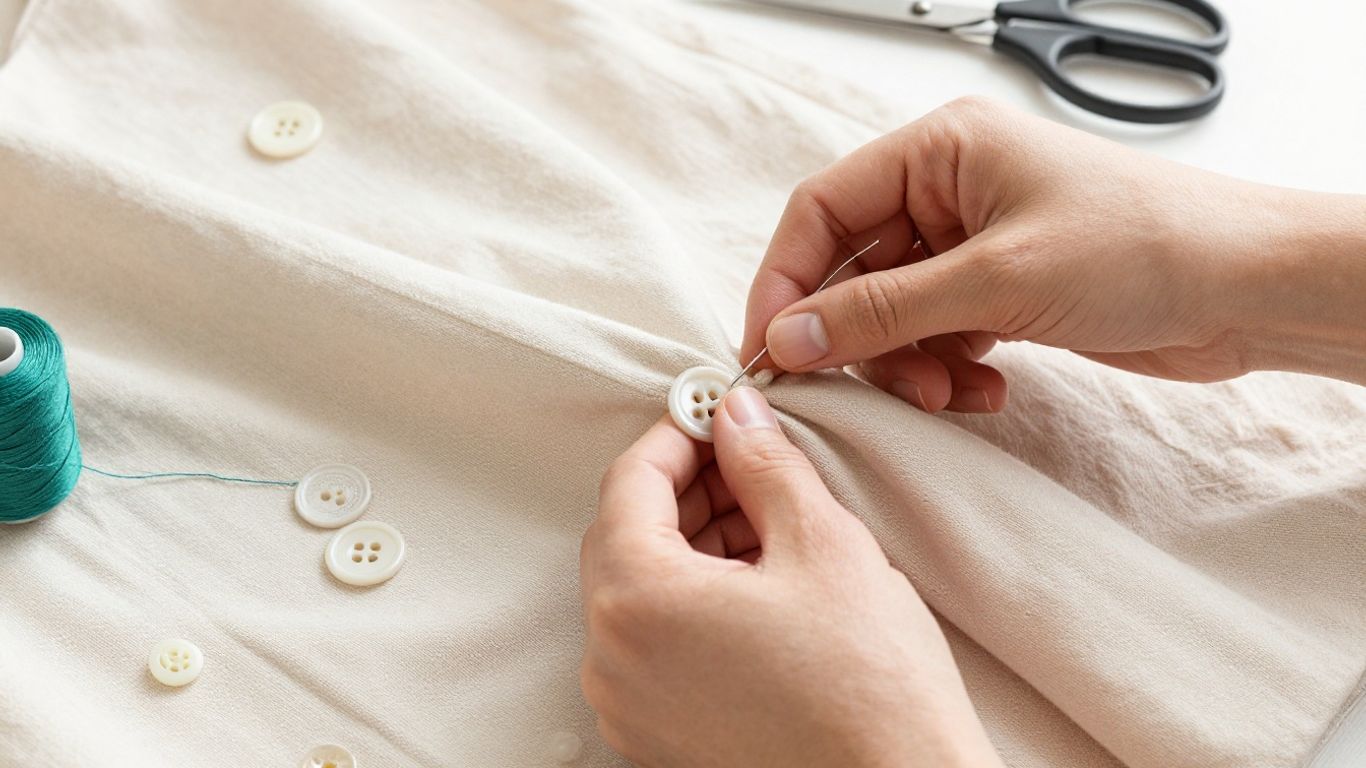
Thread a hand-sewing needle, knot the end, position the button over the original stitch marks, and bring the needle up from the wrong side of the fabric. Sew through each button hole several times with even tension. For a flat sew-through button, leave a small gap under the button and wrap the thread around those stitches to form a thread shank when the garment needs room to fasten. Finish with one or two secure knots on the underside, trim the thread, then test the button through its buttonhole before wearing the garment.
Key Takeaways
A secure button repair depends more on placement, thread tension, and the right amount of clearance than on sewing quickly. These are the points I check every time.
- Match the button to the garment and make sure it fits the existing buttonhole.
- Use the original stitch marks or nearby buttons to guide placement.
- Choose strong thread in a color that matches the garment.
- Use single or doubled thread based on the fabric and desired strength.
- Leave enough clearance under flat buttons for the garment to fasten comfortably.
- Sew shank buttons through their back loop instead of the button holes.
- Finish with a secure knot on the wrong side to keep the repair neat.
After sewing, I always fasten and unfasten the garment once. That quick test tells me whether the placement and clearance are right before the garment goes back into normal use.
Why Learn to Sew a Button by Hand?
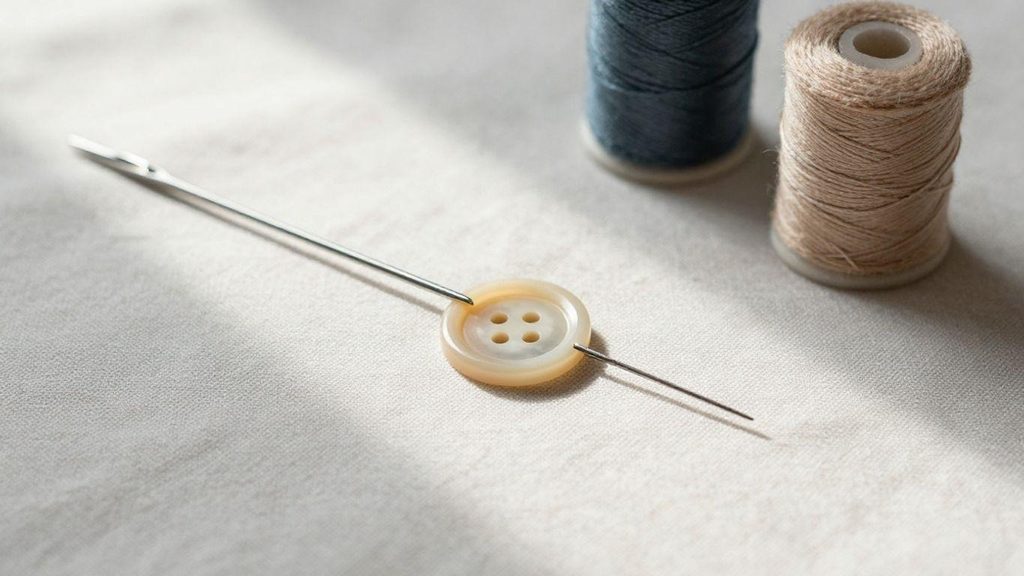
A missing button can make a perfectly wearable shirt, coat, pair of trousers, skirt, or dress unusable in a few seconds. Hand sewing lets me fix that problem immediately without setting up a machine or paying for a basic alteration.
It is also a useful foundation skill because the same control transfers to hand hemming, temporary basting, attaching hooks and eyes, small repairs, and finishing details that are awkward under a presser foot.
If you are building your sewing skills from the beginning, start with MariaSew’s How to Learn Sewing for Beginners for a broader roadmap of tools, stitches, fabric, and beginner projects.
How I Test a Hand-Sewn Button Repair
I do not consider the repair finished when the knot is tied. I test the button the way it will actually be used: I fasten it through the buttonhole, pull the garment gently at the closure, check whether the button tilts or twists, and inspect the fabric for puckering.
For shirts and lightweight garments, I look for a small amount of movement without a loose, dangling feel. For coats, waistbands, and thicker layers, I check that the button has enough clearance to pass through the buttonhole without crushing the fabric. If the garment will be washed often or the button carries regular strain, I also check the knot and stitch base from the wrong side.
- Alignment test. The button should line up naturally with its buttonhole and nearby buttons.
- Fastening test. It should pass through the buttonhole without forcing or distorting the fabric.
- Tension test. The fabric should stay flat instead of gathering around the stitches.
- Security test. A gentle pull should not create visible slack at the knot or stitch base.
- Appearance test. Thread paths should look intentional and consistent, especially on four-hole buttons.
If any one of those checks fails, I fix it immediately. It is faster to redo a few stitches now than to lose the button again after the first wash.
Button Types You Need to Know Before Sewing
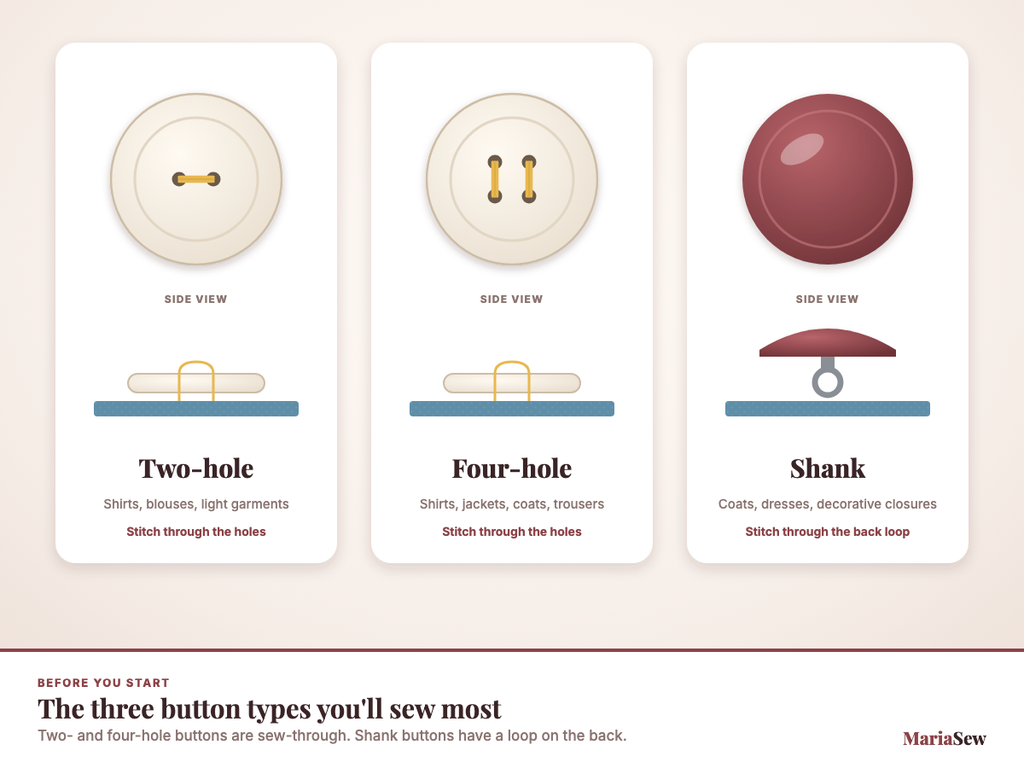
The sewing method changes with the button construction. The three most common clothing buttons are flat two-hole buttons, flat four-hole buttons, and shank buttons.
Two-hole and four-hole buttons are sew-through buttons, which means the needle passes through visible holes in the button face. A shank button has its attachment loop on the back, so the stitches remain mostly hidden from the front.
Two-Hole Buttons
Two-hole buttons are common on shirts, blouses, children’s clothing, inner waistbands, and light garments. I sew repeatedly between the two holes, keeping the button level and leaving enough clearance for the buttonhole.
Four-Hole Buttons
Four-hole buttons give you two main stitch patterns: parallel bars or a crossed X. I match the stitch pattern used on the other buttons whenever possible so the repaired button looks original rather than replaced.
Shank Buttons
Shank buttons have a loop molded or attached to the back of the button. I sew through that loop and the garment instead of stitching through the face, which is especially useful on coats and thicker fabrics where the button needs built-in clearance.
Button Type Comparison
The explanations above are the important part. The table below is a compact reference for deciding which sewing path and clearance method to use after you identify the button.
Match the existing garment whenever possible. If the original buttons use crossed thread, parallel bars, or a particular color, repeating that detail gives the cleanest repair.
| Button Type | Stitch Path | Thread Shank? | Common Uses |
|---|---|---|---|
| Two-hole sew-through | Back and forth through both holes | Sometimes | Shirts, blouses, light garments |
| Four-hole sew-through | Parallel pairs or crossed X | Sometimes | Shirts, jackets, coats, trousers |
| Shank button | Through loop on back of button | No, built-in shank provides space | Coats, dresses, decorative closures |
This is the only comparison table you need for the repair. Everything else is easier to follow as a physical sequence rather than a grid.
What You Need to Sew a Button by Hand
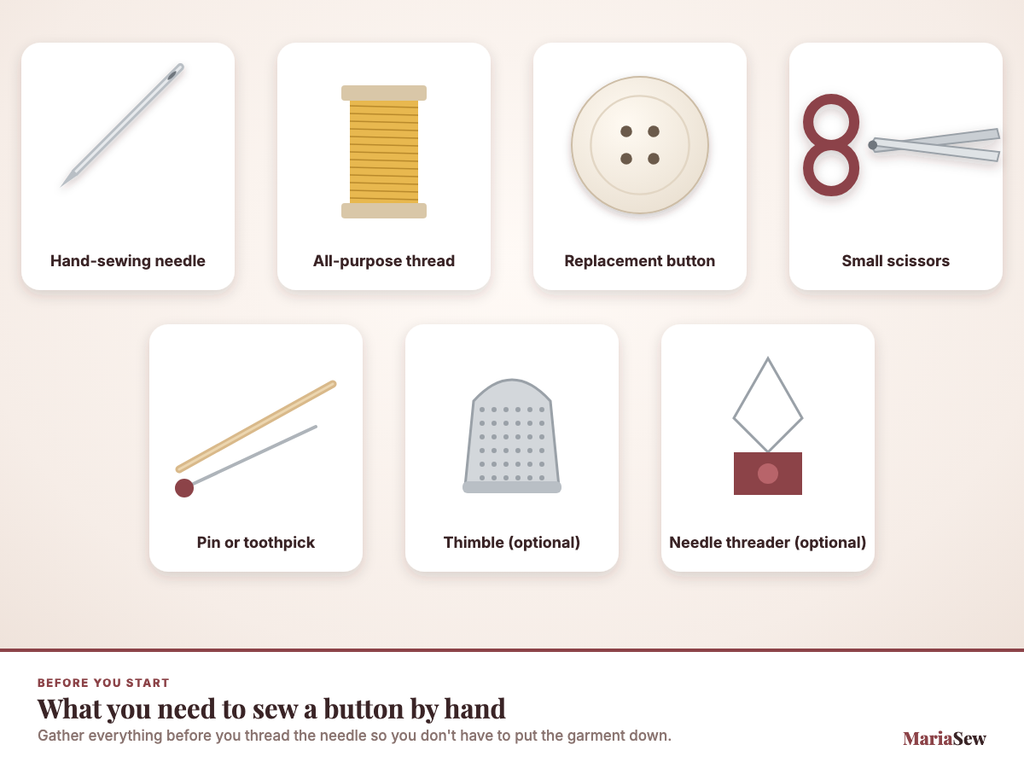
You can do the repair with a very small kit. I gather everything before threading the needle so I do not have to put the garment down halfway through the job.
Hand-Sewing Needle
Use a sharp hand-sewing needle that passes easily through both the fabric and the button holes. For heavy coats or dense waistbands, choose a stronger needle and use a thimble instead of forcing a fine needle through resistant layers.
If you’re building a basic sewing kit from scratch, MariaSew’s sewing machine parts guide also covers needle types in more depth.
Thread: Single Strand or Doubled?
All-purpose polyester thread is a reliable choice for most garments because it is strong and handles regular wear well. A single strand gives me more control on delicate fabric; a doubled strand builds the same attachment strength with fewer passes and is convenient for everyday buttons.
Replacement Button
The original button is ideal. If it is lost, check the inside hem, placket, care-label area, or spare-button packet before buying a replacement. The new button should pass through the existing buttonhole comfortably and visually match the other buttons.
Small Scissors or Thread Snips
Small sharp scissors let me trim old thread cleanly and cut the finished thread close to the knot without nicking the garment. I remove leftover thread before positioning the new button so the old stitches do not interfere.
Optional Spacer, Thimble, and Needle Threader
A straight pin, toothpick, or similar small spacer can sit across the top of a flat button while I sew, creating room for a thread shank. A thimble helps on dense fabric, and a needle threader is useful when the needle eye is small or the thread is difficult to control.
Before You Start: Check Placement and Fabric Condition
Correct placement matters as much as strong stitching. If the button sits a few millimeters too high, low, or sideways, the garment may pull or wrinkle when fastened even though the stitches themselves are secure.
- Remove old thread first. Cut away loose remnants so the replacement button can sit correctly and the original stitch marks are easier to see.
- Use the original holes when visible. Old needle marks usually identify the center of the previous button position.
- Compare with nearby buttons. On a shirt or coat, check both spacing and stitch pattern so the repair matches the row.
- Align with the buttonhole. The button should sit where the buttonhole closes naturally, not where it has to be pulled into position.
- Inspect the fabric. If the old button tore or enlarged the fabric, reinforce or repair the weak area before sewing the replacement into damaged cloth.
Knit and stretch fabrics need extra care here, see MariaSew’s how to sew stretch fabric guide for reinforcement techniques specific to those materials.
I hold the button in place and fasten the garment once before committing to the final position whenever the old stitch marks are unclear.
How to Sew a Two-Hole Button by Hand
A two-hole button is the simplest version of the repair. The goal is to keep the two holes level, maintain even tension, and leave the right amount of space under the button for the garment thickness.
Step 1: Thread the Needle and Tie a Knot
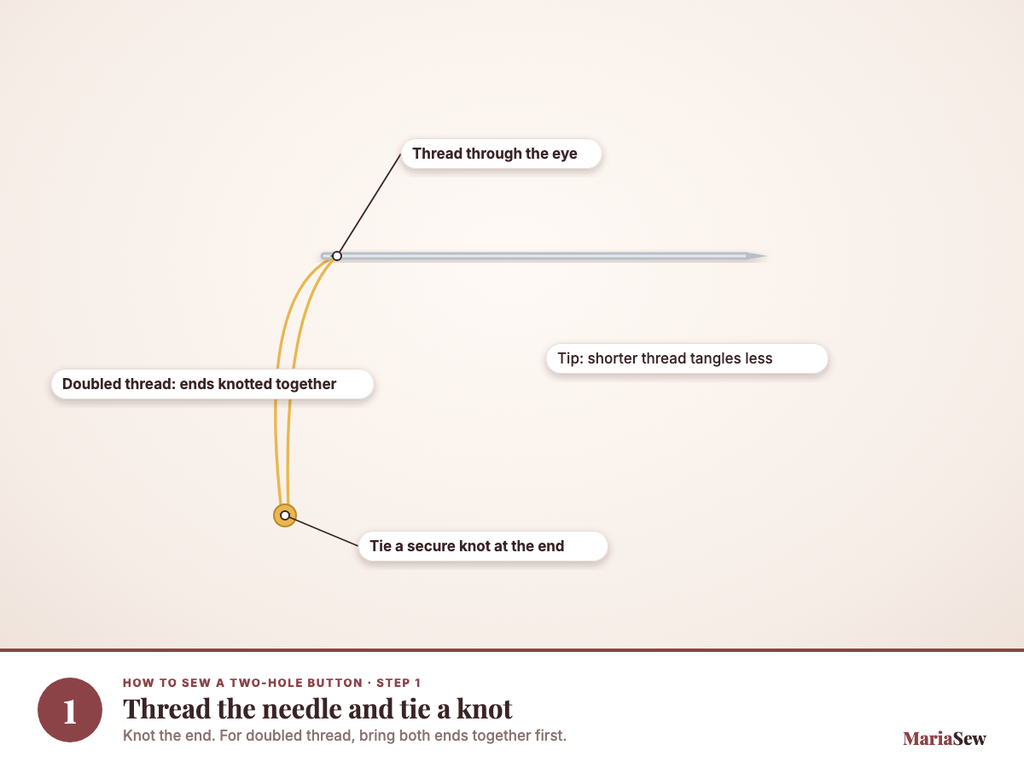
Cut a manageable length of thread, thread the needle, and tie a secure knot at the end. If you are using a doubled thread, bring the two ends together before tying the knot.
Step 2: Position the Button
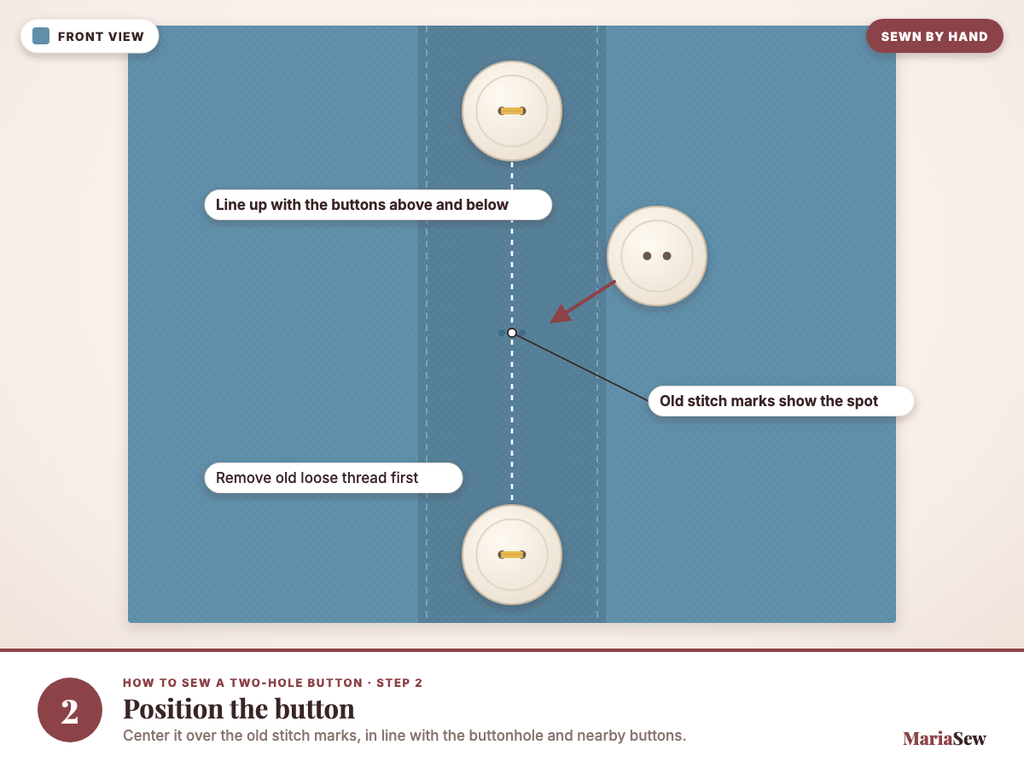
Center the button over the old stitch marks or align it with the buttonhole and nearby buttons. Hold it steady without pressing it hard into the fabric.
Step 3: Bring the Needle Up From the Wrong Side
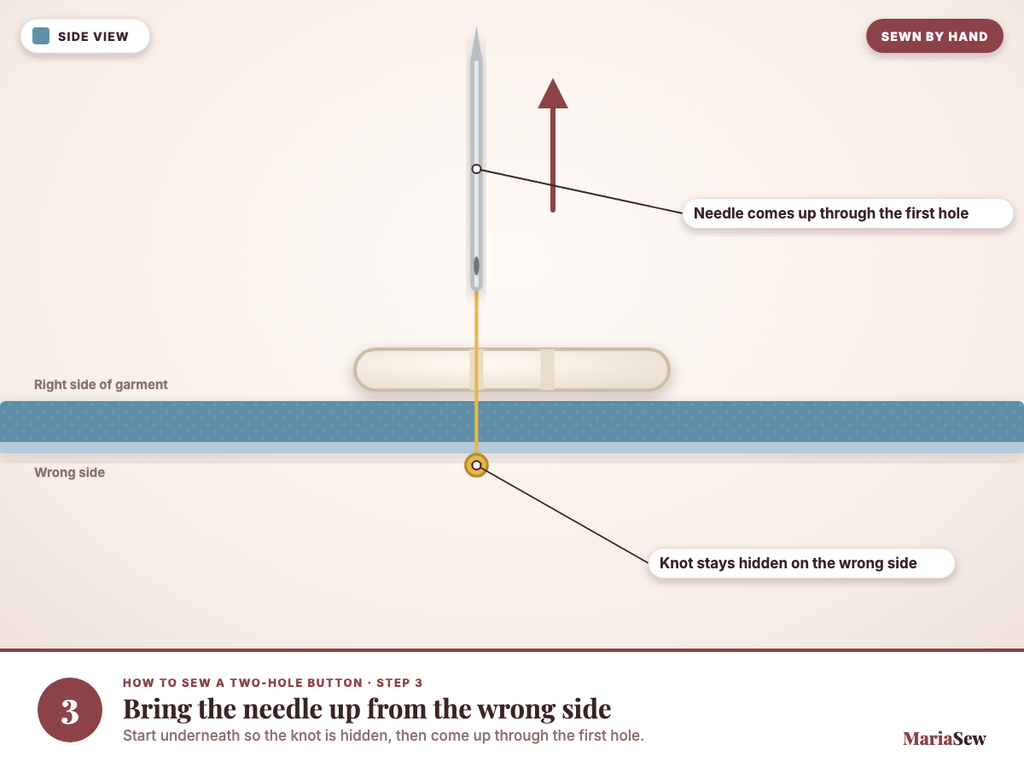
Start beneath the garment so the knot stays hidden. Bring the needle up through the fabric and the first button hole.
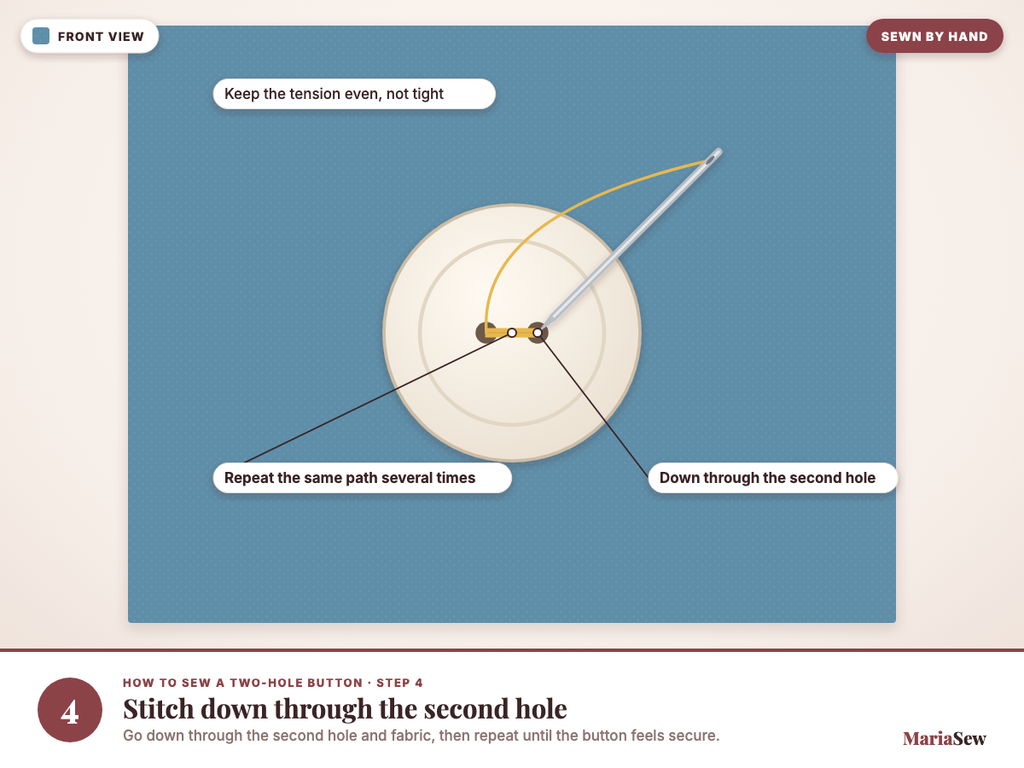
Step 4: Stitch Down Through the Second Hole
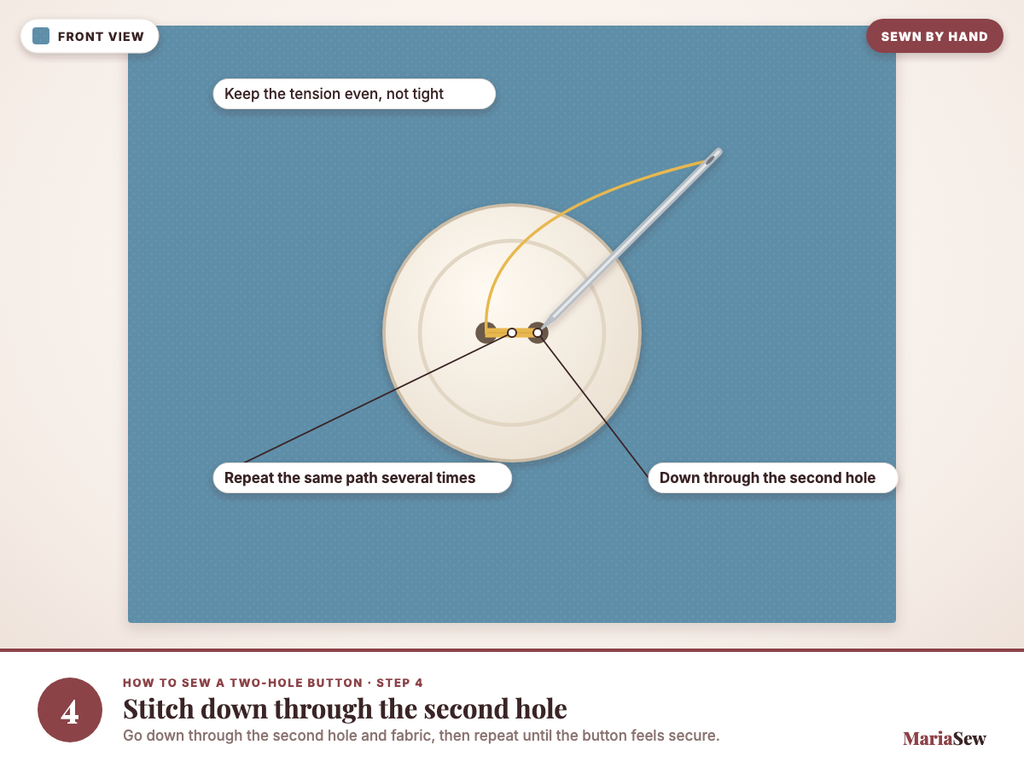
Pass the needle through the second hole and back through the fabric. Repeat the same path several times until the button feels secure.
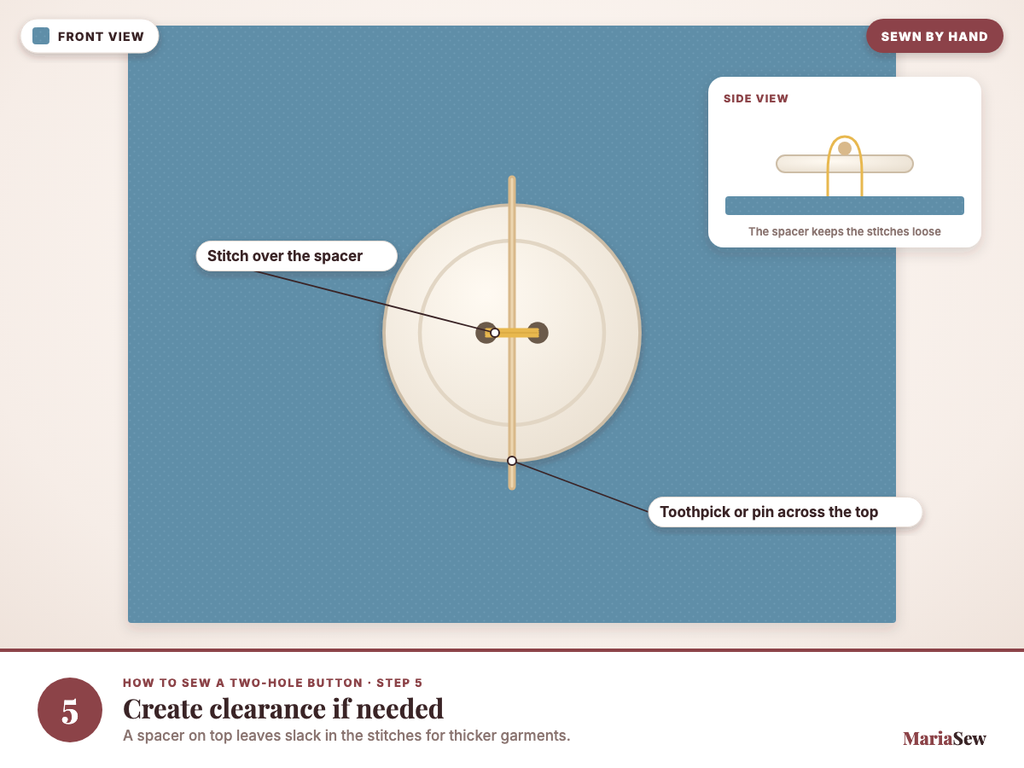
Step 5: Create Clearance if Needed
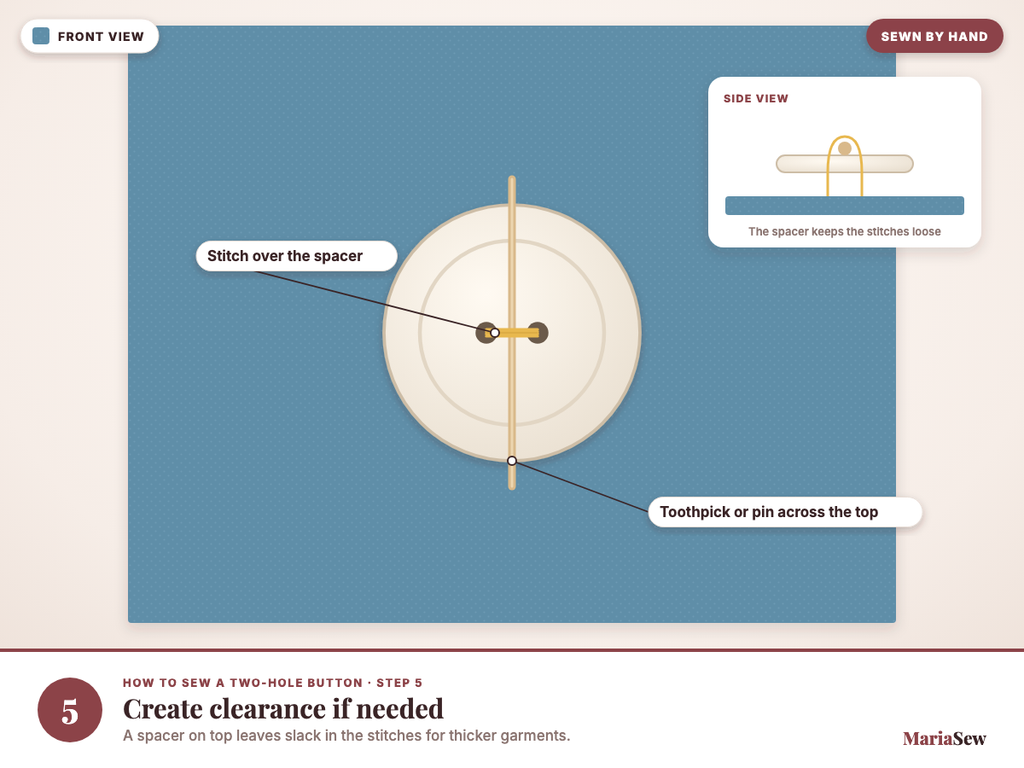
For a flat sew-through button, place a pin or toothpick over the button while making the passes, or simply avoid pulling the button tight against the cloth. The thicker the garment, the more clearance it may need.
Step 6: Form the Thread Shank
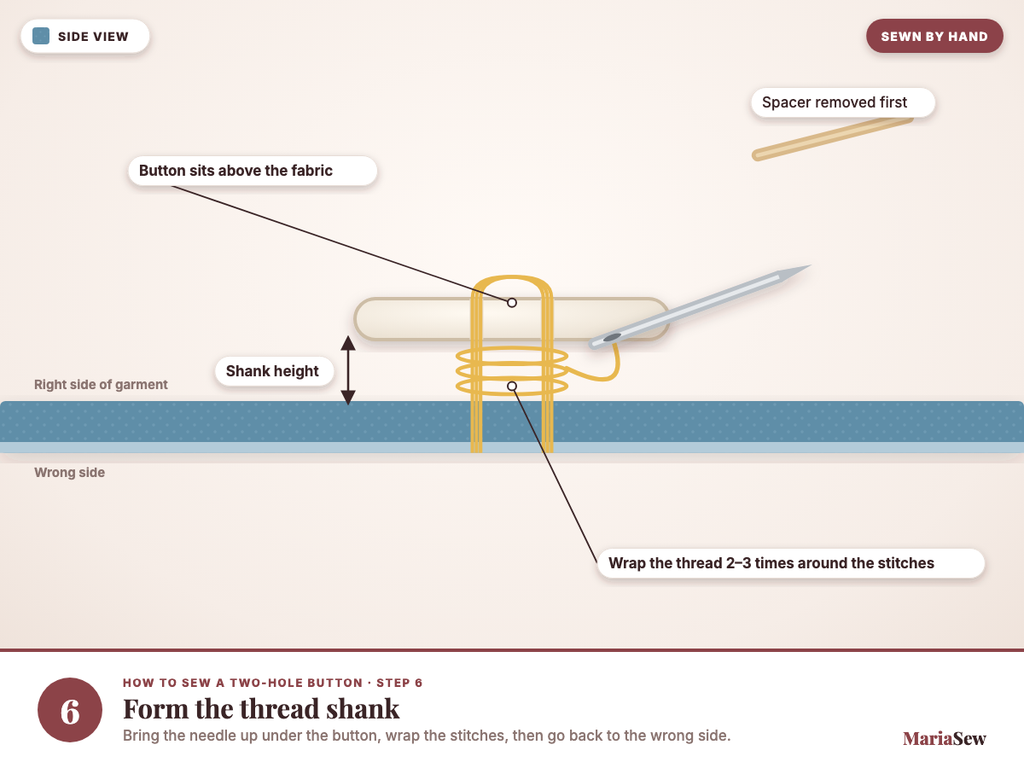
After the main passes, bring the needle up between the button and fabric. Remove the spacer and wrap the thread around the stitch bundle two or three times, then return the needle to the wrong side.
Step 7: Knot and Test
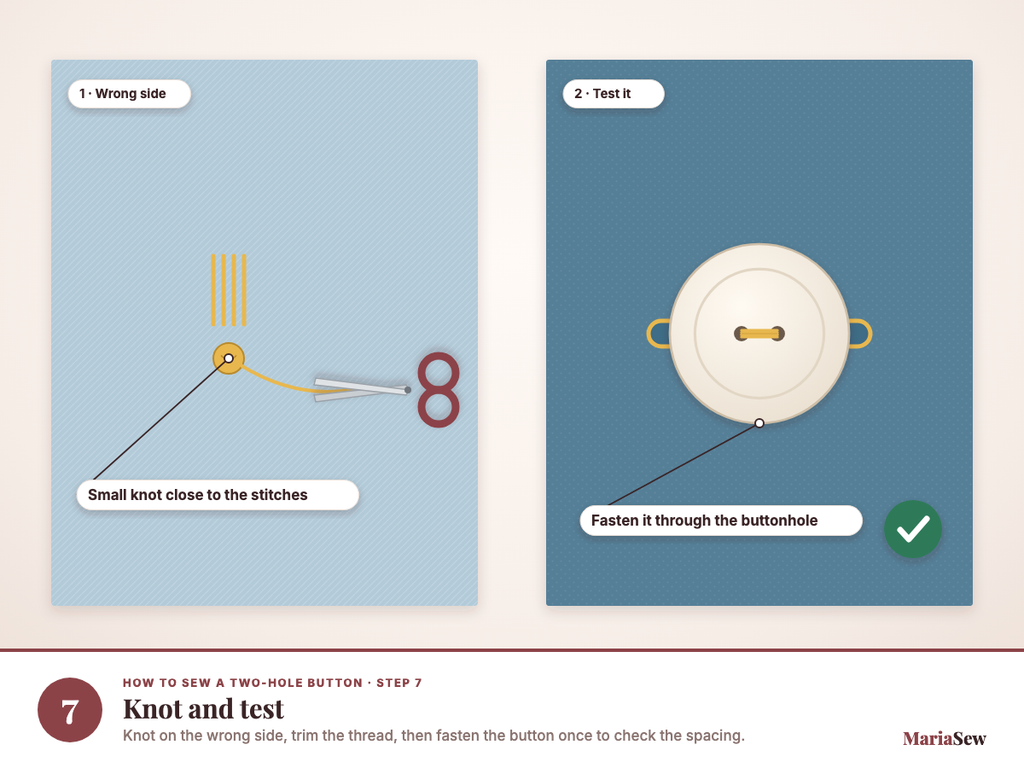
Make one or two small secure knots close to the stitch base, trim the thread, and fasten the button through the buttonhole to confirm the spacing.
How to Sew a Four-Hole Button by Hand
Four-hole buttons use the same basic method but give you two common stitch patterns. Look at the other buttons first: a matching thread pattern makes the repair look original.
Step 1: Choose Parallel or Crossed Stitches
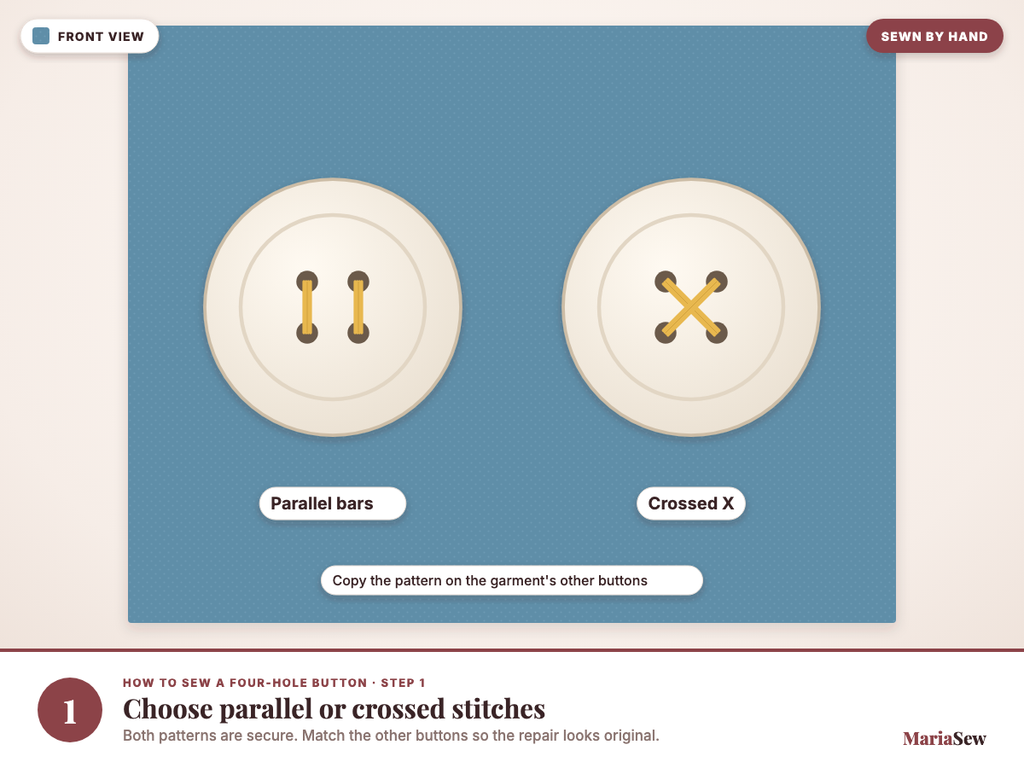
For parallel stitching, sew one pair of holes and then the other. For an X pattern, stitch between diagonal holes. Both methods can be secure when the passes are even.
Step 2: Start From the Wrong Side
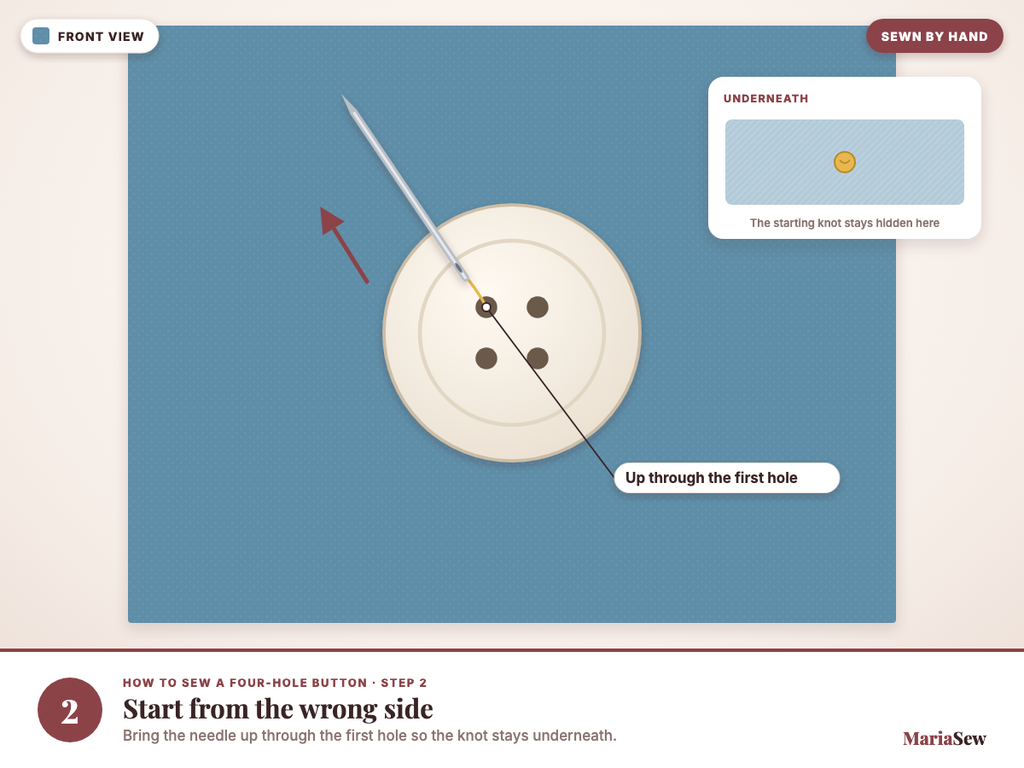
Bring the needle up through the first hole so the starting knot remains hidden beneath the fabric.
Step 3: Complete the First Hole Pair
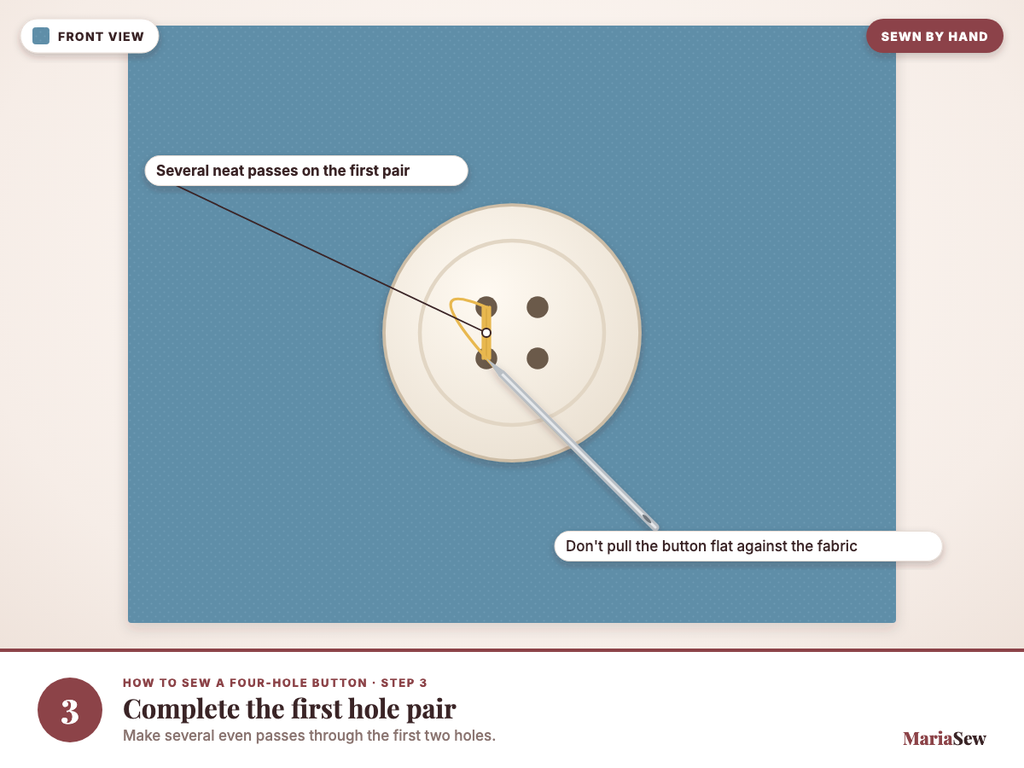
Make several neat passes through the first pair of holes without pulling the button flat against the garment.
Step 4: Complete the Second Hole Pair
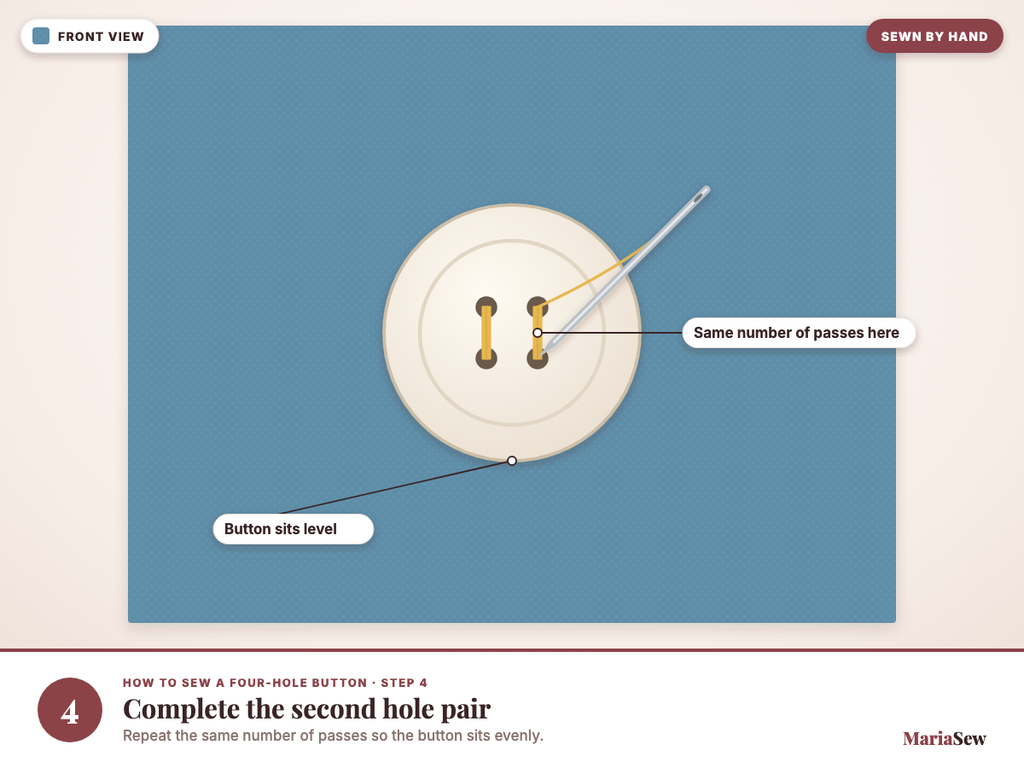
Move to the remaining holes and repeat the same number of passes so the button sits evenly.
Step 5: Add a Thread Shank if the Garment Needs It
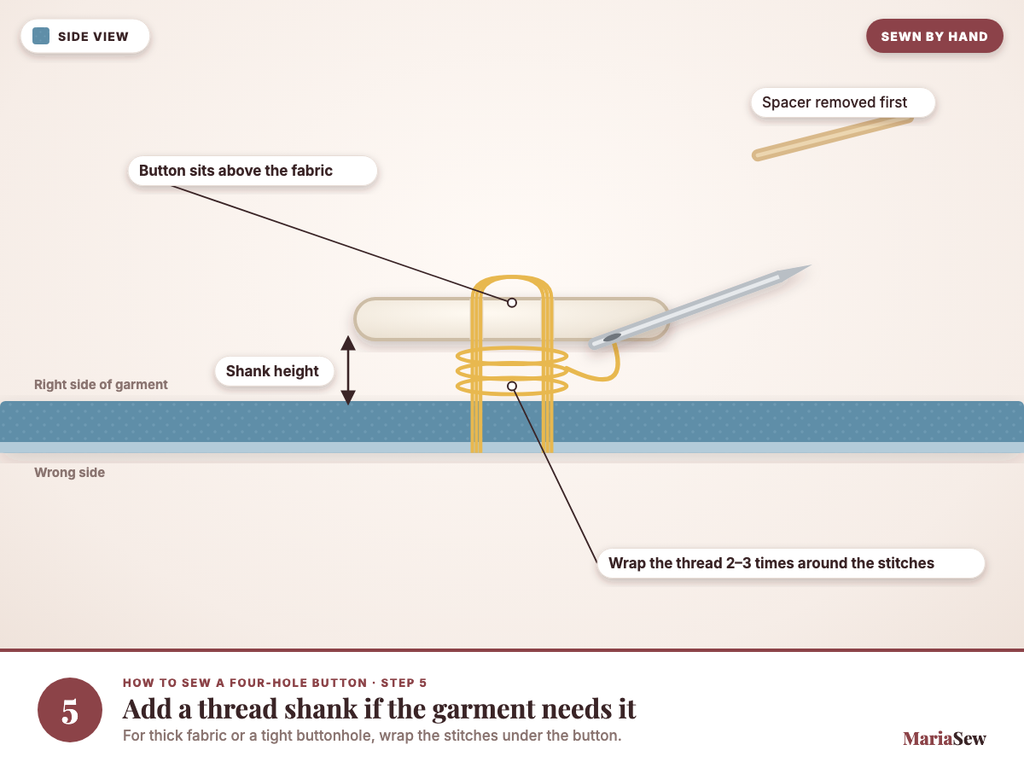
For thicker fabric or a tight buttonhole, wrap the thread around the stitch bundle under the button to create clearance.
Step 6: Secure the Back
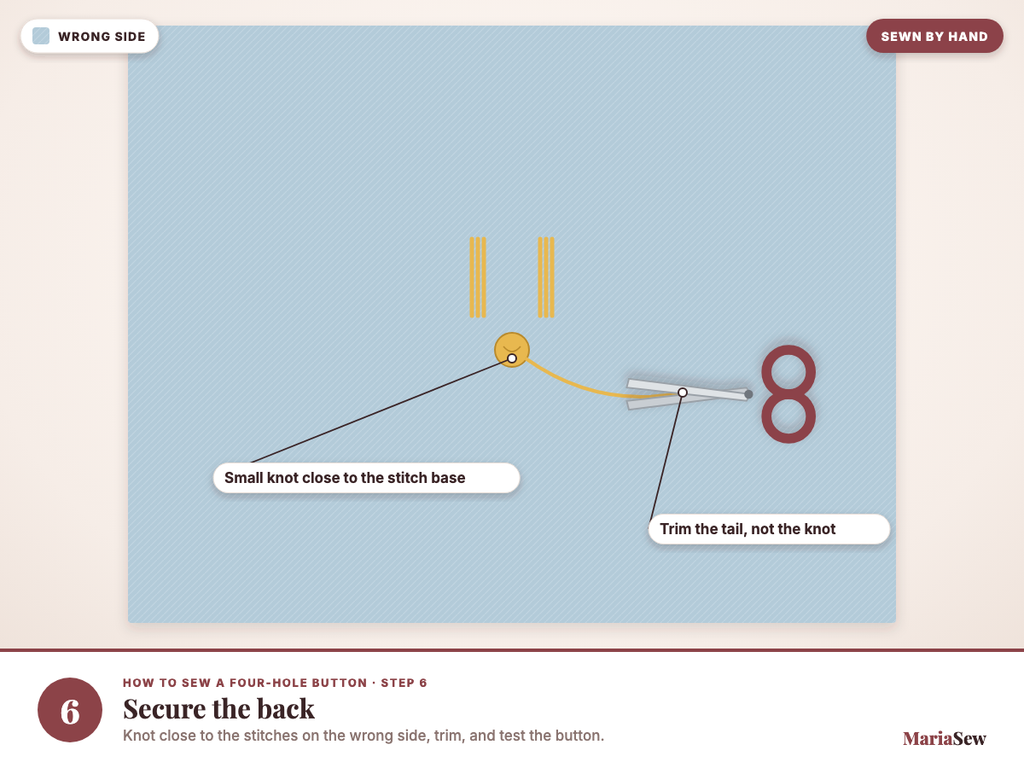
Finish with a small knot close to the stitch base, trim the thread, and test the button through its buttonhole.
How to Sew a Shank Button by Hand
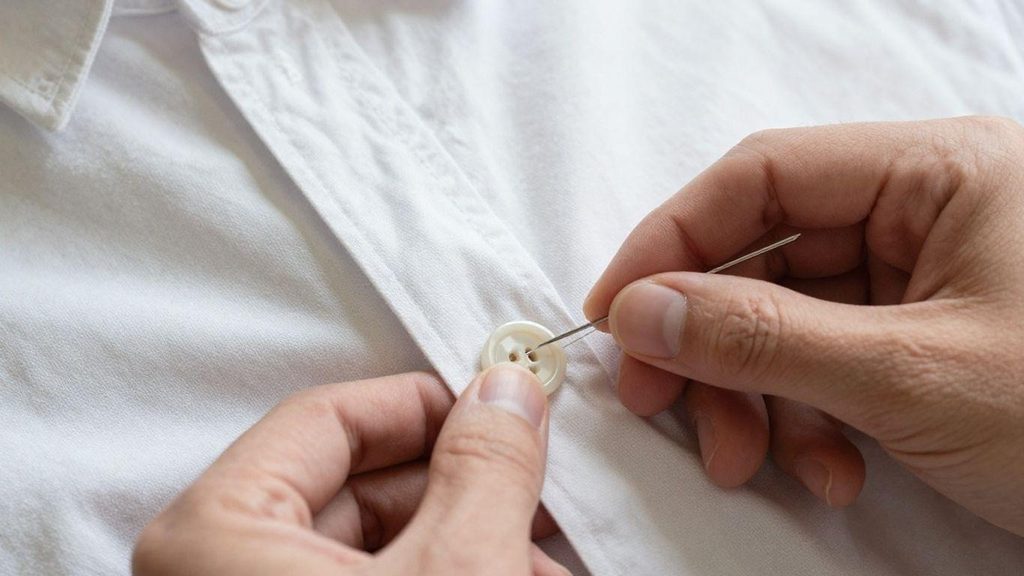
A shank button already has a loop or stem on the back, so I do not build a separate thread shank the way I would for a flat sew-through button. The job is to anchor that loop securely to the fabric.
Step 1: Mark the Position
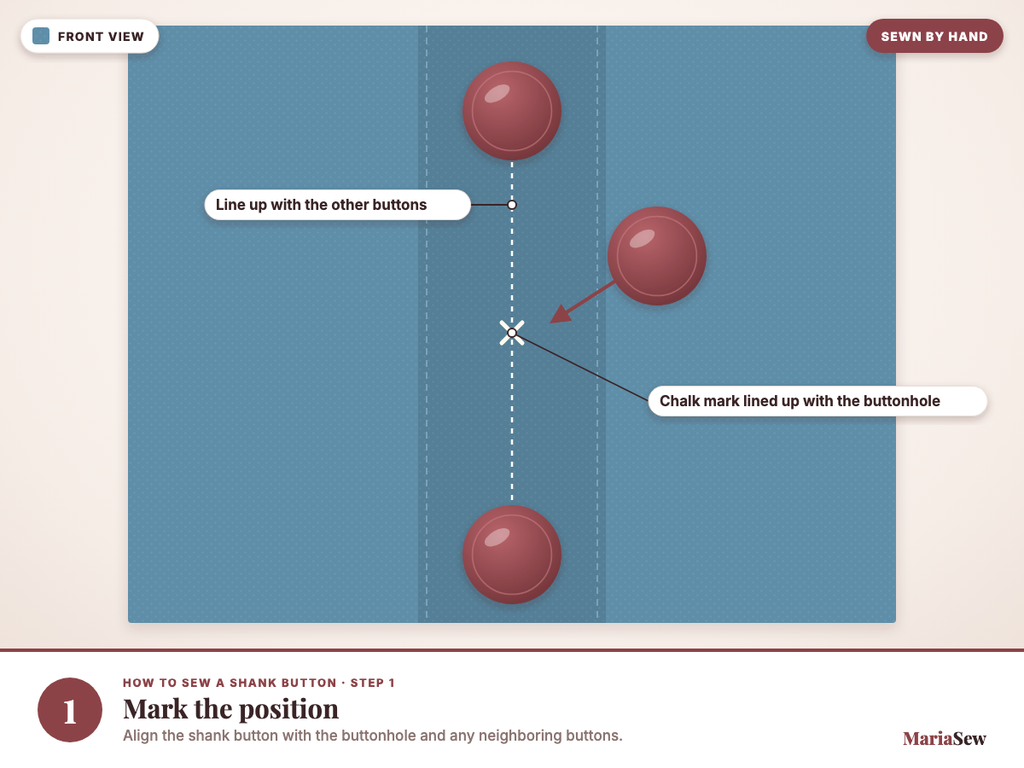
Align the shank button with the buttonhole and any neighboring buttons.
Step 2: Bring the Needle Up From the Wrong Side
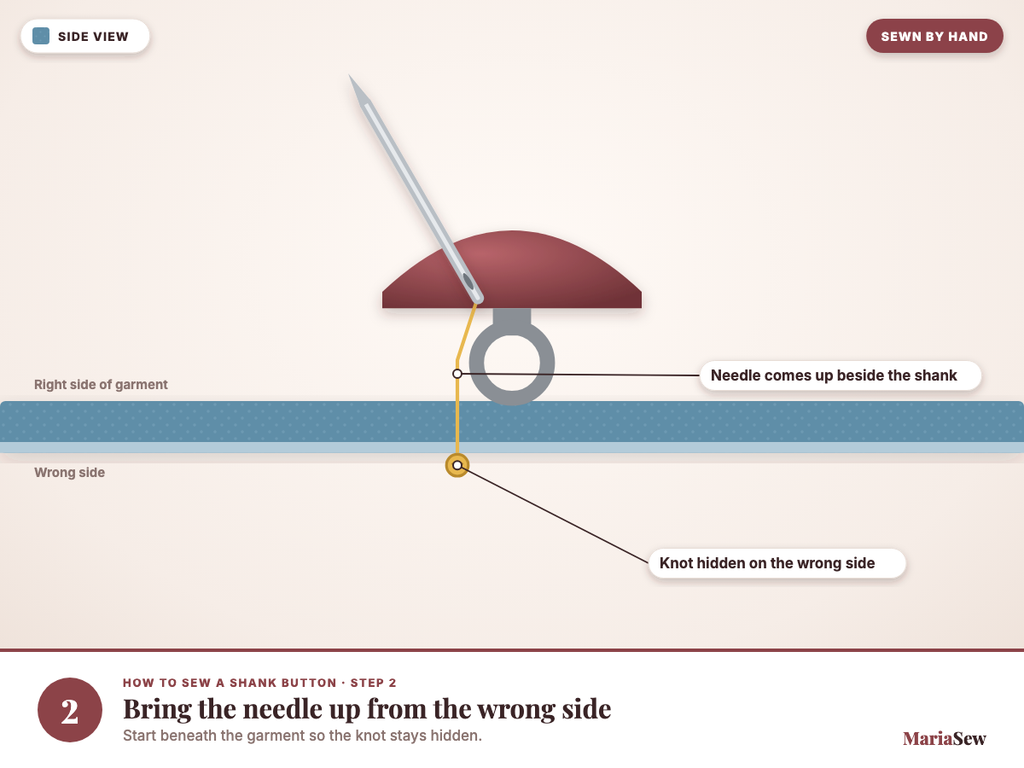
Start beneath the garment so the knot remains hidden.
Step 3: Pass Through the Built-In Shank
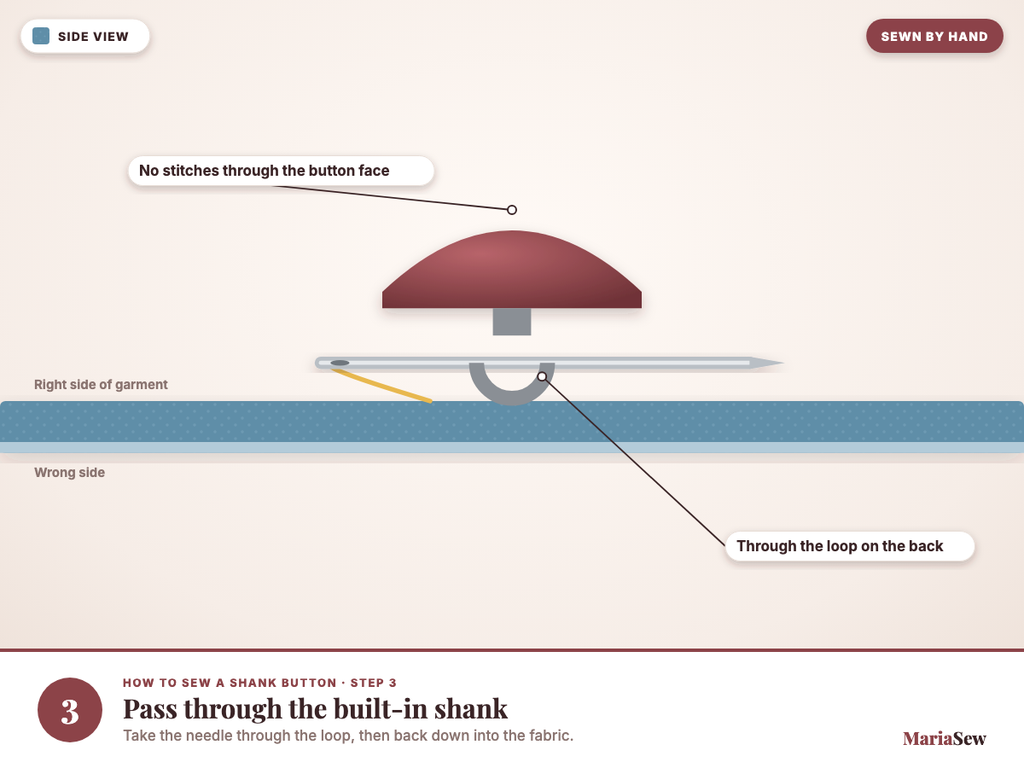
Take the needle through the loop on the back of the button and back into the fabric.
Step 4: Repeat the Attachment
Make several consistent passes through the shank and fabric until the button sits securely.
Step 5: Finish Underneath
Knot the thread close to the stitch base on the wrong side and trim the tail.
On a heavy coat, I check the fabric around the attachment point carefully because the button can carry substantial strain. If the fabric is weakened, reinforce the area first rather than relying on more thread.
How to Make a Thread Shank on a Flat Button
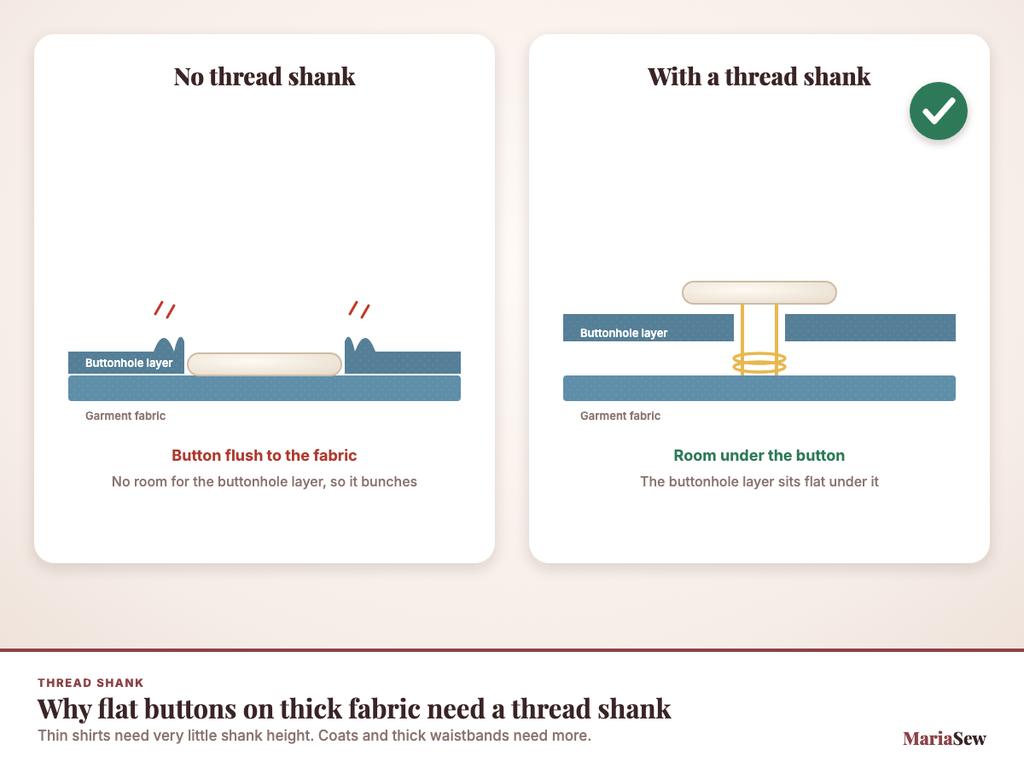
A thread shank is the small wrapped stem of thread between a flat button and the garment. It creates clearance so the fabric layer can sit between the button and the garment when the closure is fastened.
I use a small spacer, usually a pin or toothpick, across the top of the button while stitching. After the main passes are complete, I remove the spacer, bring the needle up under the button, and wrap the thread around the vertical stitch bundle two or three times before finishing on the wrong side.
Thin shirts need very little shank height. Coats, cardigans, and thick waistbands need more. The correct height is the amount that lets the button fasten smoothly without hanging loosely.
Can You Sew a Button Without Showing Thread on the Back?
Sometimes. On a lined waistband, cuff, or multi-layer area, I can catch only the outer fabric layer instead of passing completely through every layer. That hides the stitching from the inside surface.
This is an advanced detail rather than a requirement. If the fabric is thin or I cannot reliably catch a stable layer, I would rather make a neat visible stitch on the wrong side than create a weak attachment by taking tiny, insecure bites.
Can You Sew a Button on With a Sewing Machine?
Yes, many full-size sewing machines can attach flat two-hole or four-hole buttons with a button-sewing foot or compatible presser foot. The feed dogs are lowered or covered so the fabric does not advance, and the machine uses a zigzag width that matches the distance between the button holes.
Before pressing the foot controller, always turn the handwheel manually to confirm that the needle clears both holes. Shank buttons are normally easier to attach by hand, and a machine-sewn flat button may still need thread tails secured on the wrong side depending on the method and machine.
If you are new to machine sewing, review Sewing Machine Parts Explained and How to Thread a Sewing Machine before using a button-sewing foot.
If you are buying a machine mainly for mending and simple repairs, MariaSew’s Best Sewing Machines for Beginners and Best Sewing Machines Under $100 can help narrow the options.
Tips for a Neat, Durable Button Repair
A neat repair comes from controlling the small details before adding more stitches. More thread is not automatically stronger if the button is crooked, the fabric is puckered, or the knot is sitting on damaged cloth.
- Match the existing stitch pattern. On four-hole buttons, copy the parallel or crossed pattern used elsewhere on the garment.
- Keep passes consistent. Aim for similar tension and a similar number of passes through each hole pair.
- Do not overtighten. The fabric should remain flat and the button should have enough movement to enter the buttonhole.
- Use a spacer on thicker garments. A pin or toothpick makes it easier to create consistent clearance before wrapping the thread shank.
- Reinforce damaged fabric first. A strong button sewn onto a weak, torn area will simply pull through again.
- Test before trimming too close. Fasten the button once, then make sure the knot is secure before trimming the final tail.
For another practical clothing-repair skill, continue with MariaSew’s How to Sew a Hem guide.
Troubleshooting Common Button-Sewing Problems
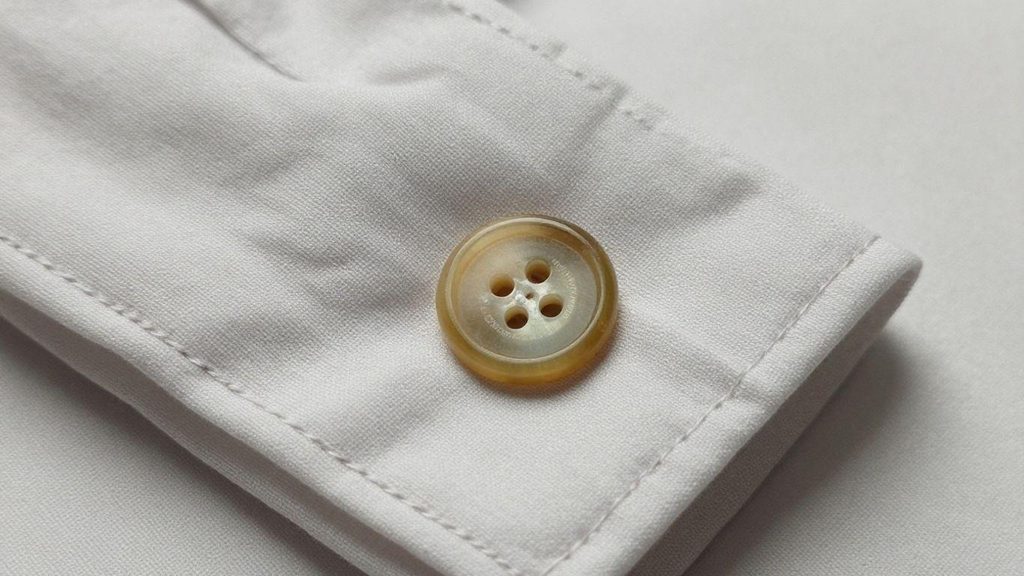
Most button repairs fail in predictable ways. I diagnose the symptom first instead of adding more stitches and hoping the problem disappears.
The Button Sits Crooked
Stop before adding more passes. Remove the newest stitches, realign the button with the buttonhole and nearby buttons, then rebuild the attachment evenly.
The Fabric Puckers Around the Button
The thread is probably too tight, or the flat button has too little clearance. Loosen the attachment and create a small thread shank. The same tension principle applies on a machine; see MariaSew’s sewing machine tension guide if puckering shows up in machine stitching too.
The Button Feels Loose After Only a Few Wears
The final knot may be weak, the number of passes may be too low for the garment, or the fabric around the attachment point may be damaged.
The Button Will Not Pass Through the Buttonhole
Check that the replacement button is the correct size and that a flat button has enough shank height for the fabric thickness.
The Needle Is Hard to Push Through
Use a suitable hand needle and thimble, and inspect whether you are trying to pierce a thick seam, interfacing, or multiple dense layers unnecessarily. If the same resistance happens on a machine instead, that’s usually a setup issue, not a fabric one, see MariaSew’s guide to why your sewing machine keeps jamming.
The Thread Keeps Tangling
Shorten the thread, let the needle hang occasionally to untwist the strand, and avoid pulling each pass in a different direction.
Common Mistakes to Avoid When Sewing on a Button
Most mistakes happen before the final knot. Placement, button type, fabric thickness, and thread tension determine whether the repair looks natural and survives repeated fastening.
- Sewing over old loose thread. Remove the previous thread so the new button sits correctly and the original stitch marks remain visible.
- Using the wrong replacement size. A button that is too large or too small may not pass through the existing buttonhole correctly.
- Pulling a flat button flush to thick fabric. Without a thread shank, the buttonhole has nowhere to sit and the closure will strain.
- Treating a shank button like a sew-through button. Use the built-in loop on the back instead of trying to stitch through the button face.
- Ignoring the stitch pattern on four-hole buttons. A mismatched X or parallel pattern can make one repaired button stand out from the rest.
- Using damaged fabric as the anchor. If the original button ripped the cloth, reinforce the area before reattaching it.
- Using an excessively long thread. Long strands twist and knot more easily, which makes even tension harder to maintain.
- Forcing a thick needle through dense fabric. Switch to an appropriate needle and thimble rather than bending the needle or damaging the cloth.
- Skipping the fastening test. A button can look straight but still sit too tight or too loose when pushed through the buttonhole.
A good repair should look ordinary. If the button draws attention because it tilts, pulls the fabric, or uses a visibly different stitch pattern, fix the cause instead of hiding it with extra thread.
Final Verdict: The Easiest Way to Sew a Button by Hand
The easiest reliable method is to match the original button position, use a suitable needle and strong thread, build even passes through the button, and leave enough clearance for the garment to fasten without strain. Two-hole and four-hole buttons may need a thread shank; shank buttons already have their own loop.
I would rather make a few neat, controlled passes and test the closure than crowd the button with thread. Once you understand placement, tension, and shank height, sewing on a button becomes a quick repair you can use for shirts, coats, trousers, skirts, dresses, and everyday mending.
If this is one of your first repairs, continue with How to Learn Sewing for Beginners or explore MariaSew’s best handheld sewing machines for quick mending when you want a portable tool for small seams and hems.
Frequently Asked Questions
How long does it take to sew a button by hand?
A simple button repair usually takes only a few minutes once the old thread is removed and the placement is clear. A first repair, thick coat button, or damaged fabric can take longer.
Should I use one strand or two strands of thread?
Both methods work. A single strand offers more control on delicate fabric, while a doubled strand adds thickness and lets you build a secure attachment with fewer passes.
What thread is best for sewing buttons?
A good-quality all-purpose polyester thread is a practical choice for most everyday clothing because it is strong and durable. Match the color to the garment unless the original design intentionally uses contrast.
How many times should I stitch through a button?
There is no universal number. Make enough even passes that the button feels secure without creating a bulky knot of thread. Thread thickness, button size, and garment stress all affect the amount needed.
How tight should a sewn-on button be?
Secure enough that it does not wobble excessively, but not so tight that it puckers the fabric or prevents the buttonhole from sitting under the button.
Do I need a thread shank on every button?
No. A flat sew-through button may need a small thread shank when the garment is thick or the buttonhole needs clearance. A shank button already has a built-in shank.
Can I sew a four-hole button in an X pattern?
Yes. A crossed X and two parallel bars can both be secure. Match the pattern used on the other buttons whenever possible.
How do I sew a button back in the exact same place?
Use the original needle holes if they are visible. If not, align the replacement with nearby buttons and the center of the existing buttonhole before stitching.
What if the fabric ripped when the button came off?
Repair or reinforce the weak area before reattaching the button. Sewing directly into frayed or torn fabric can cause the button to pull out again.
Can I sew buttons on with a sewing machine?
Many machines can attach flat buttons with a button-sewing foot and the feed dogs lowered or covered. Check the machine manual and hand-turn the needle first to verify the zigzag width matches the button holes.
What is the difference between a shank button and a thread shank?
A shank button has a physical loop built into the back. A thread shank is created under a flat sew-through button by wrapping thread around the stitches between the button and fabric.
How do I keep the knot from coming undone?
Finish on the wrong side with one or two small knots close to the stitch base, pull them snug, and trim the thread without cutting into the knot.