How to Use a Twin Needle on a Sewing Machine: Complete Guide 2026
Using a twin needle on a sewing machine is one of the easiest ways to create clean, professional-looking parallel stitches at home. A twin needle lets a regular sewing machine sew two straight rows on the right side of the fabric while the bobbin thread forms a flexible zigzag on the underside.
This makes it especially useful for T-shirt hems, knit garments, decorative topstitching, pintucks, and neatly finished edges. In this beginner-friendly guide, you will learn how to choose the right twin needle, thread the machine safely, adjust tension, prevent tunneling, and troubleshoot skipped stitches before they ruin your project.
Key Takeaways
- A twin needle creates two parallel rows of stitching on the top side and a zigzag-like bobbin thread on the underside.
- Most zigzag-capable domestic sewing machines can use a twin needle, but you must confirm needle plate, presser foot, and stitch width clearance first.
- For the safest setup, use a centered straight stitch and turn the handwheel slowly before pressing the foot pedal.
- Use a stretch or ballpoint twin needle for knits and a universal, jeans, or sharp twin needle for suitable woven fabrics.
- Lowering upper tension, adding stabilizer, and slightly lengthening the stitch often fixes tunneling better than changing bobbin tension.
- Twin needle hemming can mimic a coverstitch look, but it is not identical to a true coverstitch seam and can still break if the stitch is too tight.
Quick Answer: What Does a Twin Needle Do?
A twin needle (double needle) is a needle with two needles on one shank. It is designed to fit into most sewing machines in the same way as a normal needle, but requires the use of two top threads and one bobbin thread. The sewing machine creates two straight rows of stitching on the right side of the fabric and one zigzag row of stitching on the wrong side of the fabric as it is sewn.
This stitch is used for the hems of T-shirts as it resembles ready-to-wear coverstitching and provides a certain degree of flexibility to the seam. It can also be used to create decorative topstitching, pintucks, edge accents, and evenly spaced parallel lines. The secret is to select the right size of twin needle, the right presser foot, the right needle plate, and sew slow enough so that the needle doesn’t bend or hit the machine.
What Is a Twin Needle and Why Use One?
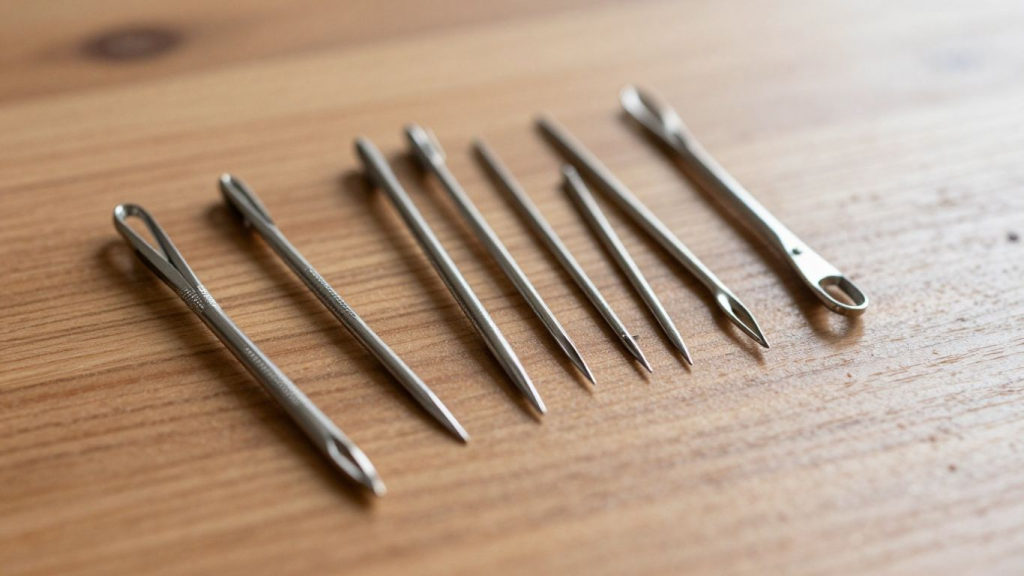
A twin needle is a sewing machine needle unit that has two points. The top of the needle is a single shank, making it easy to install in the machine like a regular needle. The bottom part is divided into two separate needles, and two top threads can be sewn side by side. One bobbin thread is used to form a zigzag connection between both lines under the top thread.
The most significant benefit is accuracy. It can be time-consuming, uneven, and hard to keep parallel to sew two separate rows by hand. A twin needle produces even spacing without having to adjust it; it is ideal for making hems and decorative lines cleaner. This is particularly useful if you want something to look more professional, but don’t have a coverstitch machine.
A twin needle is more than just for knitting hems. It can be used for topstitching on woven fabric, decorative color contrast, and to make pin tucks with the right setup and finishing edges on home decor projects. The primary constraint is clearance; the needle spacing has to pass through the presser foot and needle plate opening without striking anything.
Understanding the role of the needle, bobbin, and thread path is much easier when you’re familiar with the basic sewing machine parts and how they work together.
Best Uses for a Twin Needle
- T-shirt hems, sleeve hems, and knit garment edges.
- Decorative parallel topstitching on bags, crafts, quilting, and home decor.
- Two-color stitching effects when using different top-thread colors.
- Neat edge stitching on lightweight woven garments.
- Pintucks when combined with the correct fabric, tension, and foot setup.
For beginners, the best first project is a simple knit hem on scrap fabric. This lets you see how the two top threads and single bobbin thread interact before trying the technique on a finished garment. Once you understand the stitch formation, the same setup becomes easier to apply to decorative projects.
If you’re still developing your sewing skills, our guide on how to learn sewing covers the essential techniques every beginner should practice.
Before You Start: Check Machine Compatibility
Before putting in a twin needle, make sure that your sewing machine is capable of doing so. Many modern domestic machines can use a twin needle, especially if they have a zigzag needle plate and a wide presser foot opening. But some machines, feet, or stitch plates are not safe to use with a twin needle, even if the needle is in the holder.
The most crucial compatibility test is clearance. Put in the twin needle, choose the centered straight stitch, lower the presser foot, and turn the handwheel slowly by hand. Stop as soon as either needle approaches the presser foot or the needle plate, and use a narrower twin needle or a different foot. Do not test clearance before operating the motor.
If you’re shopping for your first machine or planning an upgrade, check out our recommendations for the best sewing machines for beginners to find models that support common sewing accessories like twin needles.
- Use a zigzag foot or another foot with a wide opening.
- Do not use a straight-stitch foot or straight-stitch needle plate with a twin needle.
- Keep the stitch centered unless your manual clearly allows another needle position.
- Set stitch width to zero for a basic straight stitch unless using an approved twin-needle mode.
- Turn the handwheel through at least one full stitch cycle before sewing with power.
- Check your machine manual for maximum twin needle width and threading instructions.
Choosing the Right Twin Needle
Twin needles have two numbers. The first number is typically the distance between the two needle points in millimeters, and the second number is the size of the needle. A 4.0/80 twin needle is a needle with 4.0 mm spacing and 80 needles. The wider the spacing, the more machine clearance is needed, and the bolder the look.
Spacing is not the only important thing; needle point style is also important. Many woven fabrics can be woven with universal twin needles. Stretch or ballpoint needles work well for jersey, rib knit, and spandex blends, as they minimize skipped stitches and small holes in knit loops. For heavier woven fabrics, denim or jeans twin needles are more durable, but you’ll still need adequate machine power and clearance.
Simple Twin Needle Selection Steps
If you are unsure, start with a moderate twin needle such as 2.5/75, 2.5/80, or 3.0/80 depending on the fabric. These sizes are easier to fit through many machine openings and are less likely to cause tunneling than very wide needles. Wider 4.0 mm spacing can look excellent on stable fabric, but it needs better support and more careful tension control.
The comparison below is a practical starting guide, not a universal rule. Always follow your machine manual and test with your exact fabric because machine clearance, foot style, thread weight, and knit recovery can change the result.
Twin Needle Size Comparison
| Twin Needle Type | Best Fabric Use | Common Starting Size | Beginner Tip |
|---|---|---|---|
| Fine twin needle | Lightweight woven fabric, fine hems, delicate topstitching | 1.6/70 or 2.0/75 | Use stabilizer or tissue if the fabric sinks into the needle plate. |
| Stretch twin needle | Jersey, rib knit, spandex blends, T-shirt hems | 2.5/75 or 4.0/75 | Best choice for skipped stitches on knit fabric. |
| Universal twin needle | Stable woven fabrics and general topstitching | 3.0/80 | Good all-purpose option for practice samples. |
| Jeans/denim twin needle | Denim, canvas, heavier woven fabric | 4.0/90 | Sew slowly and do not force thick seams. |
| Pintuck twin needle | Decorative raised tucks on lightweight fabric | 1.6/70 or 2.0/80 | Often works best with a pintuck foot and adjusted tension. |
Tools and Supplies You Need
This is a twin needle setup that does not need any expensive specialty equipment, but if you use the right basic supplies, then you will have very few problems. The purpose of this is to maintain a steady flow of both top threads, to hold the fabric up, and to minimise stitch distortion as the single bobbin thread joins the two rows below.
If you want the most balanced stitch, use two spools of the same type of thread and the same weight. If you don’t have two identical spools, you can wind a second bobbin and use the second bobbin as the second top thread if your machine has that option. Two colors can be used for decorative work, but test first – different weights of thread will alter the tension balance.
Beginners can simplify the process by keeping all their essential accessories together in one of these sewing kits for beginners before starting their first project.
- Correct twin needle for your fabric and machine clearance.
- Two top threads or one spool plus a wound bobbin used as the second top thread.
- One regular bobbin threaded as usual.
- Zigzag presser foot or another wide-opening foot approved by your machine manual.
- Scrap fabric from the same project for test stitching.
- Wash-away stabilizer, lightweight tear-away stabilizer, or hem tape for delicate knits and wavy hems.
- Small scissors, seam ripper, ruler, and fabric marker for clean setup and finishing.
How to Prepare Your Sewing Machine for a Twin Needle
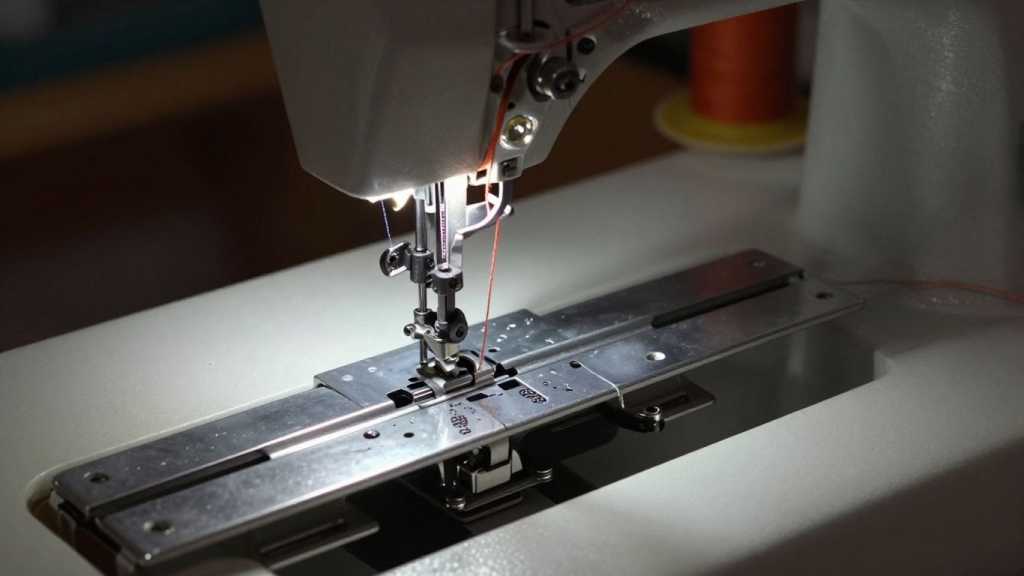
It is more important to set up the machine properly than to sew quickly. The most common twin needle issues occur before the first stitch: presser foot issue, incorrect needle plate, incorrect threading, poor spool feeding, or stitch width that allows the needle to hit metal. A proper setup will safeguard your machine and enhance stitch quality.
The best way to do this is to make one change at a time and test slowly. Put the needle in place, attach the appropriate presser foot, thread the machine with two top threads, choose the correct stitch, and test with the handwheel before operating the foot pedal. This can seem slow initially, but it will stop broken needles and broken needle plates.
Step 1: Install the Twin Needle Correctly
Shut off the machine before replacing the needle. Unclamp the needle, take the old needle out, and put the twin needle in with the flat side of the shank in the right direction for your machine, which is generally toward the back of most domestic machines. When tightening the clamp, push the shank completely up before clamping it.
Once installed, check visually to see if both needle points are straight and even. If the twin needle is bent, it should be thrown away. Two needles are attached to a single shank, and any bend or twist will cause one needle point to strike the presser foot, miss a stitch, or break during sewing.
Step 2: Attach a Compatible Presser Foot and Needle Plate
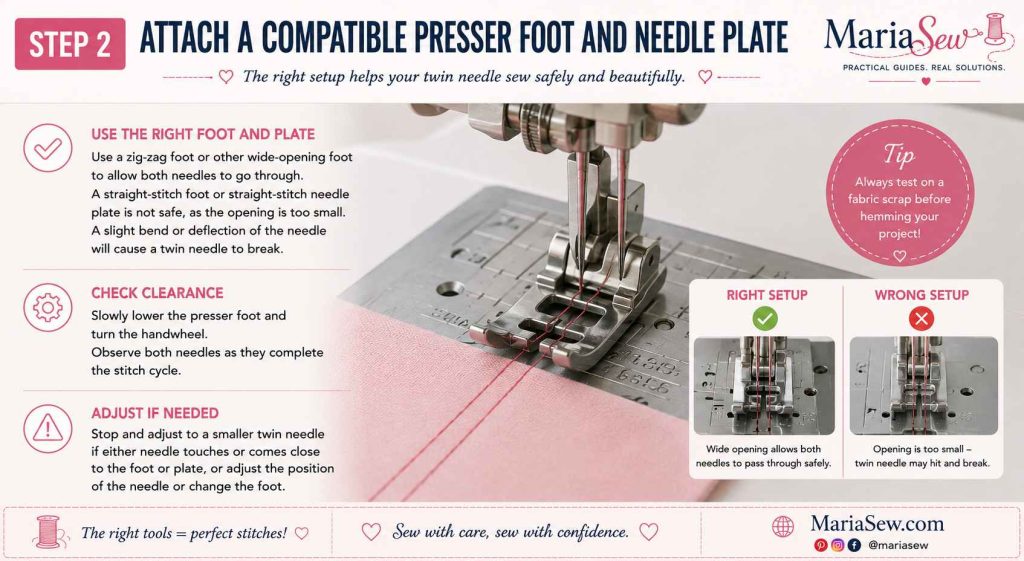
Use a zig-zag foot or other wide-opening foot to allow both needles to go through. A straight-stitch foot or straight-stitch needle plate is not safe, as the opening is too small. A slight bend or deflection of the needle will cause a twin needle to break.
Slowly lower the presser foot and turn the handwheel. Observe both needles as they complete the stitch cycle. Stop and adjust to a smaller twin needle if either needle touches or comes close to the foot or plate, or adjust the position of the needle or change the foot.
Step 3: Set the Stitch Before You Thread and Sew
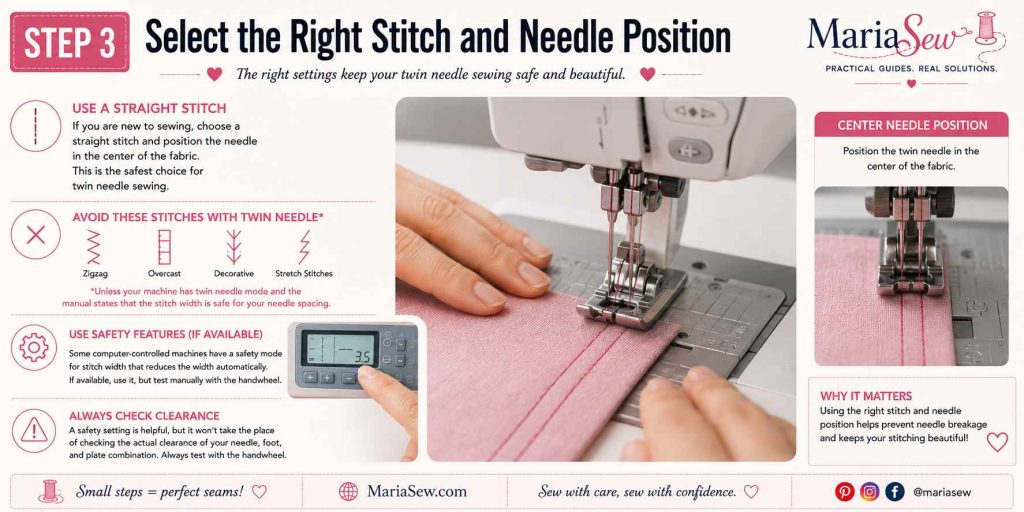
If you are new to sewing, choose a straight stitch and position the needle in the center of the fabric. The safest choice for twin needle sewing. Do not use zigzag, overcast, decorative, or stretch stitches unless your machine has a twin needle mode and the manual states that the stitch width is safe for the needle spacing used.
Some computer-controlled machines have a safety mode for stitch width that reduces the width of the stitch automatically. If available, use it, but test manually with the handwheel. A safety setting is helpful, but it won’t take the place of checking the actual clearance of your needle, foot, and plate combination.
Threading a Sewing Machine with Two Top Threads
Threading with a twin needle is like normal threading except that you have two top threads running smoothly to two different needle eyes. Most machines have a second spool pin or a second spool holder for the second thread. If you don’t have a second pin on your machine, consult your manual for an approved accessory or alternate setup.
Lift the presser foot before putting threads in place so that the tension discs open to allow the threads to sit properly. In many machines, both threads are threaded in the same direction up the machine, and each thread passes through a separate needle eye from front to back. Some manuals suggest adding one thread to each side of the needle bar thread guide; if instructions are available, follow your machine’s instructions.
If you’re unsure about the standard threading path before adding a second thread, review our step-by-step guide on how to thread a sewing machine.
Twin Needle Threading Steps
Thread tangling is common when both spools unwind in the same direction or when one thread crosses over the other near the tension discs. If the threads twist, try separating spool positions, using thread nets, or turning one spool so it feeds more smoothly. The goal is even, low-friction thread flow.
The bobbin is threaded normally. You do not use two bobbins for standard twin needle sewing. One bobbin thread interlocks with both top threads, which is what creates the zigzag shape on the underside of the fabric.
Best Machine Settings for Twin Needle Sewing
The settings of the machine vary depending on the type of fabric, needle size, thread weight, and the desired appearance of the work. Begin with a simple centered straight stitch, moderate stitch length, normal or slightly less top tension, and slow speed. After testing on scraps, then adjust one setting at a time.
An often made fact error is raising the upper tension without reason. A higher tension can result in an attractive first impression, but can lead to tunneling, or a ridge between the rows of stitches. If tunneling occurs, lower the upper tension slowly, lengthen the stitch slightly, or apply stabilizer before adjusting the bobbin tension.
Recommended Starting Points
- Stitch: centered straight stitch.
- Stitch length: 2.5 to 3.5 mm for many hems and topstitching projects.
- Stitch width: 0 for straight stitch, unless using an approved twin-needle mode.
- Top tension: start at normal, then reduce slightly if tunneling appears.
- Speed: slow to medium; avoid fast sewing on curves or thick seams.
- Presser foot pressure: reduce slightly if the fabric stretches or waves under the foot.
- Stabilizer: use wash-away tape, knit stay tape, or lightweight stabilizer for delicate or stretchy hems.
These settings are safe starting points, not universal rules. A stable cotton jersey may sew beautifully with normal tension and a 3.0 mm stitch length, while a thin rayon knit may need stabilizer and reduced pressure. Always test the same number of fabric layers used in the final hem or seam.
Fabric and Setting Comparison
| Maintenance Step | How Often | Why It Helps |
|---|---|---|
| Clean the bread pan | After every use | Prevents stuck dough and residue buildup |
| Wash the kneading paddle | After every use | Keeps mixing smooth and avoids dried dough |
| Wipe the inside chamber | As needed | Removes crumbs and flour dust |
| Check the paddle shaft | Weekly if used often | Helps prevent sticking or uneven kneading |
| Wipe the exterior | As needed | Keeps the machine clean on the counter |
| Store with lid open briefly | After cleaning | Helps moisture dry out |
| Avoid metal tools in pan | Always | Protects the non-stick coating |
Step-by-Step Guide: How to Sew with a Twin Needle
After the machine is set up, twin needle sewing is easy. The main skill is to control the fabric without pulling. The two needles are wider than one needle, so they can bend if you push the fabric, drag heavy material, or sew too fast across uneven seams.
Use a medium-weight scrap for your first test and draw a straight guideline. If you intend to sew hems, fold a hem, as a single-layer test will not have the same tension behavior as a folded edge. Sew slowly, look at the underside; if knit fabric, stretch it gently, and make adjustments before going to the actual project.
Step 1: Mark and Press Your Stitching Line
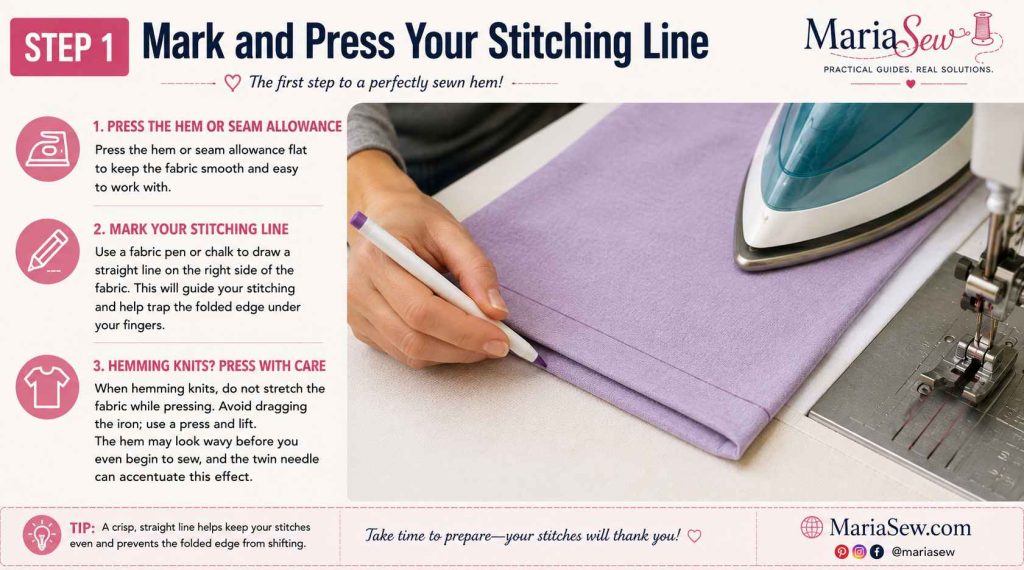
First, press the hem or seam allowance to keep fabric flat. If necessary, draw a line for the right side of the hem. This not only ensures straight parallel rows, but also helps you to trap the folded edge under your fingers.
When hemming knits, do not stretch the fabric while pressing. Avoid dragging the iron; use a press and lift. The hem may look wavy before you even begin to sew, and the twin needle can accentuate this effect.
Step 2: Start with a Test Sample
Stitch a sample with the same fabric, fold depth, needle, thread, stitch length, and stabilizer that you will use for your sew. Examine the top side for even parallel stitches, and the wrong side for a smooth zig-zag from the bobbin thread. The sample should be flat and not have a ridge between the rows.
If the sample tunnels, decrease the upper tension somewhat or increase the stabilizer. When the stitches skip, use a new stretch or ballpoint twin needle for knits. Stop immediately and change to a narrower needle or safer foot setup if the needle hits the plate or foot.
Step 3: Sew Slowly and Let the Feed Dogs Work
Feed the fabric gently and allow the feed dogs to move the fabric forward. It can bend the needles and cause a stitch to be out of shape if it is pulled from behind the foot. If the fabric is heavy, place it on the table so it won’t hang down and rub the needles.
Take your time and don’t make your curves too sharp when sewing curves. Twin needle stitching is not best suited to sharp turns, since both needles must move parallel to each other. Only stop with the needles down if you can reposition the fabric safely without twisting the needle points on your machine.
Step 4: Finish the Ends Securely
Twin needle backstitching, it can cause thread buildup and may tangle on some machines. To obtain the cleanest finish, leave thread tails, pull the top threads to the wrong side, and tie with the bobbin thread. If your machine has a lock stitch, you can also use it with twin needle sewing, depending on the manual.
Once the threads are tied, cut the ends neatly and iron the stitching on the back. Remove or rinse wash-away stabilizer or tape as directed by the product. The end rows should be even both on top and underfoot.
How to Hem Knit Fabric with a Twin Needle
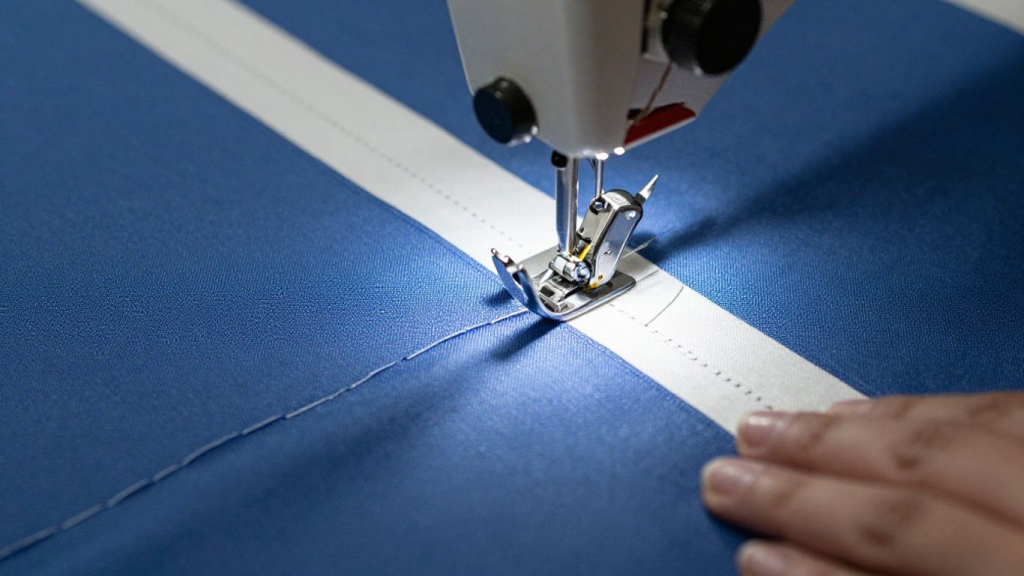
Twin needles are particularly used for knitting hems without a cover stitch machine. The two visible rows are clean on the right side, and the bobbin zigzag row below stretches the hem. This is great for T-shirts, sleeves, leggings, baby clothes, and casual knit dresses.
The most difficult part is either tunneling or wavy hems. The fabric may stretch under the presser foot, and the two upper threads may draw the fabric up between the rows of stitches to form a ridge. The problem is typically solved by using stabilizer, lower presser foot pressure, a moderate stitch length, and a slightly lower top tension.
- Press the hem allowance before stitching.
- Use a stretch twin needle for elastic knits and a ballpoint twin needle for stable cotton jersey.
- Use wash-away hem tape or lightweight knit stabilizer if the hem curls or tunnels.
- Sew from the right side so the parallel rows show on top.
- Keep the raw folded edge just inside the stitching line so the hem is secured underneath.
- Trim excess fabric carefully on the wrong side if needed, without cutting the bobbin thread.
How to Use a Twin Needle for Decorative Topstitching
Perfectly spaced decorative topstitching is achieved with a twin needle for woven fabric, bags, quilting, and home decor. It can be used around pockets, collars, bag straps, edges of cushions, quilted panels, and around contrast stitching. When a project requires more interest, two colors of thread can be used to make a custom look.
Decorative topstitching is best done on stable, well-pressed fabrics. Work in a longer stitch for heavier fabrics and work slowly over bulky seams. If topstitching thread is being used, be sure the twin needle eye is large enough, as very heavy thread may shred or break if the needle is too small.
- Use a guideline or seam guide to keep the rows straight.
- Match the needle size to the thread and fabric weight.
- Use stabilizer behind lightweight woven fabric if puckering appears.
- Avoid thick seam intersections unless the machine can handle them smoothly.
- Test color contrast on scraps before sewing the visible project area.
Troubleshooting Twin Needle Problems
The best way to troubleshoot twin needles is to isolate each symptom. Many problems resemble tension problems, but they are actually caused by needle type, thread path, machine clearance, presser foot pressure, and stabilizer. Always rethread with the presser foot up and always test on scraps before making multiple changes.
The most frequent problem is tunneling, which occurs when the fabric goes up between the two rows of stitches. This typically indicates that the top threads are tight or that the fabric requires additional support. When it comes to changing bobbin tension, the first fixes are to reduce the upper tension, increase the length of the stitch, and add stabilizer.
Skipped stitches are also frequently found on knits. A new stretch twin needle will usually resolve the issue as it will help the hook to catch the thread loop correctly. If the stitches are missed, use a narrower spacing, slower speed, more fabric support, and a different thread.
Twin Needle Troubleshooting
Common Mistakes to Avoid
Most twin needle mistakes are preventable with a simple safety check and a test sample. Beginners often rush directly from installing the needle to sewing the garment, but twin needle stitching needs a little more setup than regular straight stitching. Taking five minutes to test can save a finished project.
- Using a zigzag or decorative stitch without checking whether the twin needle can clear the foot and plate.
- Using a straight-stitch foot or straight-stitch needle plate with a twin needle.
- Using the automatic needle threader even though many machines do not support it for twin needles.
- Choosing a wide twin needle before confirming the machine maximum width.
- Increasing upper tension to fix loose-looking stitches, then creating tunneling.
- Skipping stabilizer on thin knits, slippery fabric, or hems that curl.
- Pulling the fabric from behind the foot, which can bend or break needles.
- Backstitching aggressively and creating thread knots or bulk.
- Assuming a twin needle is identical to a coverstitch machine.
Twin Needle vs Coverstitch: What Is the Difference?
A twin needle can imitate the look of a coverstitch on the right side of the fabric, but the stitch structure is different. A coverstitch machine uses multiple needles and loopers to create a very stretchy, professional hem. A regular sewing machine with a twin needle uses two top threads and one bobbin thread, so the wrong side looks like a zigzag rather than a coverstitch looper formation.
This difference matters most on very stretchy garments. A twin needle hem can work beautifully on T-shirts and casual knits, but it may break if the garment needs extreme stretch and the tension is too tight. For activewear, swimwear, and high-stretch leggings, test aggressively or use a serger/coverstitch setup if available.
If you’re wondering how coverstitching compares with serging, our detailed guide on serger vs sewing machine explains the differences and when each machine is the better choice.
Twin Needle and Coverstitch Comparison
| Feature | Twin Needle on Sewing Machine | Coverstitch Machine |
|---|---|---|
| Top appearance | Two parallel rows that look similar to ready-to-wear hems | Two or three parallel rows, depending on setup |
| Wrong side | Single bobbin thread creates a zigzag connection | Looper threads create a professional coverstitch structure |
| Stretch level | Moderate stretch when tension is balanced | Higher stretch and durability for knit hems |
| Cost and accessibility | Low-cost needle accessory for many domestic machines | Separate specialty machine with higher cost |
| Best for | Beginner knit hems, decorative topstitching, casual garments | Frequent knit garment sewing, activewear, production hems |
Final Pre-Sewing Checklist
Before sewing on the final garment, run through this short checklist. Twin needle sewing is easy once the setup is correct, but a missed clearance check can break needles or damage the machine. These points are the quickest way to avoid preventable problems.
- Correct twin needle type and size selected for fabric.
- Zigzag foot or approved wide-opening presser foot attached.
- Needle plate opening is wide enough for both needles.
- Centered straight stitch selected and stitch width set safely.
- Both top threads feed smoothly without twisting.
- Automatic needle threader avoided unless the manual approves it.
- Bobbin inserted normally, and thread tails pulled to the back.
- Handwheel test completed with no metal contact.
- Scrap test sewn, pressed, and stretched if using knit fabric.
- Tension, stitch length, and stabilizer adjusted before sewing the final project.
If you frequently sew garments and need a more comfortable workspace, adding a sewing machine extension table can provide better fabric support and improve stitch accuracy.
Conclusion
A simple modification to a sewing machine that can take your home-sewn clothing and craft projects to a new level of professionalism is the ability to sew with a twin needle. When the needle size is right, the stitch is centered, the presser foot clearance is adequate, and the tension is balanced, you can sew parallel rows for hems, topstitching, and decorative stitching in a clean manner.
Testing is best done before the final product. Select the proper needle and thread through the fabric, support the fabric, and repair any tunneling or skipped stitches before proceeding. After it’s become second nature, a twin needle is one of the most versatile, inexpensive tools for creating professional sewing finishes at home.
Frequently Asked Questions
Can I use a twin needle on any sewing machine?
Not every machine can use every twin needle. Many modern zigzag-capable domestic machines can use twin needles, but you must check the manual, use a compatible presser foot and needle plate, and confirm clearance with the handwheel before sewing.
Do I need a special presser foot for a twin needle?
Most projects use a zigzag foot or another wide-opening foot. Do not use a straight-stitch foot because the opening is usually too narrow for two needles.
What stitch should I use with a twin needle?
For beginners, use a centered straight stitch. Decorative or zigzag stitches should only be used if your machine manual approves twin needle use for that stitch and the width is safely limited.
Why is my twin needle stitching tunneling?
Tunneling usually happens when the upper tension is too tight, or the fabric is not supported. Lower the upper tension slightly, use a longer stitch, and add wash-away stabilizer or hem tape.
Why am I getting skipped stitches with a twin needle?
Skipped stitches often come from the wrong needle type, a dull needle, unstable knit fabric, or poor threading. Use a fresh stretch or ballpoint twin needle for knits and rethread with the presser foot raised.
Can I use different thread colors in a twin needle?
Yes. Two different top-thread colors can create a decorative two-tone effect. Use threads of similar weight and quality, so one thread does not pull differently from the other.
Does a twin needle work on knit fabric?
Yes, a twin needle works well for many knit hems when you use a stretch or ballpoint twin needle, polyester thread, and a flexible tension setting. Always test the hem stretch before sewing the final garment.
Can I backstitch with a twin needle?
It is usually cleaner to pull the threads to the wrong side and tie them manually. Some machines allow lock stitches or gentle backstitching, but heavy backstitching can cause bulky knots or thread tangles.
Is a twin needle the same as a coverstitch?
No. A twin needle can mimic the look of coverstitching on the right side, but the underside uses one bobbin thread in a zigzag formation. A coverstitch machine creates a stronger, more professional knit hem structure.
What size twin needle should a beginner start with?
A moderate size such as 2.5/75, 2.5/80, or 3.0/80 is often easier to control than a very wide needle. Choose based on fabric type and machine clearance.