How to Use a Blind Hem Foot on a Sewing Machine: A Beginner’s Step-by-Step Guide
The first blind hem I ever sewed had stitches visible on the outside, just faintly, but enough to bother me every time I wore the trousers. It took me a few scrap tests to realize the fix wasn’t a machine problem at all, it was how little fabric I needed to actually catch. Twelve years later, blind hemming is one of the fastest, most satisfying skills I teach beginners, because the difference between “visible” and “invisible” usually comes down to one small adjustment, not a total redo.
This beginner-friendly guide explains how the foot works, how to fold fabric correctly, which stitch settings to use, and how to troubleshoot common problems like visible stitches, puckering, and uneven hems. Whether you’re hemming trousers, skirts, dresses, curtains, or home decor projects, the right setup helps you create a professional finish without hours of hand sewing.
Quick Answer: What Does a Blind Hem Foot Do?
A blind hem foot helps you sew a hem that is almost invisible from the right side of the fabric. The guide on the foot keeps the folded edge in the correct position while the blind hem stitch makes several straight stitches on the hem allowance, then one small zigzag stitch that catches the garment fabric. When the hem is opened and pressed, only tiny dots of thread should be visible on the outside.
This makes the blind hem foot especially useful for garments and home projects where you want a clean finish without obvious topstitching. It is faster than hand hemming, more consistent for long hems, and easier to repeat once you understand the fold and stitch-width setup.
What Is a Blind Hem Foot and Why Use It?
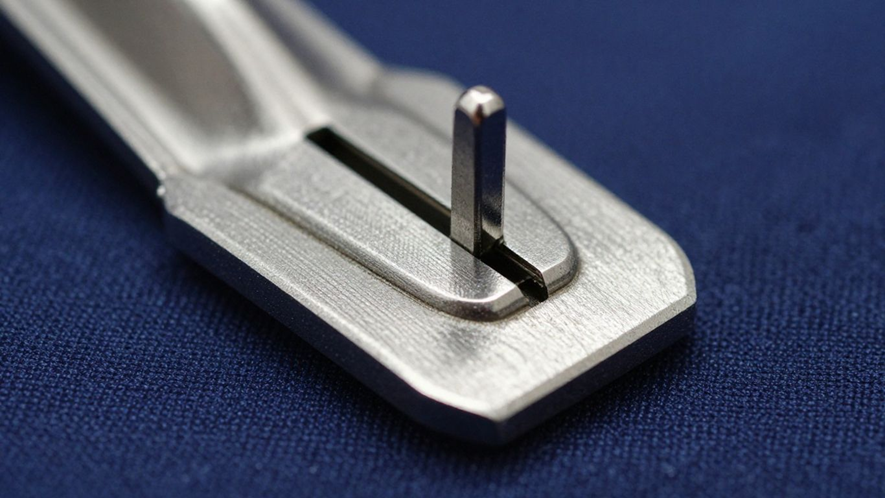
A blind hem foot is a sewing machine presser foot designed for creating invisible or nearly invisible hems. Its most recognizable feature is the center guide, sometimes made of metal and sometimes plastic, that sits against the folded edge of the fabric. This guide keeps the fabric from drifting so the needle catches the same small amount of fabric throughout the seam.
The foot is helpful because blind hemming is all about controlled accuracy. If the needle catches too much fabric, the stitches show clearly on the outside. If it catches too little, the hem may come loose after wearing or washing. The blind hem foot keeps the fold stable, which makes it easier for beginners to find the right balance.
You can use a blind hem foot for trousers, skirts, dresses, curtains, table linens, and some lightweight home decor projects. It is not always the best choice for extremely sheer chiffon, very bulky wool, or stretchy knits unless you test the stitch carefully first. For those fabrics, a hand blind hem, narrow hem, coverstitch, or stretch-friendly hem may look cleaner.
Benefits of Using a Blind Hem Foot
The biggest benefit is speed. A hand-sewn blind hem can look beautiful, but it takes time, especially on curtains or wide skirt hems. A blind hem foot lets you complete long hems more quickly while keeping the outside of the fabric neat and understated.
It also improves consistency. Because the guide runs along the fold, your stitches stay evenly spaced and close to the edge. This is useful for beginners who struggle to keep a straight line while also managing folded fabric layers. With practice, the foot can make hems look more polished and less homemade.
Before thinking about machine settings, focus on the practical benefits you want from the tool: hidden stitches, secure hems, less hand sewing, and smoother fabric feeding. These benefits only appear when the fabric is folded and pressed correctly, so preparation matters as much as the foot itself.
- Creates a nearly invisible finish on the right side of the fabric.
- Keeps the folded edge aligned with the foot guide.
- Saves time on long hems compared with hand sewing.
- Works well for trousers, skirts, dresses, and curtains.
- Helps beginners learn repeatable, professional-looking hemming technique.
| Benefit | Why It Matters | Best Use Case |
|---|---|---|
| Hidden finish | Only tiny catch stitches appear on the outside when adjusted correctly. | Dress pants, skirts, formal hems |
| Consistent alignment | The guide helps maintain an even distance from the fold. | Long hems and curtains |
| Faster workflow | Machine stitching replaces slow hand hemming for many projects. | Everyday alterations |
| Secure construction | The hem is stitched along the allowance and anchored into the garment. | Wearable garments and washable items |
Understanding the Parts of a Blind Hem Foot
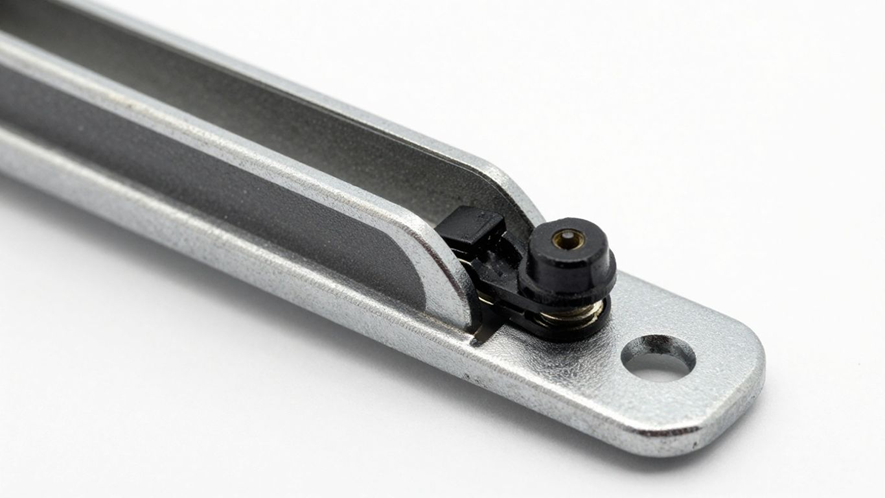
Most blind hem feet have three important areas: the attachment point, the guide blade, and the needle opening. The attachment point connects to your machine’s presser bar or snap-on ankle. The guide blade is the vertical fence that rides along the fabric fold. The needle opening gives the needle space to move as it makes the blind hem stitch.
Some blind hem feet are fixed, meaning the guide does not move. Others are adjustable and include a small screw that lets you shift the guide closer or farther from the needle. Adjustable feet are useful if you work with different fabric weights because a thick wool hem and a thin cotton hem may need slightly different alignment.
Before installing any presser foot, confirm that it matches your machine’s shank type. Many home sewing machines use low-shank snap-on feet, but not all machines are the same. A foot that does not fit correctly can cause skipped stitches, broken needles, or uneven feeding.
- Check whether your machine uses a low-shank, high-shank, slant-shank, or snap-on foot system.
- Look for the center guide or adjustable blade on the foot.
- Confirm the needle opening is wide enough for your blind hem stitch width.
- Attach the foot firmly before lowering the needle.
- Turn the handwheel manually before sewing to make sure the needle does not hit the foot.
| Foot Type | Best For | Beginner Note |
|---|---|---|
| Fixed guide blind hem foot | Basic hems on stable fabrics | Simple to use, but stitch width does most of the adjustment. |
| Adjustable blind hem foot | Different fabric weights and hem depths | More flexible because the guide can move left or right. |
| Universal low-shank blind hem foot | Many standard home machines | Confirm compatibility before buying or using. |
| Brand-specific blind hem foot | Machines with special presser-foot systems | Often fits more reliably than a generic option. |
Tools and Supplies You Need Before Hemming
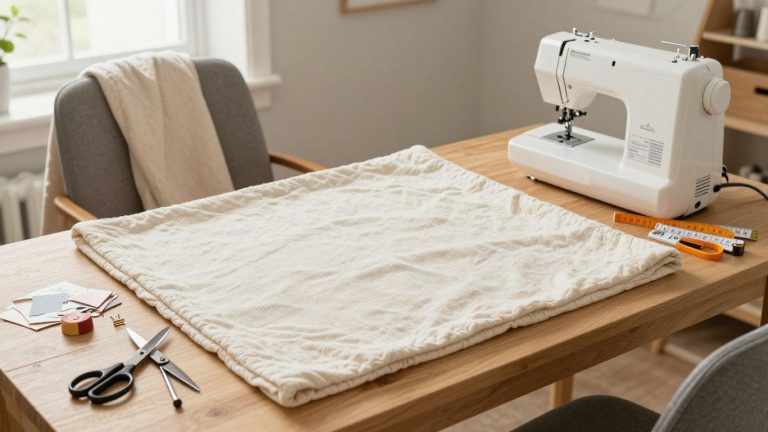
A blind hem foot is only one part of the setup. You also need a matching thread, a suitable needle, a seam gauge or measuring ruler, pins or clips, an iron, and a finished raw edge. These items help keep the fabric stable before it reaches the needle.
For most woven fabrics, a universal needle in the correct size works well. For tightly woven or delicate fabrics, a sharp or Microtex needle can create a cleaner stitch. And for knits, use a ballpoint or stretch needle and test carefully because a standard blind hem stitch may not stretch enough for high-stretch garments.
Thread color matters more in blind hemming than in many other seams. The goal is not to create decorative stitching; the goal is for the stitch to disappear. Use the closest color match available, and when choosing between two shades, test both on a scrap because thread can look different once stitched and pressed.
If you’re still building your sewing toolkit, our guide to the best sewing kits for beginners covers the essential tools every new sewer should have.
- Blind hem foot that fits your sewing machine.
- Matching all-purpose polyester thread or a finer thread for lightweight fabrics.
- Needle matched to the fabric weight and fabric type.
- Seam gauge, ruler, or measuring tape for a consistent hem allowance.
- Iron and pressing cloth, especially for delicate or heat-sensitive fabrics.
- Pins, clips, or hand basting to hold the fold securely.
- Scrap fabric from the same project for stitch testing.
| Fabric Type | Suggested Needle | Thread Tip |
|---|---|---|
| Light cotton or rayon | 70/10 or 80/12 universal or sharp | Use matching all-purpose or fine polyester thread. |
| Medium cotton, linen, or twill | 80/12 universal | Standard polyester thread usually works well. |
| Dress pants or suiting | 80/12 or 90/14 depending on thickness | Match thread closely and press with a cloth. |
| Curtains and home decor fabrics | 90/14 for heavier fabric | Use durable thread and test stitch width on scraps. |
| Knit fabric | Ballpoint or stretch needle | Use a stretch-friendly stitch only if the hem needs to stretch. |
How to Prepare Fabric for a Blind Hem
Good preparation is the secret to a clean blind hem. The machine cannot fix uneven measuring, a raw edge that is fraying, or a fold that was never pressed flat. Before you attach the blind hem foot, finish the raw edge with a zigzag stitch, overcast stitch, serger, or narrow fold depending on your fabric.
Next, measure the hem allowance accurately. For trousers, the allowance may be around one to two inches. For curtains, it may be deeper. Press the hem to the wrong side first, then fold the garment back on itself so the finished edge sticks out slightly. This small exposed edge is where the straight stitches will travel.
If you’re hemming trousers specifically, our detailed guide on how to hem pants walks through measuring and creating the correct hem length.
The key is to keep only a tiny fold of the main fabric available for the zigzag stitch to catch. If too much of the garment fold is exposed, the outside stitches will be visible. If too little is exposed, the hem may not attach securely. This is why a scrap test is essential before sewing the final hem.
- Finish the raw edge of the hem allowance so it will not fray inside the garment.
- Measure the hem depth evenly around the garment or project.
- Press the hem allowance to the wrong side of the fabric.
- Fold the garment back so only a narrow edge of the hem allowance extends past the fold.
- Pin, clip, or baste the fold so it stays consistent while sewing.
- Place the folded edge against the blind hem foot guide and test the needle swing by hand.
Use this table as a compact checklist after following the preparation steps. It can help you quickly confirm that the fabric is ready before you sew.
| Preparation Step | What to Do | Why It Matters |
|---|---|---|
| Finish raw edge | Zigzag, overcast, serge, or fold depending on fabric. | Stops fraying inside the hem. |
| Press first fold | Press the hem allowance to the wrong side. | Creates a crisp and accurate hem depth. |
| Back-fold fabric | Fold garment back so a small hem edge is exposed. | Positions fabric for the blind hem stitch. |
| Secure fold | Use pins, clips, or basting. | Prevents shifting while sewing. |
| Test alignment | Turn handwheel and check where zigzag catches. | Avoids visible stitches or weak hems. |
Step-by-Step Guide: How to Use a Blind Hem Foot
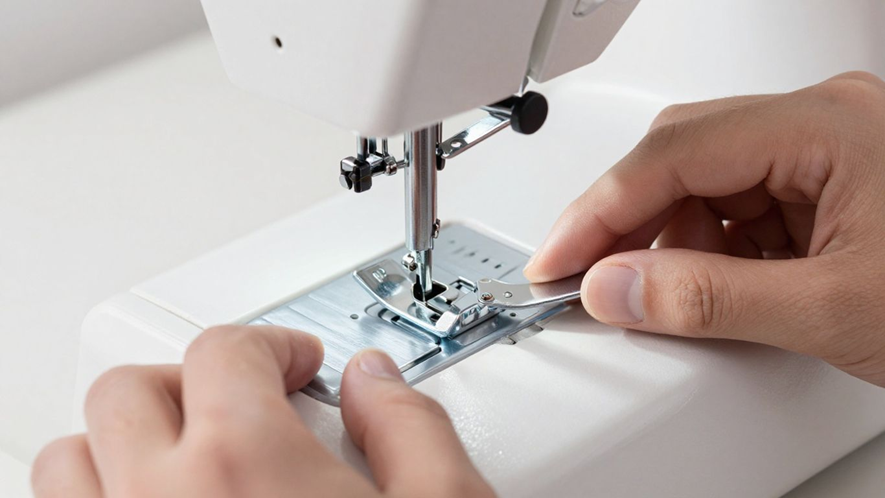
Once the fabric is folded correctly, the actual sewing process is straightforward. The goal is to keep the folded edge riding gently against the guide without pushing or pulling the fabric. Let the feed dogs move the fabric while your hands simply keep the fold aligned.
Set your machine to the blind hem stitch. On many machines, this stitch looks like a row of straight stitches with an occasional zigzag jump to one side. The straight stitches run along the hem allowance, and the zigzag catches a tiny thread of the main garment fold.
Start with a scrap test using the same fabric and fold. Sew a few inches, open the hem, press it, and inspect the right side. If the stitches show too much, reduce the stitch width or move the guide so the needle catches less fabric. If the hem is not secure, increase the stitch width slightly so the needle catches a little more.
1. Turn Off the Machine and Attach the Blind Hem Foot
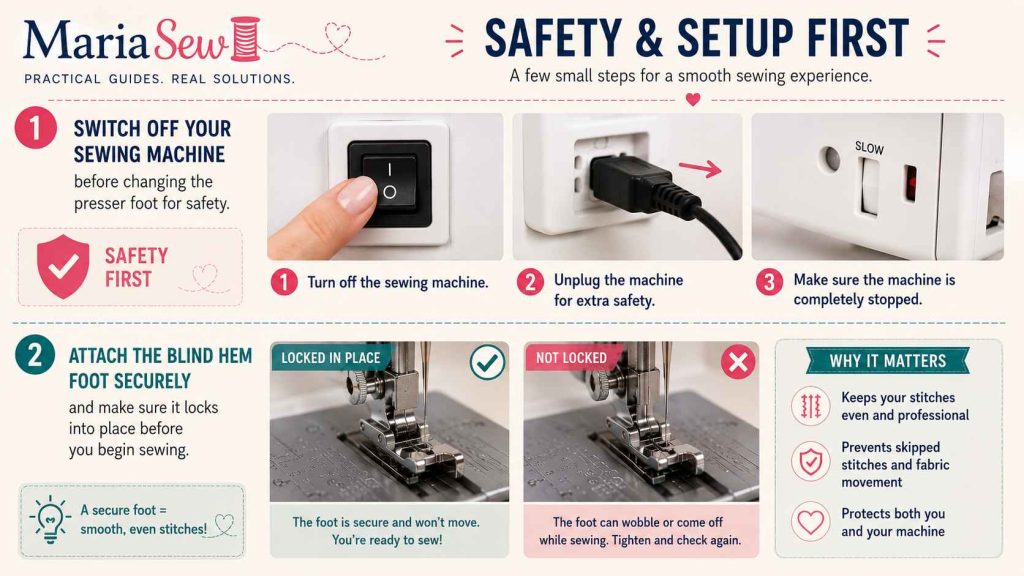
Switch off your sewing machine before changing the presser foot for safety. Attach the blind hem foot securely and make sure it locks into place before you begin sewing.
2. Select the Blind Hem Stitch
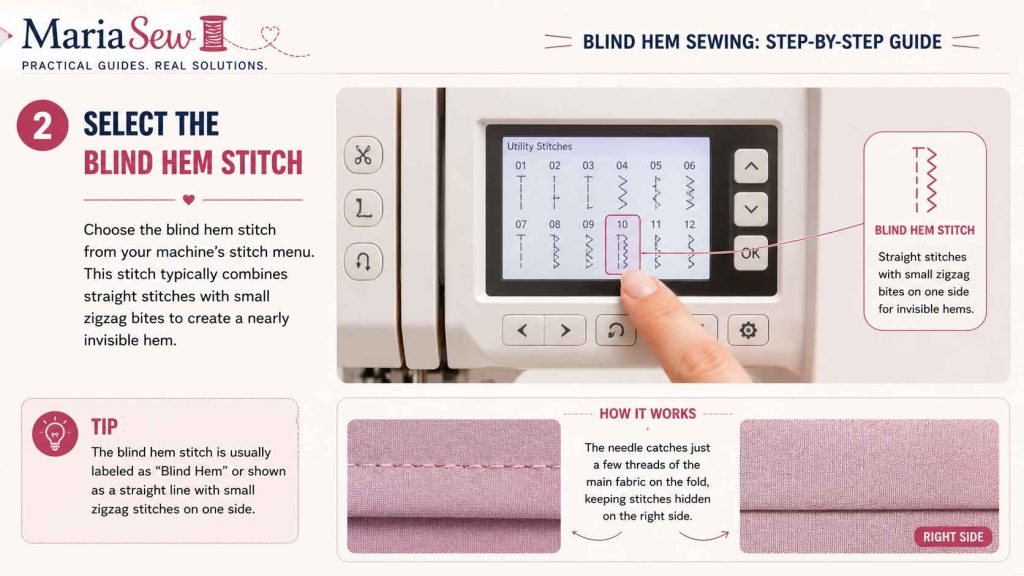
Choose the blind hem stitch from your machine’s stitch menu. This stitch typically combines straight stitches with small zigzag bites to create a nearly invisible hem.
3. Set the Stitch Length and Width
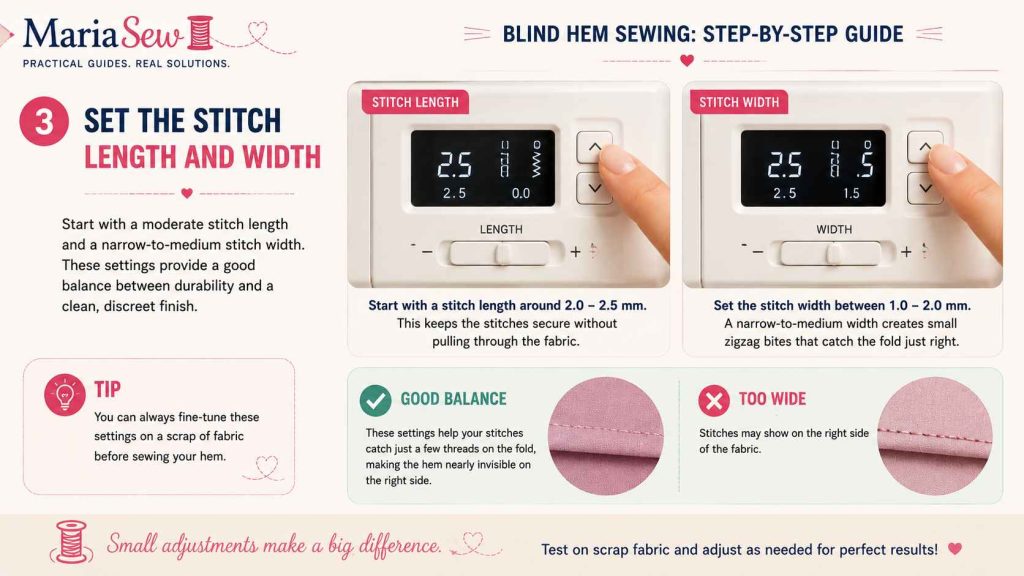
Start with a moderate stitch length and a narrow-to-medium stitch width. These settings provide a good balance between durability and a clean, discreet finish.
4. Position the Fold Against the Guide
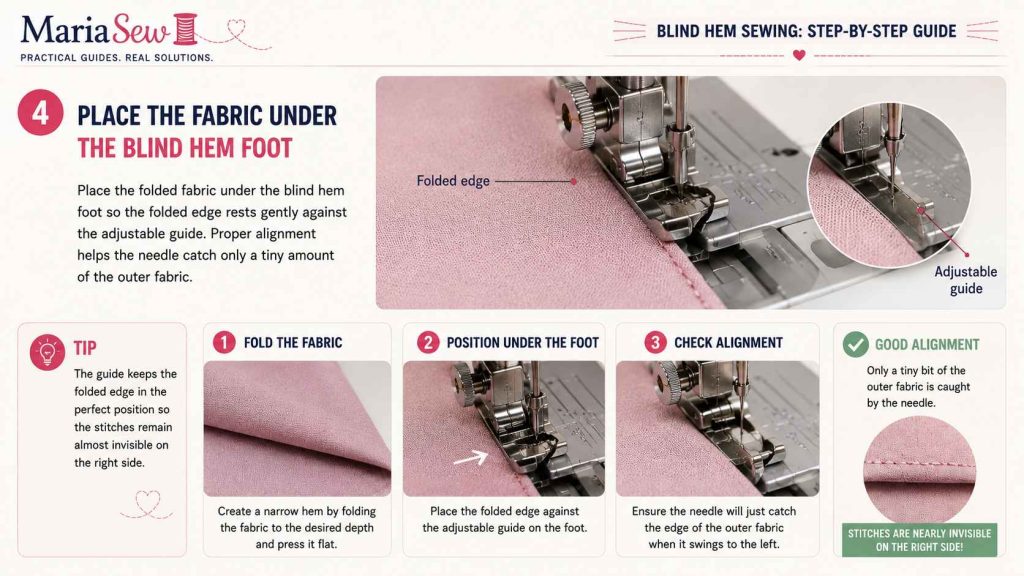
Place the folded fabric under the blind hem foot so the folded edge rests gently against the adjustable guide. Proper alignment helps the needle catch only a tiny amount of the outer fabric.
5. Test the Needle Placement
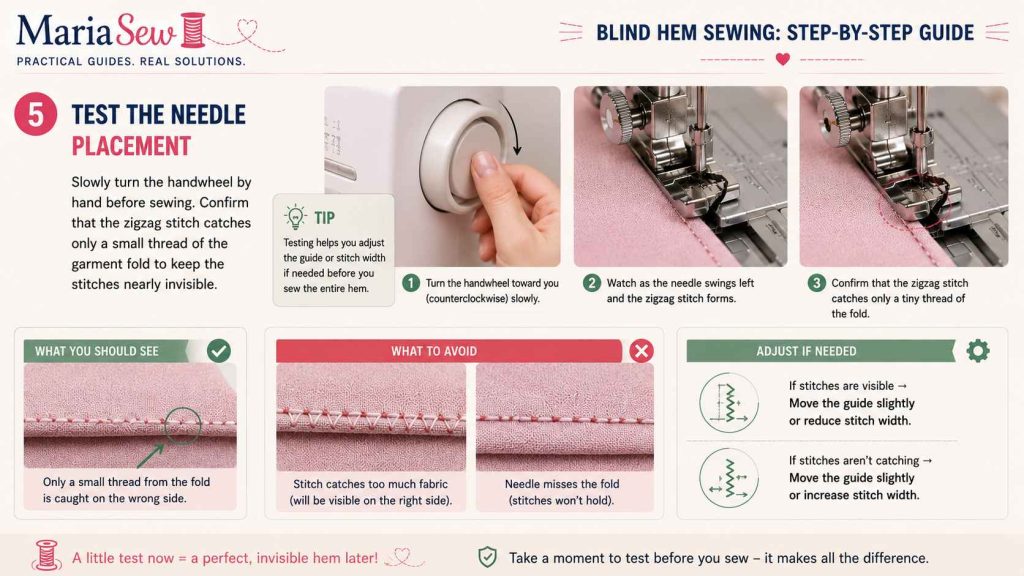
Slowly turn the handwheel by hand before sewing. Confirm that the zigzag stitch catches only a small thread of the garment fold to keep the stitches nearly invisible.
6. Sew the Hem Slowly
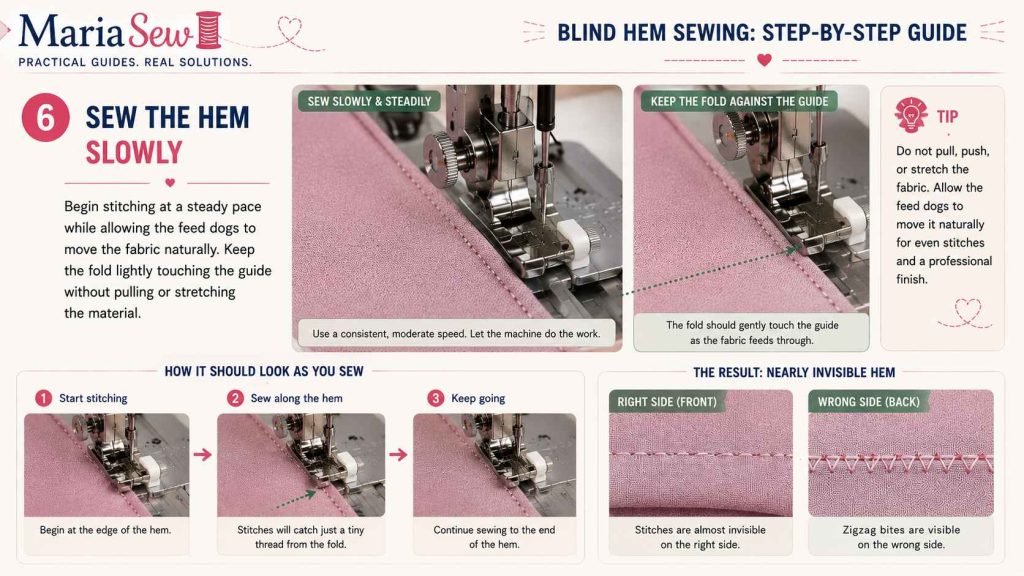
Begin stitching at a steady pace while allowing the feed dogs to move the fabric naturally. Keep the fold lightly touching the guide without pulling or stretching the material.
7. Press and Inspect the Finished Hem
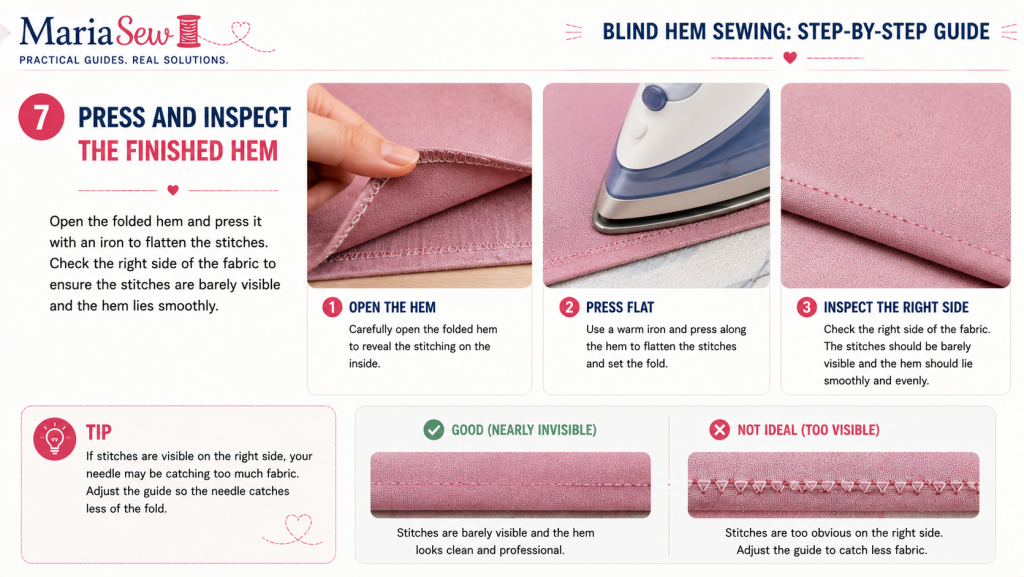
Open the folded hem and press it with an iron to flatten the stitches. Check the right side of the fabric to ensure the stitches are barely visible and the hem lies smoothly.
8. Fine-Tune the Settings if Needed
If the stitches are too noticeable, reduce the stitch width or adjust the guide slightly. If the hem feels loose, increase the stitch width until the needle catches enough fabric for a secure hold.
| Step | Action | Result to Check |
|---|---|---|
| 1 | Attach blind hem foot and select blind hem stitch. | Foot is secure and needle clears the opening. |
| 2 | Place fold against the guide. | Fold stays straight without being forced. |
| 3 | Test stitch on scrap fabric. | Zigzag catches a tiny amount of the fold. |
| 4 | Sew slowly along the hem. | Stitches remain even and fabric does not pucker. |
| 5 | Open and press the hem. | Outside stitches are nearly invisible. |
Best Stitch Settings for a Blind Hem Foot
Blind hem settings vary by machine, so treat any number as a starting point rather than a fixed rule. Many machines use a blind hem stitch symbol that alternates straight stitches with a left or right zigzag bite. The exact direction depends on your machine and how the fabric is folded.
Stitch width is the adjustment that controls visibility. A wider zigzag catches more of the garment fabric and makes the hem stronger, but it can also make the stitch more visible from the outside. A narrower stitch hides better but may not catch enough fabric to hold the hem securely.
Stitch length controls how close the straight stitches sit along the hem allowance. A medium length usually works for stable woven fabrics. Very short stitches can perforate delicate fabric, while very long stitches may look loose or unstable. Always test, press, and inspect before sewing the final garment.
- Begin with the machine’s built-in blind hem stitch if available.
- Use a matching thread and a needle suited to your fabric weight.
- Start with a narrow-to-medium stitch width and adjust after testing.
- Use moderate stitch length for most woven fabrics.
- Reduce tension only if puckering remains after rethreading and testing.
Best Fabrics and Projects for Blind Hemming
Blind hemming works best when the fabric can hold a pressed fold and when the small catch stitch can hide within the texture or weave. Medium-weight woven fabrics are the easiest for beginners because they are stable, press well, and do not shift dramatically under the foot.
Dress pants, skirts, lined dresses, curtains, and table linens are ideal projects. On fabric with a busy print or textured surface, the tiny catch stitches are easier to hide. On smooth solid fabric, thread matching becomes more important because small dots may be easier to see.
If you’re working on dress hems instead of pants, see our tutorial on how to hem a dress without sewing for a no-sew alternative.
Some fabrics need caution. Very sheer fabrics may reveal the hem structure from the right side. Thick wool may need a looser hand-stitched blind hem because the machine stitch can leave dents. Stretch knits may need a different hem finish if the hem must stretch during wear.
- Best beginner fabrics: cotton, linen, lightweight denim, twill, suiting, and curtain fabric.
- Best projects: trousers, skirts, dresses, curtains, napkins, and home decor hems.
- Use caution with: chiffon, organza, bulky wool, velvet, and high-stretch knits.
- Always press fabric gently and use a pressing cloth when shine, heat marks, or melting are possible.
- Test the blind hem on a scrap that includes the same fold thickness as the final project.
| Fabric or Project | Blind Hem Foot Suitability | Best Advice |
|---|---|---|
| Cotton trousers | Excellent | Use matching thread and test width before hemming. |
| Skirts and dresses | Very good | Press the fold carefully and keep the hem depth even. |
| Curtains | Excellent | Use deeper hems and support the fabric weight while sewing. |
| Very sheer fabrics | Tricky | Consider a narrow hem, rolled hem, or hand finish. |
| Bulky wool | Possible but test first | Use steam pressing and avoid catching too much fabric. |
| Stretch knits | Depends on stretch need | Use a stretch-friendly method if the hem must stretch. |
Troubleshooting Common Blind Hem Problems
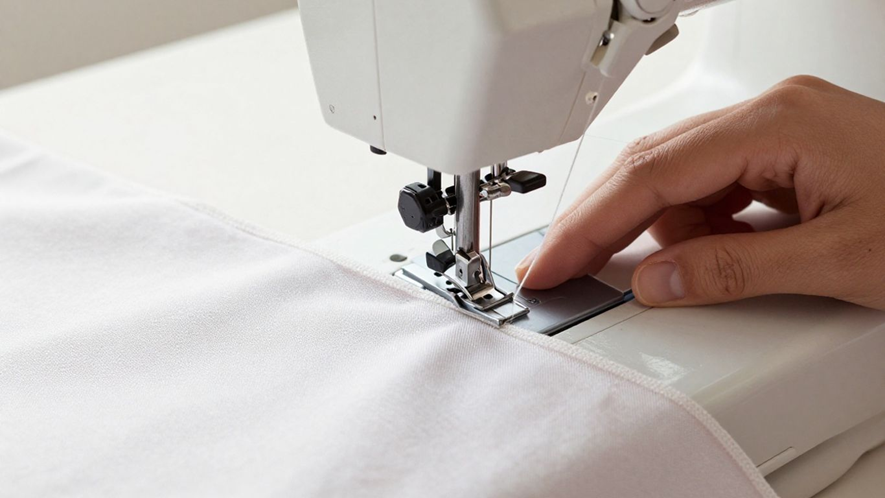
Most blind hem problems come from one of four areas: the fold is not positioned correctly, the stitch width is too wide or too narrow, the thread color is too visible, or the fabric is not stable enough. Fixing the issue usually requires a small adjustment rather than starting over completely.
If stitches are visible on the outside, the needle is catching too much of the main fabric fold. Narrow the stitch width, move the adjustable guide slightly, or refold the fabric so less of the garment fold is exposed. If the hem is falling open, the needle may not be catching enough fabric, so widen the stitch very slightly.
If the hem puckers, do not immediately change every machine setting. In my experience, puckering is almost never a tension problem the first time it appears, it’s usually the fabric being pulled slightly during sewing. First rethread the machine, check the needle, press the fabric again, and test on a stable scrap. Keep your hands relaxed and let the machine feed the fabric on its own.
- Visible outside stitches usually mean the stitch is catching too much fabric.
- A loose or opening hem usually means the stitch is not catching enough fabric.
- Puckering can come from tension, pulling, dull needles, or fabric instability.
- Skipped stitches often mean the wrong needle, a dull needle, or incorrect threading.
- Uneven hems usually come from poor measuring, weak pressing, or inconsistent folding.
Common Blind Hem Mistakes to Avoid
A blind hem looks simple, but small mistakes can make the final result obvious. The first mistake is skipping the test seam. Different fabrics respond differently to the same stitch width, so a perfect setting on cotton may look too visible on suiting or too weak on linen.
Another mistake is using a thread that is close but not close enough. Blind hem stitches are small, but they are not magic. If the thread is lighter or darker than the fabric, the catch points can still show. When possible, choose thread in the same color family and similar sheen.
If you’re just getting started with sewing, learning how to thread a sewing machine correctly can also prevent many stitching problems.
- Do not sew the final garment before testing the exact fold on scrap fabric.
- Do not skip pressing; the fold must be crisp and even.
- Do not use a dull or oversized needle on fine fabric.
- Do not catch too much fabric just to make the hem feel stronger.
- Do not pull the fabric through the machine while sewing.
- Do not assume every fabric is suited to a machine blind hem.
The third common mistake is pulling the fabric through the machine. A blind hem foot guides the fabric, but the feed dogs still need to move it naturally. Pulling can distort the fold, create puckers, and shift the hem allowance out of alignment.
| Mistake | What Happens | Prevention |
|---|---|---|
| Skipping scrap test | Stitches may show or fail to catch. | Test, press, inspect, and adjust before final sewing. |
| Poor pressing | Hem looks twisted or uneven. | Press each fold sharply before sewing. |
| Wrong thread color | Tiny stitches become visible. | Use the closest possible thread match. |
| Pulling fabric | Puckering or stretched hem. | Guide lightly and let feed dogs move the fabric. |
| Wrong needle | Skipped stitches, holes, or snags. | Use a fresh needle suited to the fabric. |
Pro Tips for a Cleaner Invisible Hem
For the cleanest finish, press before sewing and press again after sewing. The final press relaxes the stitches and helps the hem lie flat. Use a pressing cloth on delicate or dark fabrics to prevent shine marks, and avoid high heat on synthetic materials that can melt or distort.
If you are hemming a circular skirt or curved hem, use more pins or hand basting because the fold will not behave like a straight hem. Curves often need easing, trimming, or a narrower hem allowance to prevent bulk. For long curtains, support the fabric on the table so its weight does not pull the hem away from the guide.
For formal garments, consider hand basting the fold before using the blind hem foot. It adds a few minutes, but it gives you much better control and reduces the risk of shifting. Once the machine hem is complete, remove the basting thread and press the finished edge.
- Use a seam gauge every few inches to keep the hem depth consistent.
- Hand baste slippery or expensive fabric before machine hemming.
- Use a pressing cloth on wool, suiting, rayon, and dark fabrics.
- For curtains, support the fabric weight so it does not drag off the table.
- For curved hems, use narrower allowances and more frequent pressing.
Conclusion
Learning how to use a blind hem foot gives beginners a simple way to create polished, nearly invisible hems with a regular sewing machine. The process depends on accurate measuring, clean edge finishing, careful pressing, and small stitch-width adjustments. Start with stable woven fabric, practice on scraps, and inspect the right side before hemming your final garment. With a little testing, this foot can help you finish pants, skirts, dresses, curtains, and everyday alterations with a professional look.
Once you’re comfortable with blind hemming, you can build your skills with our tutorials on how to sew a hem and how to hand sew a hem to master different hemming techniques for various fabrics and projects.
Frequently Asked Questions
Can I use a blind hem foot on all fabrics?
You can use it on many fabrics, but it works best on stable woven fabrics that hold a pressed fold. Very sheer, bulky, or stretchy fabrics may need extra testing or a different hemming method.
Do I need a special sewing machine for a blind hem foot?
Most modern sewing machines can use a blind hem foot if the foot matches the machine’s shank or snap-on system. You also need a blind hem stitch or a similar adjustable zigzag-style stitch.
Why are my blind hem stitches visible on the outside?
The needle is catching too much of the garment fabric. Reduce the stitch width, adjust the guide, or refold the fabric so the zigzag takes a smaller bite.
Why does my blind hem come undone?
The stitch may not be catching enough fabric. Increase the stitch width slightly and test again until the hem is secure but still discreet.
Should I finish the raw edge before blind hemming?
Yes. Finish the raw edge with a zigzag, overcast stitch, serger, or clean fold before blind hemming so the inside of the garment does not fray.
Is machine blind hemming better than hand hemming?
Machine blind hemming is faster and consistent for many everyday hems. Hand hemming may be better for couture garments, very delicate fabrics, or fabrics where any machine stitch would show.
Can I use a blind hem foot for curtains?
Yes. Curtains are one of the best uses for a blind hem foot because the hems are long and benefit from a fast, consistent, nearly invisible finish.
What stitch length should I use for a blind hem?
Use a moderate stitch length as a starting point and test on scrap fabric. Very short stitches can perforate delicate fabric, while overly long stitches may not hold the hem securely.
Can I use a regular presser foot for blind hemming?
You can sew a blind hem without a blind hem foot, but it is harder to keep the fold aligned. The blind hem foot guide makes the process easier and more consistent.
Should I press the hem after sewing?
Yes. A final press helps the hem lie flat, relaxes tiny puckers, and improves the finished appearance. Use a pressing cloth when needed.