Brother PE900 Embroidery Machine Review 2026: Features, Pros & Cons
I recently got my hands on the Brother PE900 embroidery machine, and I’ve been putting it through its paces. If you’re thinking about getting into embroidery, or maybe upgrading from a simpler machine, the PE900 seems like a solid option.
It’s got a good balance of features that make it approachable for beginners but also powerful enough for those looking to do a bit more. I wanted to share my thoughts on what this machine is really like to use, beyond just the spec sheet.
Key Takeaways
- The Brother PE900 offers a 5×7-inch embroidery area, which is a great size for many common projects like logos and monograms, providing a good balance for both beginners and those doing small-batch work.
- It features a user-friendly color touchscreen and automatic jump stitch trimming, simplifying the embroidery process and reducing manual cleanup.
- While the machine is portable due to its lighter build, using a rubber mat can help improve stability and stitch quality by dampening vibrations.
- Budgeting for extra consumables like stabilizers and a variety of thread colors is important, as the included accessories are basic.
- The PE900 is well-suited for home businesses doing custom items, but may require an upgrade to a multi-needle machine if production volume increases significantly due to manual color changes.
Introduction to the Brother PE900

Well, I just recently purchased the Brother PE900 embroidery machine, and I wanted to talk about my thoughts so far. If you’re new to embroidery or ready to move up from a simpler machine, this one appears to hit a sweet spot. It’s also powerful enough if you’re considering doing small runs of things for a side project, but it’s not overly complicated, so you can likely get it up and running relatively quickly.
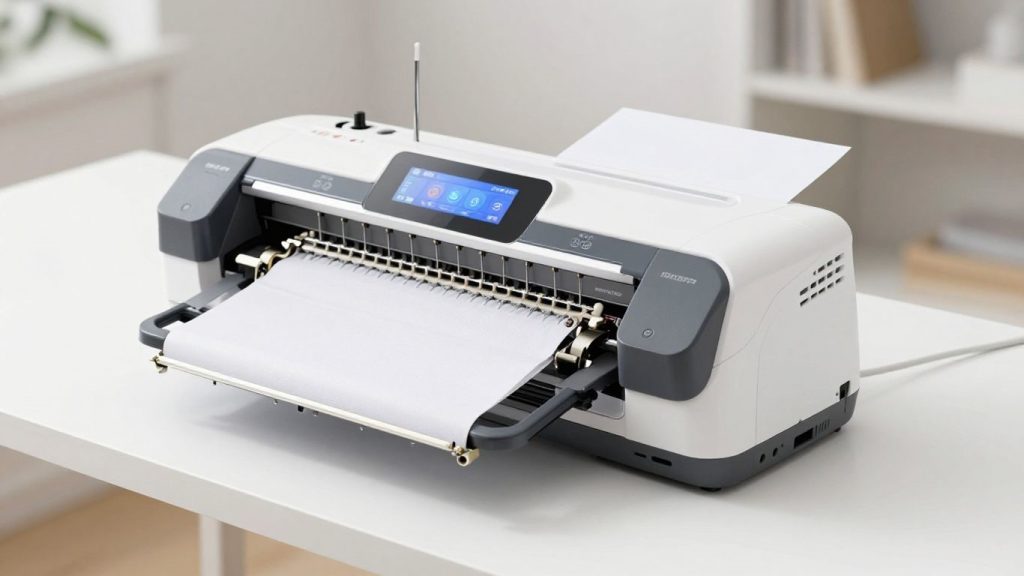
Brother calls this a “prosumer” machine, which is a fancy way of saying it’s above the most basic models and on the higher end of home-use tech. It has a 5×7-inch embroidery area, which is an excellent and versatile size for many projects. I’ve found that most logos or monograms fit well in this space, so you do have a little breathing room. What I love about the PE900 is that it seems like a solid introduction to more serious embroidery without being too scary.
Well, I just recently purchased the Brother PE900 embroidery machine, and I wanted to talk about my thoughts so far. If you’re upgrading from a basic sewing machine like the one discussed in Brother CS7000X review, this feels like a big step forward.
There’s definitely an excitement when you take out your first unit, and maybe a little bit of ‘what did I just sign myself up for?’ The specifications are impressive in the abstract — that 5×7 field, a color touchscreen, and wireless design transfer. But embroidery is more about what’s physically happening when that needle is inside its moving process. This machine makes flat items, such as shirts, towels, or pillowcases, and calls for you to be part of the process — like changing thread colors manually.
If you’re coming from hand embroidery, this is a giant sort of leap. The confidence you get from watching the machine create complex designs is really cool.” The 5×7 field is a game-changer because it supports designs that simply are unreachable with smaller 4×4 machines. It’s the standard size for a lot of “real” projects, such as larger monograms or clothes for babies. I can’t wait to see what I can make with it, and I will provide additional information on functionality and how it operates in real-world use.
And the machine itself is only half of that equation. You’ll also want to budget for consumables such as stabilizers and a nice selection of threads. These are not always included in the box, and using the right ones makes a world of difference in your final stitch-out. Also, don’t overlook accessories, such as a good pair of embroidery scissors.
Brother calls this a “prosumer” machine, meaning it sits between beginner and advanced models. Compared to machines like Brother CS7205 review, the PE900 is more specialized for embroidery.
Also, understanding basic sewing machine parts will help you get more comfortable with how this machine works.
Here’s a quick look at what comes included:
- A 5×7-inch embroidery hoop
- An embroidery foot
- A seam ripper (you’ll probably need this at some point!)
- A cleaning brush
It’s a good starting point, but be prepared to invest a little more in supplies to get the most out of your Brother PE900 right away.
Key Features of the Brother PE900
When I first started looking into the Brother PE900, I wanted to know what made it stand out. It’s more than just a sewing machine; it’s a dedicated embroidery unit with some really neat Brother embroidery machine features. Let’s break down what I found most useful.
When I first started exploring this machine, I compared it with heavy-duty options like Singer 4452 Heavy Duty Sewing Machine Review and Singer HD500 Review. While those focus on power sewing, the PE900 is all about precision embroidery.
Embroidery Area and Hoop Sizes
Like the PE770, the PE900 has a 5×7 inch (130mm x 180mm) embroidery field. This size is the sweet spot for me. It’s sufficient for popular projects like left-chest logos, customized towels, or even small designs on baby onesies.
You have enough space to do your work without being too cramped, and it’s the standard size that suits a majority of designs. It is a definite upgrade over the smaller 4×4 hoops I have used previously.
The 5×7 inch embroidery field is perfect for most home projects. If you’re into quilting, you might also want to explore best quilting sewing machine for comparison.
Built-in Designs and Fonts
It was the number of built-in designs and fonts when I first tried out this app that won me over. The PE900 comes with a nice selection of these pre-loaded, which is fantastic when I want to just dive in and start stitching without having to hunt down or create a design.
They have some great fonts for monogramming/putting names on stuff, also. It’s a good resource to begin with, and I found myself referring to these quite often early on when learning the ropes of the machine.
The built-in designs are great for beginners. If you’re starting from scratch, having a sewing kits for beginners can make things even easier.
Connectivity and Software Options
For me, connectivity is a big deal, and the PE900 certainly delivers. It includes such a USB port, which is how I typically transfer my designs onto the machine. I learned about the Artspira app, which is really cool.
It allows you to wirelessly transfer designs to the machine, and even make some simple edits straight from your phone or tablet. This makes the entire process feel much more contemporary and adaptable. You can import designs such as PES, the format used for Brother machines.
Modern features like wireless transfer make it feel advanced compared to older models like Singer HD4411 Prisma Review.
User Interface and Ease of Use
I was a little worried about what happens when you have such a complex interface, but the PE900 has a very nice, large colour touchscreen. It is bright and clear, making it easy to view designs and move around menus. I especially appreciated the virtual trace function. It shows you exactly where the design is going to be placed in the hoop before you begin stitching, so that you won’t make a mistake. It also creates a real game-changer, the auto-threader, which reduces that fiddly threading process.
The PE900 is easy to use, yet in embroidery preparation, it is only half successful. So proper hooping and selecting the correct stabilizer are equally essential to the machine features. Don’t count on the machine to rescue you from bad prep work; it’s a collaboration.
The touchscreen is intuitive, especially if you already understand basics like threading and setup from guides like how to thread a sewing machine.
Pros and Cons of the Brother PE900
Here are some of the pros and cons of the Brother PE900 that would help you in deciding whether you should consider it or not.
Pros of the Brother PE900
- Generous 5×7 inch embroidery field for a wide range of projects.
- Intuitive color touchscreen with easy-to-use navigation.
- Wireless connectivity via the Artspira app for convenient design transfer.
- Built-in designs and fonts provide immediate creative options.
- Automatic threader simplifies a common embroidery task.
Cons of the Brother PE900
- Single-needle operation means manual thread changes for multi-color designs, which can slow down production.
- Hoops can be a bit tricky for very stretchy fabrics if not secured perfectly.
- Consumables like stabilizers and a variety of threads are not included and need to be purchased separately. This is a common point for many Brother embroidery machine features, but it’s worth noting for budget planning. This is a common point for many Brother embroidery machine features.
Who is the Brother PE900 For?
Who should actually be checking out the Brother PE900? I’ve spent some time with this machine, and I think it really nails a sweet spot for several different types of people.
To begin with, if you’re new to machine embroidery, this is an excellent introduction. It’s not prohibitively complex, so you can have it up and running pretty quickly and without completely overwhelming yourself. The interface came across to me as simple, which is a huge benefit when you’re already attempting to learn something new. It’s user-friendly…
If you’re a beginner, this is a great starting point. Pair it with simple DIY projects like how to sew an apron to build confidence.
For hobbyists upgrading from machines like Janome JW8100 review, this offers more embroidery flexibility.
Small business owners can also benefit, especially for custom items and small batches.
Here’s a quick breakdown:
- Absolute Beginners: Easy to learn, less intimidating.
- Hobbyists Upgrading: More design space and features than basic models.
- Small Home Businesses: Good for custom orders and small batches.
- Crafters: Adds a professional touch to handmade items.
Something to consider is the expense of consumables. The machine itself is relatively inexpensive, but plan on spending additional money for stabilizers, quality thread in many colors, and possibly some extra hoops. Some of these are not typically found in the box and yet are essential for achieving optimal results. I discovered this the hard way when I ran out of stabilizer on my first big project!
In short, if you’re looking for a workhorse machine that can do more basic sewing than your average model, offers a good amount of embroidery space but does not cost the earth or provide too much complexity, then be sure to check out the PE900. It’s a sturdy workhorse for home and small-scale projects.
Comparison with Other Sewing Machines
The things to focus on when researching any new unit are whether you can compare that model to others in your price range. Some features may be fancy shmancy, but it all depends on what makes sense for your projects and your budget. The Brother PE900 is an embroidery-only machine, so it doesn’t offer the sewing functions seen in some combo models. This is huge for me because I already own a sewing machine, so whatever embroidery machine I purchase simply needs to enhance its specific role.
One of the features that sets the PE900 apart from others in its class, especially entry-level models, is its automatic jump stitch trimming. The thing is, cutting all those little ends after a design is complete, it downright sucks! This feature trims them automatically, resulting in a much cleaner product. It’s not perfect, you’ll still have to do a little trimming here and there, but it saves a huge amount of time.
If you’re unsure whether you need a serger or embroidery machine, check out serger vs sewing machine for clarity.
For more advanced comparisons, machines like Janome MC6650 review offer different capabilities, especially for quilting and heavy-duty sewing.
Here’s a quick look at how it compares in some key areas:
- Embroidery Area: 5″ x 7″ hoop size (PE900). It is a very common and multi-purpose size for most home projects, whether that be designing t-shirts or decorative patches. If you plan to do very big, single designs, you may want more advanced embroidery machine models with larger hoops, but for the majority of users, this is a great access step.
- In-built Designs: It offers a decent number of in-built designs to start with, and that is great. I always recommend using these first to familiarize yourself with the machine itself and to work out any physical setup kinks before importing your own files.
- Connectivity: Wireless LAN connection is a major plus. That means I can send designs directly from my computer or tablet without having to fiddle around with USB sticks. This news makes the whole experience a lot more modern and streamlined.
When thinking about any computerized sewing and embroidery machine, it’s worth considering what you’ll use the machine for the most. A dedicated embroidery machine, such as the PE900, typically provides superior performance and specialized features compared to a combo unit, where compromises may have been made.
Brother PE900 vs Brother PE800
The Brother PE900 and PE800 were certainly on my radar when I was in the market for an embroidery upgrade. It’s a recurring question: is the latest model worth the additional money? Honestly, the PE900 wins for me, hands down, but it definitely depends on what you want to do.
The most noticeable difference I noticed was the connectivity. A Wi-Fi-enabled PE900 is a game changer. Thanks to the Artspira app, I can upload designs right from my computer or even my tablet! It’s much more modern, and it keeps me from having to mess with USB sticks. PE800 is a USB-only design transfer machine. It works, sure, but it’s simply not as convenient.
Looking beyond the specs, the PE900 feels a little more refined. It features a jump stitch trimming function to automatically cut those little threads between color changes, and a color sort feature that organizes stitches of the same shade together. That also translates to less trimming for me and faster stitch-outs as well. The PE800 doesn’t have these. For a multi-colour wizard like me, these little things on the PE900 start to add up.
Brother PE900 vs Brother SE1900
I spent quite a bit of time trying to figure out the real differences, because when I went looking at machines, the Brother PE900 and SE1900 kept showing up. It’s easy to drown in the minutiae, but ultimately, I came down to a couple of things.
The SE1900 is a combo machine that sews and embroiders, whereas the PE900 is an exclusively embroidery machine. That’s a big deal if you’re searching for one machine to do it all. The SE1900 has many more built-in sewing stitches, 130, versus the PE900’s basic sewing functions. The SE1900 may better suit your needs if you do a lot of garment sewing or quilting in addition to embroidery. That said, I learned that the SE1900 also had a larger embroidery area of its own at 5×7 inches (the same as the PE900), but it has more flexibility on hoops that you can purchase separately.
The SE1900 is a combo machine (sewing + embroidery), unlike the PE900. If you want embroidery-only focus, PE900 is better.
But if you want versatility, reading comparisons like serger vs sewing machine can help you understand machine types better.
Here’s a quick rundown of what I noticed:
- Connectivity: Both machines come with USB connectivity, but the PE900 sets itself apart with built-in Wi-Fi support. That means I can send designs to them wirelessly from my computer, or the Artspira app: it’s a pretty nifty feature! You need a USB stick for the SE1900.
- Screen: A larger, more vibrant color touchscreen in the PE900. For me, it simply feels a little fresher and easier to look around. The SE1900’s display is a functional affair, but not quite as nice.
- Price: Overall, the SE1900 costs a little more, probably because it’s a dual-function machine that has more sewing features. The PE900 is embroidery-only, so it tends to be much more affordable compared to the others that also have sewing functions.
For me, already having a dedicated sewing machine and wanting to add embroidery capabilities without spending a fortune at the same time, there were many reasons why the PE900 was the better option for me personally. If I were in the market for a machine that did both sewing and embroidery, this SE1900 is something that I would look more substantively at. It depends on what you really need the most.
Ultimately, both are solid Brother sewing machine features, but they cater to slightly different users. If you’re deep into embroidery and want the latest wireless tech, the PE900 shines. If you want a versatile machine that handles both sewing and embroidery well, the SE1900 is a strong contender. Checking out Brother PE900 sewing machine reviews helped me make my decision, and I think it’s worth looking at those too.
Brother PE900 vs Janome Memory Craft 400E
I kept seeing the Brother PE900 and Janome Memory Craft 400E when I started researching embroidery machines. On the surface, they’re pretty similar as both are single-needle machines targeting home users, but I wanted to dig a little deeper to see how much they actually differ.
I was really drawn to features of the PE900 embroidery machine, such as its wireless connectivity and integration with the Artspira app. That means I can send designs directly from my tablet. That feels pretty modern. The 5×7-inch embroidery field is standard for this class, suitable for most personal projects and small business logos. It also has a nice color touchscreen that makes it pretty easy to pick designs and adjust settings.
The Janome 400E, on the other hand, feels more like a workhorse. It has a 5×7-inch hoop size, the same as the PE900. Its reputation is as reliable with a solid build. Note, though: It lacks some of the newer tech features. That means, for example, that there’s no built-in Wi-Fi, so transferring designs means using a USB stick. The screen is also slightly more rudimentary than the PE900’s color display.
Both are strong machines, but PE900 stands out due to modern features. Compared to traditional machines like those reviewed in Janome MC6650 review, it feels more tech-forward.
Here’s a quick look at some key differences:
- Connectivity: PE900 has Wi-Fi and app support; 400E uses USB.
- Screen: PE900 has a color touchscreen; 400E has a monochrome LCD.
- Built-in Designs: PE900 generally offers more variety and newer designs.
- Ease of Use: Both are user-friendly, but the PE900’s screen might be more intuitive for some.
To me, how you decide between these two boils down to what you value. If you want the latest features and a more connected experience, then the Brother PE900 does look to be the way to go. But if you want a stripped-down, no bullshit, solid machine that just makes pretty stitches, the Janome 400E would be my pick. I was drawn to the PE900 as I like that you can wirelessly send designs, but I understand the appeal of the Janome’s simplicity, too.
So, Is the Brother PE900 Worth It?
Having spent a decent amount of time with the Brother PE900, I can confidently say that it’s a good machine, even more so if you’re totally new to embroidery or want something more versatile than your basic sewing machine. It takes on most common projects — logos on shirts, for example, or personalized gifts, with ease, and that 5×7 hoop size is pretty standard for a lot of what people want to make.
The automatic thread trim is a huge time saver, and you can now use the touchscreen pretty intuitively. I wouldn’t expect it to be a high-volume production piece, though; if you have lots of colors, you’ll definitely feel the pain of manual thread changes. For home use, small side projects, or learning the ropes, though, I think it’s a great choice that can give you a lot of bang for your buck.
Yes — especially if you’re serious about embroidery. It’s beginner-friendly yet powerful enough for small business use.
If you’re still building your setup, don’t forget essentials like a good sewing kits for beginners and proper organization tools like the best sewing box.
Frequently Asked Questions
What extra stuff do I need to buy to use the Brother PE900 well?
In addition to whatever comes with the box, I always splurge on stabilizer, decent bobbin thread, and a few tools. A stabilizer is important; you need the correct one for different fabrics, like cut-away for stretchy shirts or tear-away for towels. And don’t use regular sewing thread, get some embroidery bobbin thread, and also buy yourself some curved snips for cutting threads close. This is also good because you can try your designs out on cheap felt and see if it is a problem with the file or your setup.
How can I stop the thread from bunching up underneath when I start a new design?
That big jumbled tangle of thread, aka a ‘bird nest,’ usually happens almost right away. My best advice: Please stay with the machine for at least two minutes. Just ensure to trim the small thread tail from the bobbin prior to starting, and re-thread the top thread through tension discs gently so it feels tight but not too tight. Make sure your bobbin is wound evenly, too; a lumpy bobbin can throw off the tension.
Is the 5×7-inch embroidery area big enough for most projects?
The 5×7-inch area suits most home projects and some small businesses. It’s large enough for things like left-chest logos, monograms, or designs on onesies. It provides you with a little maneuvering space to rotate designs or add a name without touching the edges. If you are going to be doing really large designs, such as on the back of a jacket, you will probably want to invest in a machine with a larger embroidery field at some point.
Can I use this machine for a small business?
Yes, I feel the PE900 is a perfect starting point for a home embroidery business. It’s ideal for custom work like baby clothes, personalized towels, or limited runs of company shirts. Just keep in mind that it is a single-needle machine, so you will have to stop and manually change the thread color for each color in a design. Of course, if you get really busy with lots of color changes, then eventually (maybe!) you will want to upgrade to a multi-needle machine.
What makes the automatic jump stitch trimming feature so useful?
This feature really saves you time! When moving the needle from one area of the design to another, it cuts off the thread automatically. Without it, you’d have to scissor dozens of tiny thread ends after each design completes, a painstaking process. The auto-trim gives the project a much cleaner finish immediately, though I still employ small scissors for start and end threads.
How do I make sure my fabric stays smooth and doesn’t get wrinkled from the hoop?
Ideally, the fabric should be pulled tightly enough on the hoop so that you won’t get puckered or ‘hoop burn’ marks, which are more of an issue on delicate fabrics. If doing the standard hoop has been a bit of a challenge or is leaving marks on you, I would highly recommend researching magnetic hoops! They grip the fabric super-tight without having to crank down (which can really change how things look and save your wrists a nasty strain).